Advanced Product Options
Installation
Help
This app comes with FREE installation by the MageWorx Shopify professionals. All you need to do to get the app on your store is to submit a request by hitting the button below. Please, bear in mind that usually, we install the app within 24 hours (on business days). Alternatively, you can install the extension on your own, following the instructions in this user guide.
First, backup the copy of the current theme to discard the changes if needed.
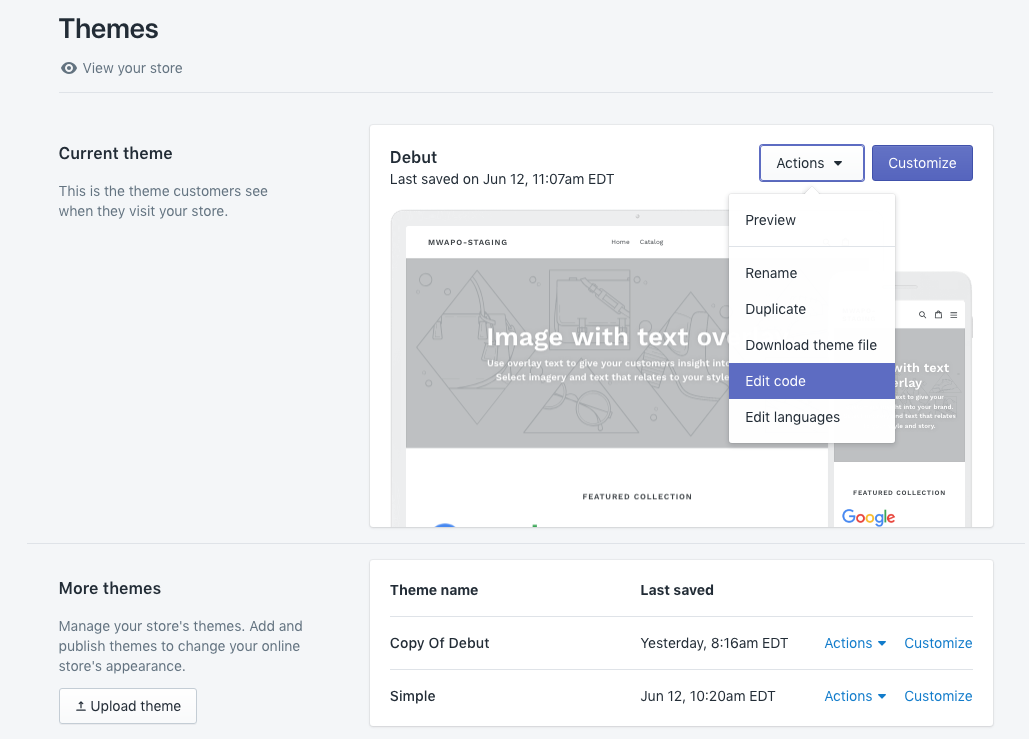
From your Shopify admin, go to Online Store > Themes, find the current theme and click the Actions > Edit code.
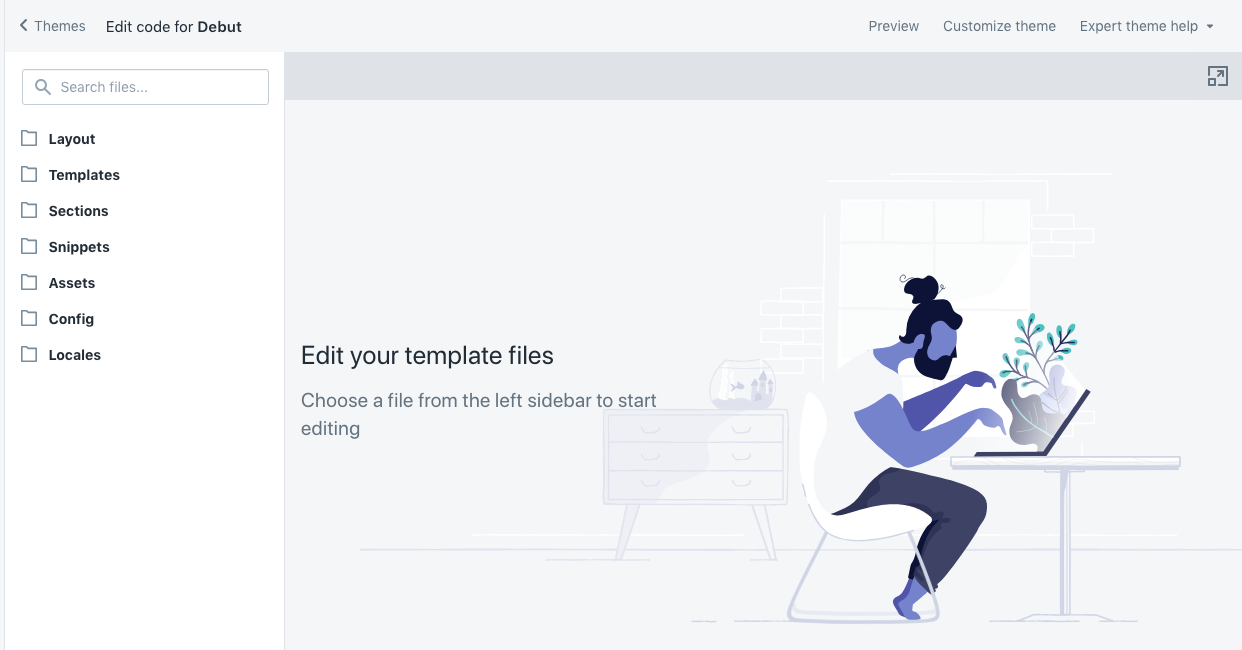
The code editor workspace shows the bunch of theme files logically sorted into several folders:
Edit Layout files
Open the Layout folder, and click the theme.liquid file.
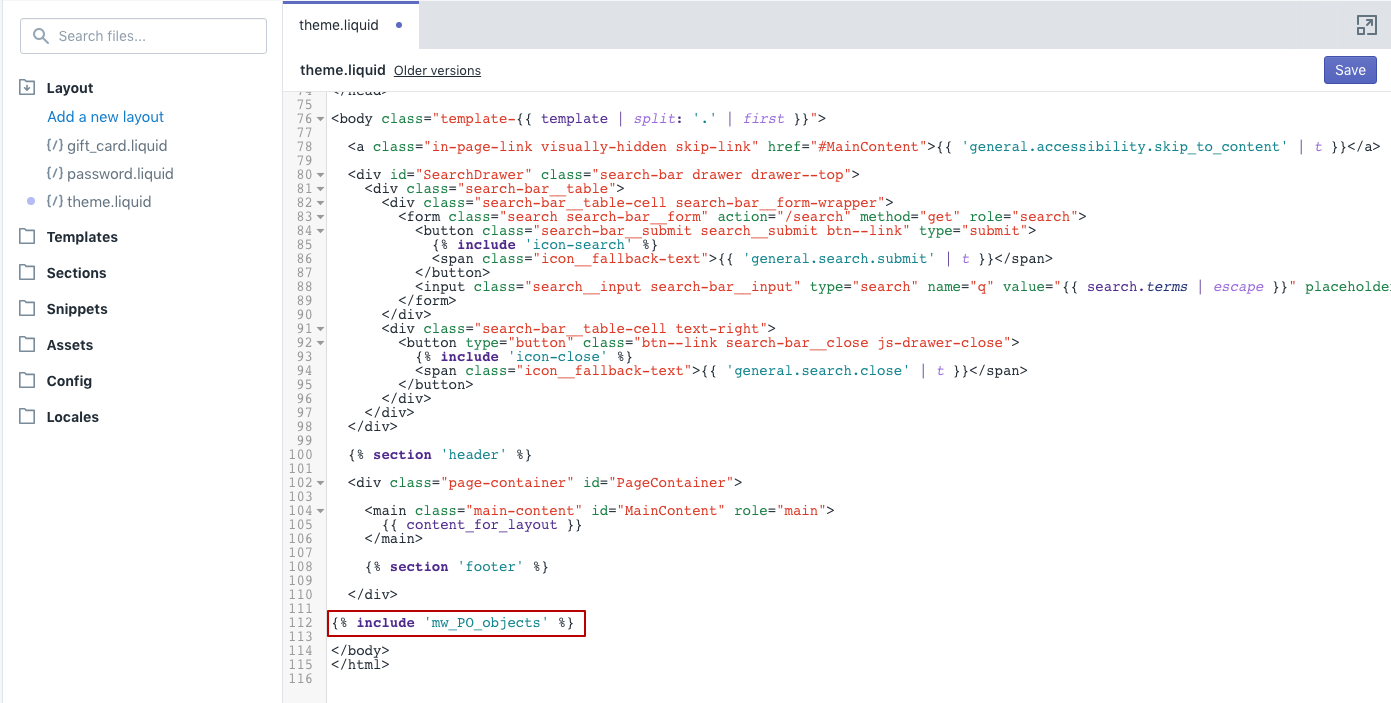
Find the code:
</body>
in most cases, it will be at the end of the document. Add:
{% include 'mw_PO_objects' %}
as depicted above and click the Save button.
Edit Sections files
Edit product-template.liquid
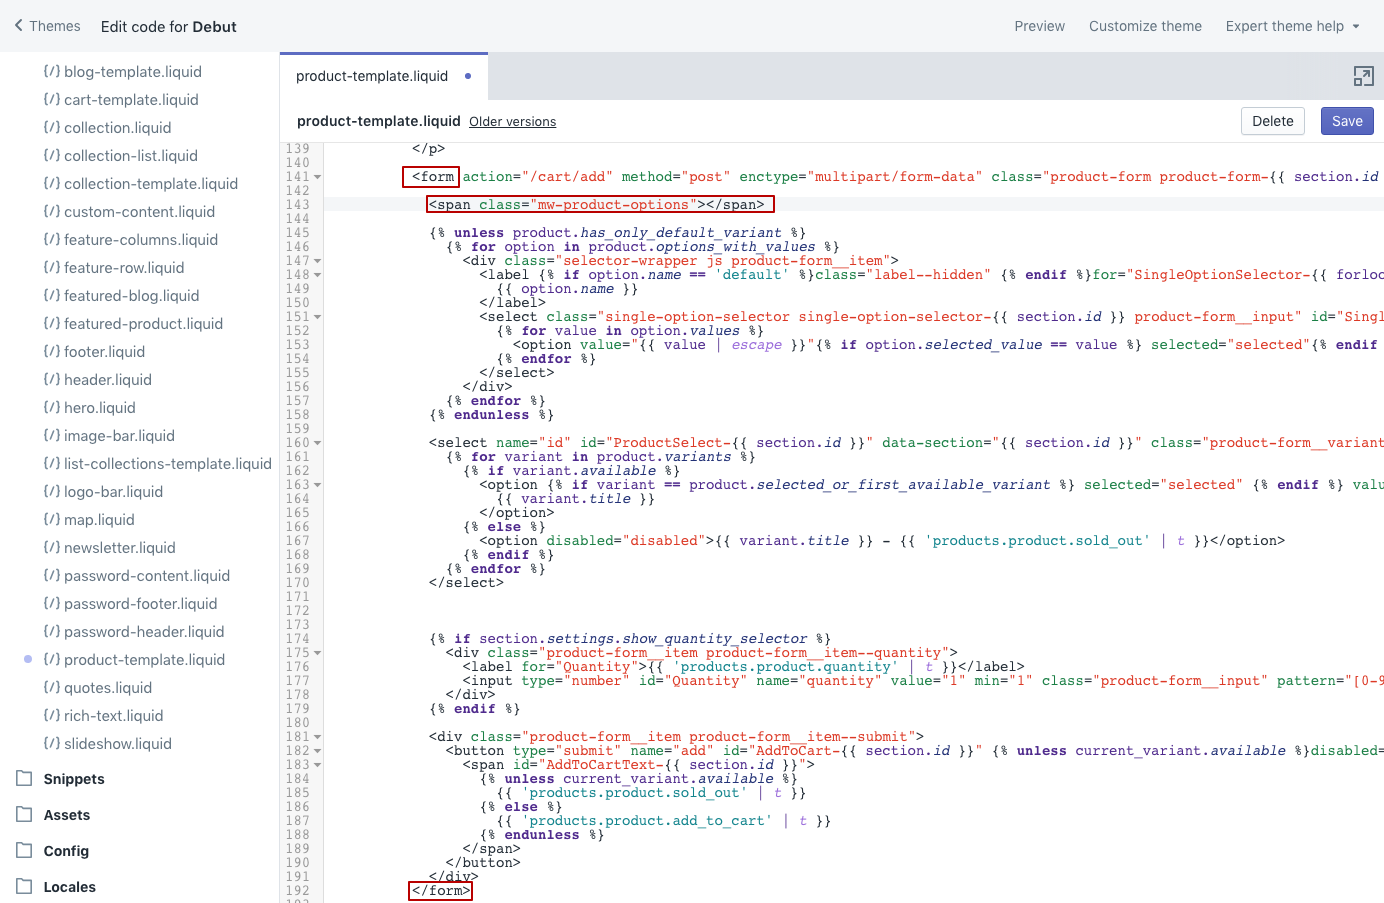
Open the Sections folder, and click the product-template.liquid file. Find the block that is wrapped in the <form> tag. If you locate several forms in the file, you may need to find the one that gives some info regarding the ‘add to cart’ activity. For instance, in the default theme, it will be:
<form action="/cart/add" ... >
...
</form>
or
{% form 'product', product ... %}
...
{% endform %}
and add
<span class="mw-product-options"></span>
just on the next line after the opening <form> or {% form %} tag:
Help
If you are stuck here or have some peculiar questions, please do not hesitate to contact our support team for help. Alternatively, you can submit a request for a FREE installation, and our team will implement the whole procedure for you, , totally free of charge.
Please note that your theme may use the snippets that are added to the template. The code that initiates the usage of the snippets starts with:
{% include 'snippet-name' %}
This actually means that the snippet-name snippet is used. If you find some snippet that includes something like:
{% include 'product-form' %}
you should go to Snippets folder and locate this file. Please note that though the name may be different, it should contain a reference to the 'product', not the, e.g. social networks or such.
This snippet should have some insights regarding the add to cart activity. So if you find something like:
<form action="/cart/add">...
...
</form>
or
{% form 'product', product ... %}
...
{% endform %}
Add:
<span class="mw-product-options"></span>
exactly after the opening <form> or {% form %} tag. This shares the same logic as the above-mentioned analogue adding to the product-template.liquid file.
Edit cart-template
I. Open the Sections folder, and click the cart-template.liquid file. Find the line:
{% for item in cart.items %}
This line should be followed by the cart_item opening tag. This is how the tag looks in the default Shopify theme.
<div class="cart__row">
But note that sometimes it may look like this:
<li class="...">
or this:
<tr class="...">
So basically these are 3 possible variants you can edit cart-template.liquid.
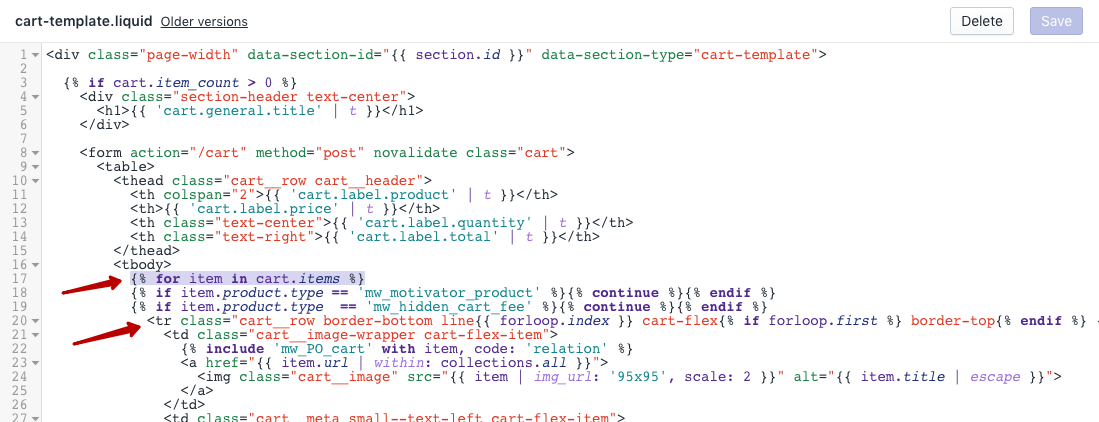
The theme on our demo environment provides the 3 option (tr class)
-
If you observe:
then this tag should be replaced with:<div class="cart__row">
<div class="cart__row {% include 'mw_PO_cart', code: 'class' %}" {% include 'mw_PO_cart' with item, code: 'style' %}>
{% include 'mw_PO_cart' with item, code: 'relation' %}
-
If you observe:
<li class="...">
then this tag should be replaced with:
<li class="... cart__row {% include 'mw_PO_cart', code: 'class' %}" {% include 'mw_PO_cart' with item, code: 'style' %}>
{% include 'mw_PO_cart' with item, code: 'relation' %}
Tip
...— these are the words that were in the code before the changes were made. Please do not delete them! -
If you observe:
<tr class="...">
then this tag should be replaced with:
<tr class="... cart__row {% include 'mw_PO_cart', code: 'class' %}" {% include 'mw_PO_cart' with item, code: 'style' %}>
Tip
...— these are the words that were in the code before the changes were made. Please do not delete them!
Then you need to paste the line:
{% include 'mw_PO_cart' with item, code: 'relation' %}
<td> that goes after the <tr> tag as shown here:

II. Next, we should find a piece of code that is responsible for building properties.
Search cart-template.liquid for property or properties to find the block that builds properties in a cart. This is how this block looks like in the default theme:
{% assign property_size = item.properties | size %}
  {% if property_size > 0 %}
    {% for p in item.properties %}
        {% if forloop.first %}<br>{% endif %}
        {% assign first_character_in_key = p.first | truncate: 1, '' %}
        {% unless p.last == blank or first_character_in_key == '_' %}
          {{ p.first }}:

          {% if p.last contains '/uploads/' %}
            <a href="{{ p.last }}">{{ p.last | split: '/' | last }}</a>
          {% else %}
            {{ p.last }}
          {% endif %}

          <br>
        {% endunless %}
    {% endfor %}
  {% endif %}
Comment this block with {% comment %}{% endcomment %}. Put {% comment %} before the block, and {% endcomment %} after it.

Here, you can find the example from our demo environment.
After {% endcomment %} add:
{% include 'mw_PO_cart' with item, code: 'properties' %}
Find this line:
{{ item.price | money }}
and replace it with:
{% include 'mw_PO_cart' with item, code: 'price' %}
Find this line:
{{ item.line_price | money }}
and replace it with:
{% include 'mw_PO_cart' with item, code: 'line_price' %}
III. Finally, find a piece of code that represents quantity input field. It usually has the name attribute of updates[]:
<input name="updates[]" ... >
Be sure it has the id attribute set to updates_{{ item.id }}:
<input name="updates[]" id="updates_{{ item.id }}"... >
Edit Templates files
Edit customers/order.liquid
Open the Templates folder, and click the customers/order.liquid file.
Find the line:
{{ line_item.title | link_to: line_item.product.url }}
After it you'll need to paste:
{% include 'mw_PO_order' with line_item %}
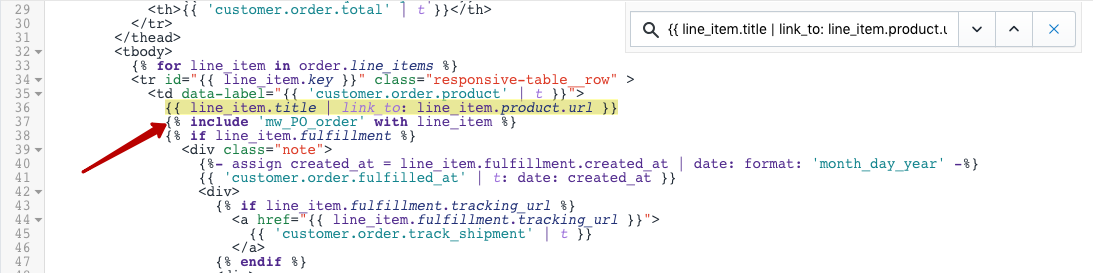
Here, you can find the example from our demo environment.
Add Snippet files
Snippets
Please note that these edits are needed in case you choose the theme after the installation of the app, because if you've installed the theme and then added the app, these files will be added automatically. If that is exactly your case, please go to the next section.
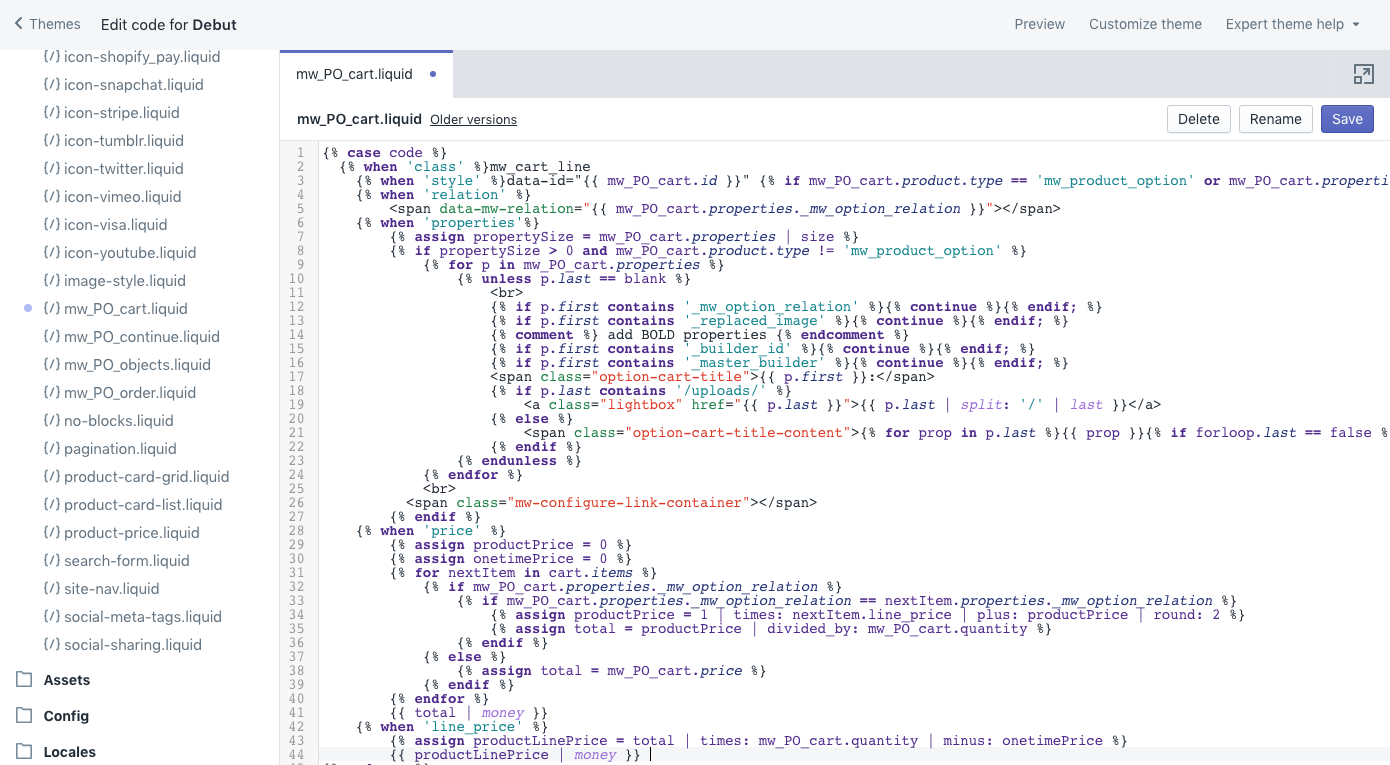
Add mw_PO_cart.liquid
Open the Snippets folder, and click the Add a new snippet option. The snippet name should be mw_PO_cart.
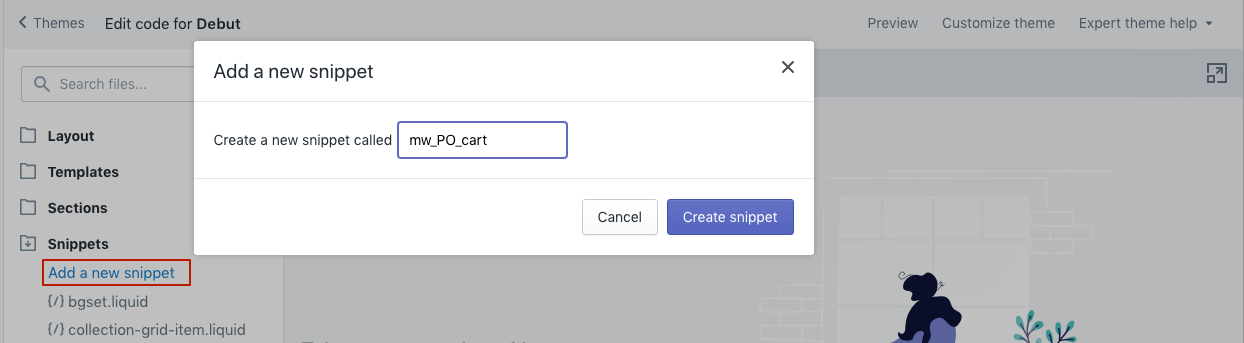
Fill it in with the code from below and save:
{% case code %}
  {% when 'class' %}mw_cart_line
    {% when 'style' %}data-id="{{ mw_PO_cart.id }}" {% if mw_PO_cart.product.type == 'mw_product_option' or mw_PO_cart.properties._mw_is_variant %} style="display:none"{% endif %}
    {% when 'relation' %}
        <span data-mw-relation="{{ mw_PO_cart.properties._mw_option_relation }}"></span>
    {% when 'properties'%}
        {% assign propertySize = mw_PO_cart.properties | size %}
        {% if propertySize > 0 and mw_PO_cart.product.type != 'mw_product_option' %}
            {% for p in mw_PO_cart.properties %}
                {% unless p.last == blank %}
                    <br>
                    {% if p.first contains '_mw_option_relation' %}{% continue %}{% endif; %}
                    {% if p.first contains '_replaced_image' %}{% continue %}{% endif; %}
                    {% comment %} add BOLD properties {% endcomment %}
                    {% if p.first contains '_builder_id' %}{% continue %}{% endif; %}
                    {% if p.first contains '_master_builder' %}{% continue %}{% endif; %}
                    <span class="option-cart-title">{{ p.first }}:</span>
                    {% if p.last contains '/uploads/' %}
                        <a class="lightbox" href="{{ p.last }}">{{ p.last | split: '/' | last }}</a>
                    {% else %}
                        <span class="option-cart-title-content">{% for prop in p.last %}{{ prop }}{% if forloop.last == false %}, {% endif %}{% endfor %}</span>
                    {% endif %}
                {% endunless %}
            {% endfor %}
            <br>
          <span class="mw-configure-link-container"></span>
        {% endif %}
    {% when 'price' %}
        {% assign productPrice = 0 %}
        {% assign onetimePrice = 0 %}
        {% for nextItem in cart.items %}
            {% if mw_PO_cart.properties._mw_option_relation %}
                  {% if mw_PO_cart.properties._mw_option_relation == nextItem.properties._mw_option_relation %}
                    {% assign productPrice = 1 | times: nextItem.line_price | plus: productPrice | round: 2 %}
                    {% assign total = productPrice | divided_by: mw_PO_cart.quantity %}
                  {% endif %}
            {% else %}
                {% assign total = mw_PO_cart.price %}
            {% endif %}
        {% endfor %}
        {{ total | money }}
    {% when 'line_price' %}
        {% assign productLinePrice = total | times: mw_PO_cart.quantity | minus: onetimePrice %}
        {{ productLinePrice | money }}
{% endcase %}
When done, click the Save button.
Add mw_PO_order.liquid
Add another snippet named mw_PO_order. Fill it in with the code from below and save:
{% for p in mw_PO_order.properties %}
  {% unless p.last == blank %}
     <br>
     {% if p.first contains '_mw_option_relation' %}{% continue %}{% endif; %}
     {% if p.first contains '_replaced_image' %}{% continue %}{% endif; %}
     {% comment %} add BOLD properties {% endcomment %}
     {% if p.first contains '_builder_id' %}{% continue %}{% endif; %}
     {% if p.first contains '_master_builder' %}{% continue %}{% endif; %}
     <span class="option-cart-title">{{ p.first }}:</span>
  {% if p.last contains '/uploads/' %}
    <a class="lightbox" href="{{ p.last }}">{{ p.last | split: '/' | last }}</a>
     {% else %}
       <span class="option-cart-title-content">{% for prop in p.last %}{{ prop }}{% if forloop.last == false %}, {% endif %}{% endfor %}</span>
     {% endif %}
  {% endunless %}
{% endfor %}
When done, click Save button.
Add mw_PO_objects.liquid
Add another snippet named mw_PO_objects. Fill it in with the code from below and save:
<style>.mw-product-options .mw-init-spinner{width:100%;text-align:center}.mw-product-options .mw-init-spinner>div{width:18px;height:18px;background-color:#999;border-radius:100%;display:inline-block;-webkit-animation:sk-bouncedelay 1.4s infinite ease-in-out both;animation:sk-bouncedelay 1.4s infinite ease-in-out both}.mw-product-options .mw-init-spinner .bounce1{-webkit-animation-delay:-.32s;animation-delay:-.32s}.mw-product-options .mw-init-spinner .bounce2{-webkit-animation-delay:-.16s;animation-delay:-.16s}@-webkit-keyframes sk-bouncedelay{0%,100%,80%{-webkit-transform:scale(0)}40%{-webkit-transform:scale(1)}}@keyframes sk-bouncedelay{0%,100%,80%{-webkit-transform:scale(0);transform:scale(0)}40%{-webkit-transform:scale(1);transform:scale(1)}}</style>
<script type="text/javascript"></script>
<script type="text/javascript">
window.mwProductOptionsObjects = {
  product: {{ product | json }},
  cart: {{ cart | json }},
  template_name: {{ template.name | json }},
  shop: {
    domain: {{ shop.permanent_domain | json }},
    money_format : {{ shop.money_format  | json }},
    money_with_currency_format : {{ shop.money_with_currency_format  | json }}
  }
};

{% if product %}
  {% for variant in product.variants %}
    window.mwProductOptionsObjects.product.variants[{{ forloop.index | minus: 1}}].inventory_quantity = {{ variant.inventory_quantity | default: 0 }};
    window.mwProductOptionsObjects.product.variants[{{ forloop.index | minus: 1}}].inventory_management = {{ variant.inventory_management | json }};
    window.mwProductOptionsObjects.product.variants[{{ forloop.index | minus: 1}}].inventory_policy = {{ variant.inventory_policy | json }};
  {% endfor %}
{% endif %}

function mwShowInitSpinner() {
  var opt = document.getElementsByClassName('mw-product-options');
  if (opt.length > 0) {
    var timeSpinner = 6000;
    opt[0].innerHTML = '<div id="mw-apo-init-spinner" class="mw-init-spinner"><div class="bounce1"></div><div class="bounce2"></div><div class="bounce3"></div></div>';
    setTimeout(function(){ document.getElementById('mw-apo-init-spinner') && document.getElementById('mw-apo-init-spinner').remove(); }, timeSpinner);
  }
}
mwShowInitSpinner();
</script>
When done, click Save.
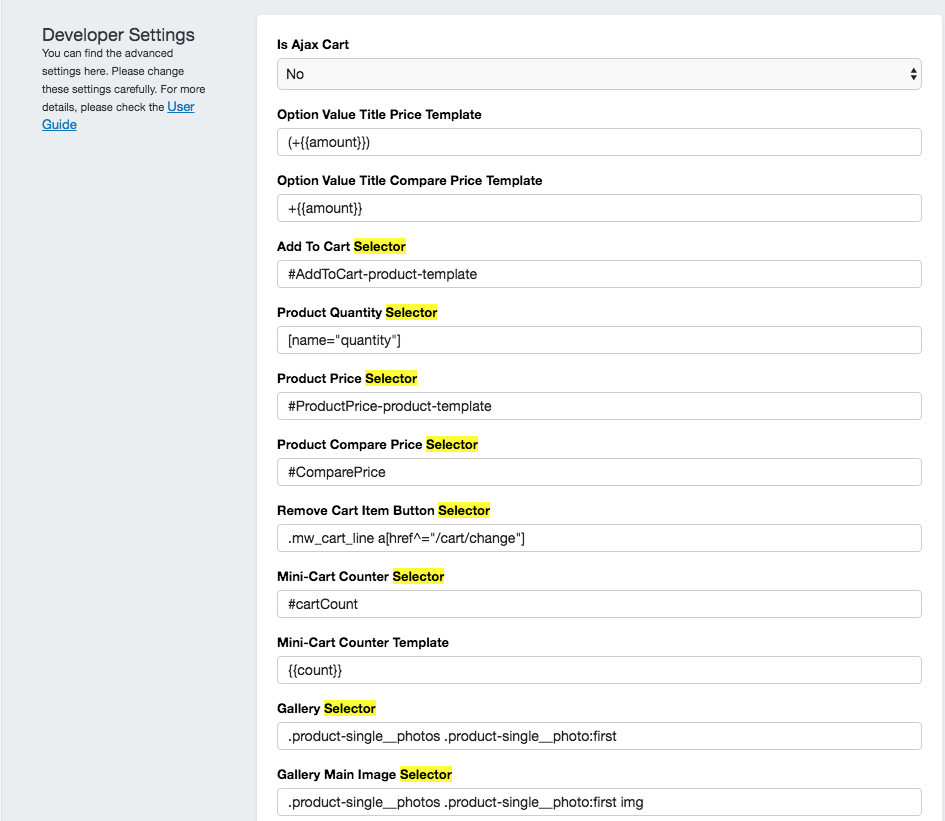
Defining Selectors
To set up the app to correctly perform such operations as changing the product price, adding a product to cart, etc., it’s necessary to tweak some Developer Settings. Basically, you need to specify selectors for the corresponding fields. To learn more about the selectors, follow this link.
Depending on the theme, these modifications may vary.
First, figure out the theme name and locate it in the table below.
| Theme Name | Product Form Filename | Form Code | Product Price Selector | Add To Cart Button Selector | Cart Quantity Selector | Product Image Gallery Wrapper | Product Image |
|---|---|---|---|---|---|---|---|
| Narrative | product-form.liquid | {% form 'product', product, class:'product-form' %} | .product__current-price | .product__add-to-cart-button | - | .product__image-container .product__image-wrapper:first | .product__image-container .product__image-wrapper:first img |
| Minimal | product-template.liquid | {% form 'product', product, class:productform_class %} | #ProductPrice | #AddToCart | .cart-count | .product-single__photos .product-single__image-wrapper:first div | .product-single__photos .product-single__image-wrapper:first div img |
| Debut | product-template.liquid | {% form 'product', product, class:form_classes %} | .price-item--regular | #AddToCart-product-template | .site-header__cart-count span:first | .product-single__photos .product-single__photo-wrapper:first | .product-single__photos .product-single__photo-wrapper:first img |
| Supply | product-template.liquid | {% form 'product', product, class:form_class, id:form_id %} | #productPrice-product-template | #addToCart-product-template | .cart-count | #productPhotoContainer-product-template .product__image-wrapper:first | #productPhotoContainer-product-template .product__image-wrapper:first img |
| Boundless | product-template.liquid | {% form 'product', product, id:form_id, class:form_class %} | .product__price--reg | #AddToCart-product-template | - | .product__photo .product__photo—single:first | .product__photo .product__photo—single:first img |
| Pop | product-template.liquid | {% form 'product', product, id:form_id %} | .product-price | #addToCart-product-template | #cartCount | .product-single__photos .product-single__image-wrapper:first | .product-single__photos .product-single__image-wrapper:first img |
| Simple | product-template.liquid | {% form 'product', product, class:'product-form' %} | #ProductPrice | #AddToCart | #CartCount | .product-single__photos | .product-single__photos img |
| Venture | product-template.liquid | {% form 'product', product, class:form_class, id:form_id %} | #ProductPrice-product-template | #AddToCart-product-template | - | #ProductPhoto a:first | #ProductPhoto a:first img |
| Jumpstart | product-template.liquid | {% form 'product', product %} | #ProductPrice-product-template | #AddToCart-product-template | .btn__cart .icon | #slider-product-template .flex-active-slide:first div | #slider-product-template .flex-active-slide:first div img |
| Brooklyn | product-template.liquid | {% form 'product', product, class:'product-form' %} | #ProductPrice | #AddToCart--product-template | - | .product-single__photos .product-single__photo-wrapper:first | .product-single__photos .product-single__photo-wrapper:first img |
To tweak the selectors, please go to Apps > Advanced Product Options.
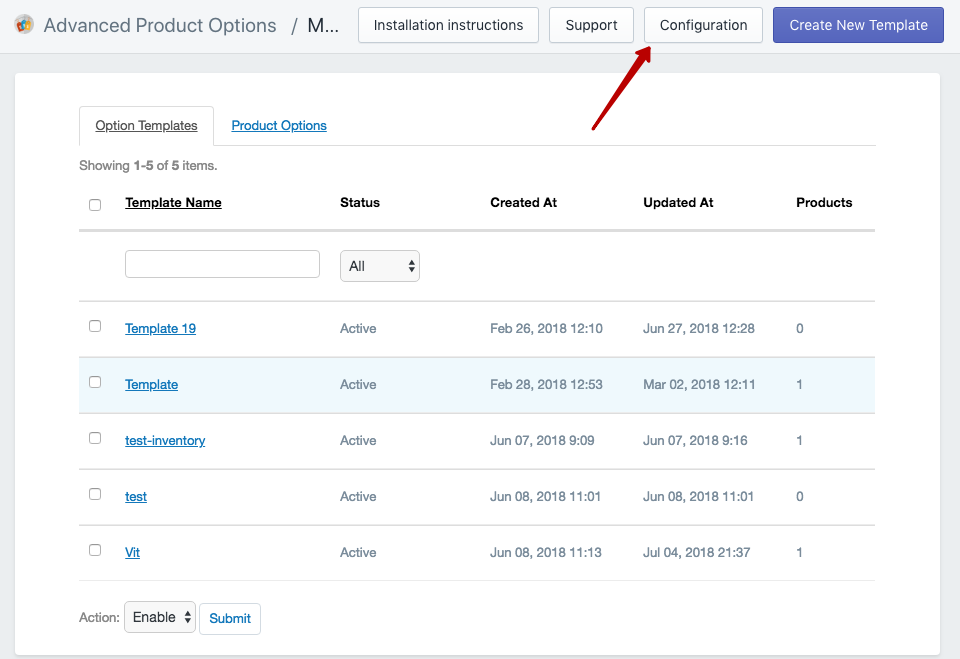
Click the Configuration button and scroll down to the Developer Settings configuration.
Tip
Selectors can be viewed in your browser Console. In most browsers, it is launch by this keyboard shortcut: ⌘ + ⌥ + I (for Mac) or CTRL + SHIFT + I (for Windows).
For example, we wish to modify the Product Price Selector field. For this, we open any product on the frontend and open the browser console.
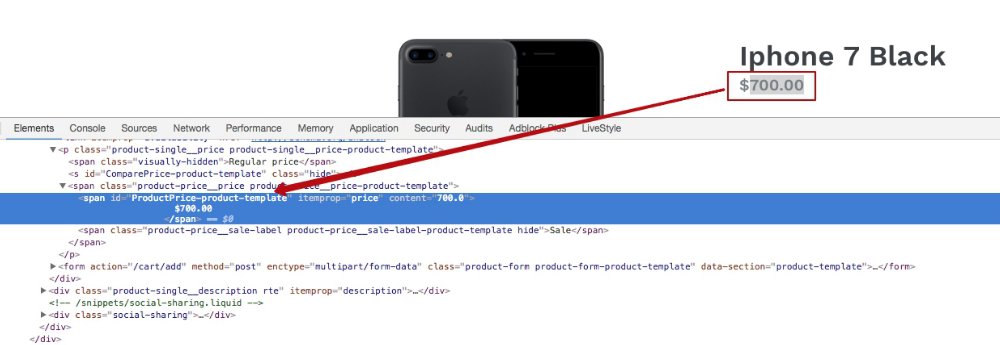
The selector name here is #ProductPrice-product-template and we put this value in the appropriate configuration box.
If, for some reason, you can’t do it, do not hesitate to submit a request so we could help you with this (our support service is free of charge).
Custom Options Templates
The app allows creating the templates and assigning them to the appropriate products. The template itself is the pre-defined set of options that can be applied to different products at the same time. Thus, you can create one template and assign it to different products. To create, view, edit or delete the templates you should go to Apps > Advanced Product Options.

Please note that during the initial setup this grid will be empty.
To create a new Product Custom Options template click the Create New Template button. The template configuration consists of three tabs: General Information, Product Options, and Associated Products.
General Information
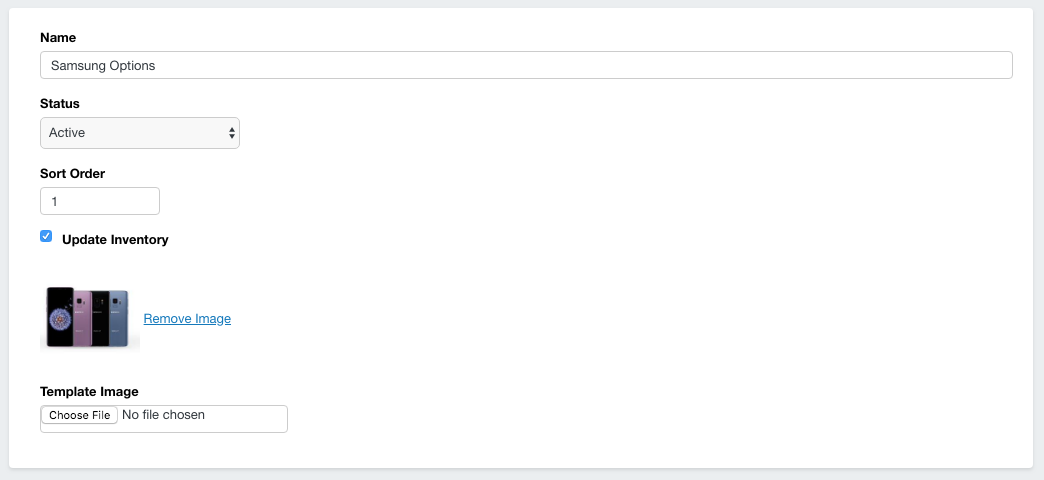
The Title is a name of the template that will be visible to the administrator.
To temporarily disable the template, select the Inactive Status.
The Sort Order specifies the order of the template if one single product has several templates applied.
Enabling the Update Inventory checkbox lets the stock of custom options to be updated for the assigned products.
The image provided in the Template Image can be used to distinguish several templates. It is used as an image on the checkout in some cases.
Product Options
Product Option is the name of the option, like Color, Size or Season, while the Product Option Value is the exact value for this option like Black, M or winter.

To add the new product option to the template, click the Add New Option button.

Both the Title and the Description are visible on the frontend.
The description can be shown either in the tooltip or as the plain text. 
The configuration of the description design can be changed in app's configuration
The CSS Class allows you to enter a specific CSS class for each option to distinguish them.
The Input Type is the way how the custom option variants will be populated.
The Required drop-down drop-down appoints whether a customer must choose this custom option before processing to the checkout.
The Image Mode specifies how the option’s images are displayed. If Disable is selected, the image won't be shown.
The Display Beside Option displays all the images as thumbnails directly below this option, while for the Display Once Selected the image will be shown below the option value if this value is selected.
With Overlay mode, each next selected image will overlay the main (and the previous ones) product image. This works with the png files as they have the transparent alpha channel. This feature is useful when you let customers create their own item design, like applying a wording print design over a T-shirt.
The Sort Order defines the sorting order of an option among the other custom options on the product page.
The two buttons provide the possibility to duplicate this option (so you don’t have to recreate all custom options) or delete it.
Input Type
The Input Type is the essence of the custom options. It provides the possibility to select the desired type of the option to fit the client's business demand.
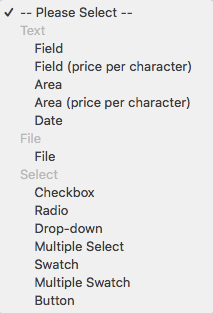
Text
This option can be useful in case the store owner wishes the client to put some text to personalize the product (e.g. the name to engrave on the cup). This feature provides 2 option types to select from.
-
The Field is for one-string texts.
-
The Area is for multiple strings.
It is possible to change the data provided in this boxes either by symbol (price per character) or fully.
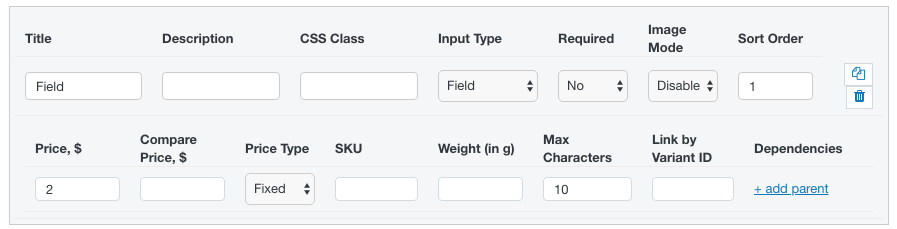
Once the Input Type is selected, the custom options value grid will be shown. We will describe its features and nuances a bit later in this document. Right now, you will need to know that Title is the desired title to be shown for the customer and the Price is the price that will be added if this option value will be populated by the customer.
The Max Character limits the number of the characters to be provided by the client.
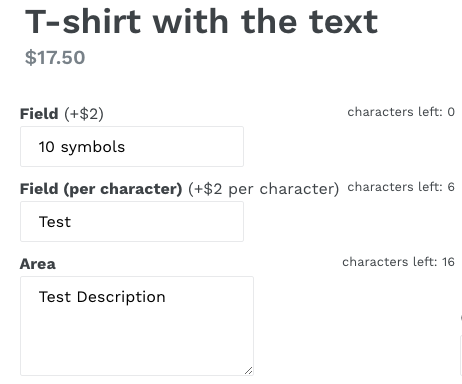
This example shows the 3 options: Field, Field (price per character) and Area. The price for the first 2 options (Fields) is 2 and for the Area is 0. The surcharge will be 2+2*4+0=10.
- The Date product option.
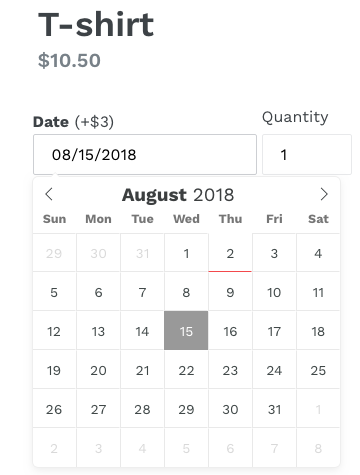
This option comes useful in case the store owner allows the customers to set a product pick-up time.
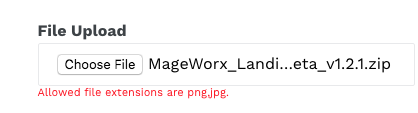
File
This option allows users to upload files. It may be useful to encourage the customers to send some particular files (like the custom T-shirt design). In the backend, you can specify the Allowed File Extension to load.
Select
This one allows visualizing the customizable options. They cover all visualization tools available in Shopify.
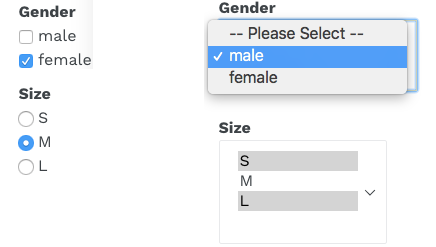
This example shows the 4 options: Checkbox, Radio button, Drop-down and Multiple Select.
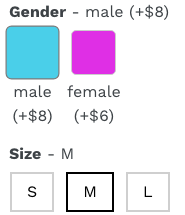
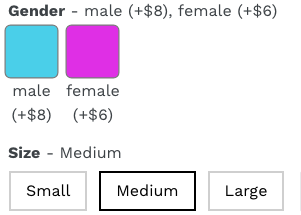
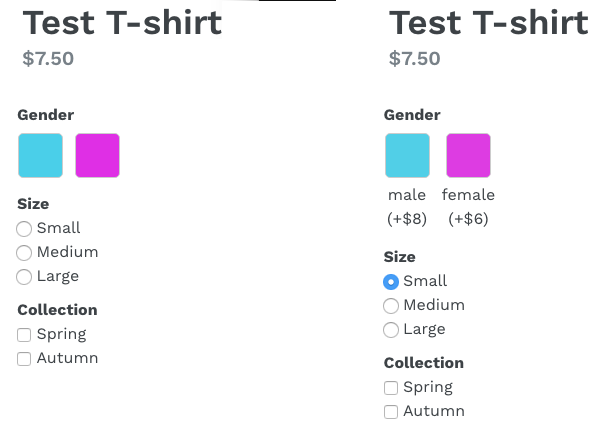
This example shows the Swatches, Multiple Swatches (upper row, Gender option) and Button type (lower row, Size option).
You can Disable Title Below Swatch Image if it is needed. This configuration can be changed in app's configuration
For the Button type, the Title of the option will be located inside the box.
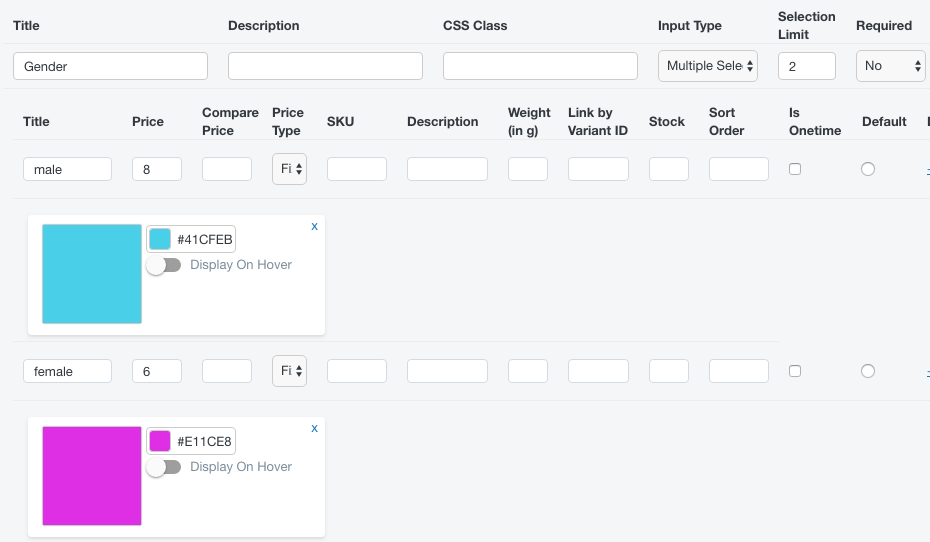
When choosing the Multiple select option, you can also set the limit of product variants a customer can choose when buying a product. That can be done in the Selection Limit field.
Custom Option Values
Once the Input Type is selected, the custom options value grid will be shown. We've already described the specific option values setting in the previous section and here we'll go through the default ones.

The Price is the price that will be added if this option value will be selected by the customer.
In case this custom option is beng sold at a discounted price, you can use the Compare Price as well.
The Price Type specifies the surcharge of the option. If Fixed option is selected, the numbers represent the exact sum of money, Percent stands for the percentage changes. To calculate the percentage not from the original product price but from the price that the customer gets when previous options are chosen, use the Percentage based on the options above. If the product option doesn't change the price, the field can be left empty.
The SKU setting allows adding SKUs for the custom options. The SKU policy is described in this document.
This setting may be disabled in the app's configuration. If you do not observe it on your website, please check here whether the Enable SKU setting is set to Yes.
With the Weight feature, you can add weight to custom option, thus making the shipping costs more accurate.
The Link by Variant ID field is used to link the option value to some existing products. In this case, the linked products will be added to the checkout if these options are chosen. Please check this article to find the correct variant ID.
This setting may be disabled in the app's configuration. If you do not observe it on your website, please check here whether the Link by Variant ID setting is set to Yes.

Both the Title and the Description are visible on the frontend.

The description can be shown either in the tooltip or as the plain text. The configuration of the description design can be changed in app's configuration.
Our app allows you to specify the available Stock quantity for each custom option’s value.
This setting may be disabled in the app's configuration. If you do not observe it on your website, please check here whether the Enable Inventory Qty for Options setting is set to Yes. There you may also configure additional stock settings.
The app provides the possibility to manually change the Sort Order.
If the Onetime option is selected, the custom price will be added only once despite the quantity of the products added to cart, e.g, the custom price is +$4 and 10 products added to the cart. The surcharge will be just $4 or $40 with this option unchecked.
The Default radio button provides the possibility to specify the default value for the custom option. If chosen, on the frontend this value will be preselected.
Conditional logic
With Advanced Custom Options app, you can apply the conditional logic. With this feature, you can create a product with a range of options (e.g. storage, RAM, size, color, etc.) and display these options depending on customers' initial choice. Thus, you can offer products with the specific set of options (child options) based on the initially selected one (parent option). For this, on the child (dependable) option value click the +add parent link.
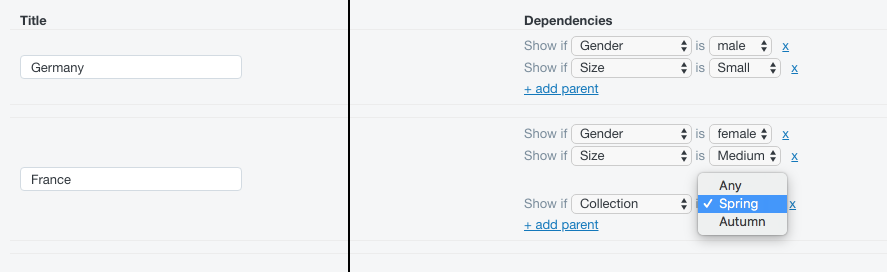
It is possible to add several parent custom options. It is possible to select the particular custom option value or any value of some option. Any parent option values might be selected to display the current option value.

On this screenshot, you can observe that the Germany option has appeared exactly after we've selected the Small size option. On the configuration screen (previous image) we can see several parent options (like the Male option) for Germany. So Germany would be displayed if we selected the Male Gender as well.
Custom Option Images
The app provides the possibility to create a visual presentation of the products. It allows you to display images instead of custom options, replace a product’s image with an option’s one or upload multiple images to the single option.
All the custom options support the image uploading. First of all, you need to select the appropriate image mode as it was previously described.
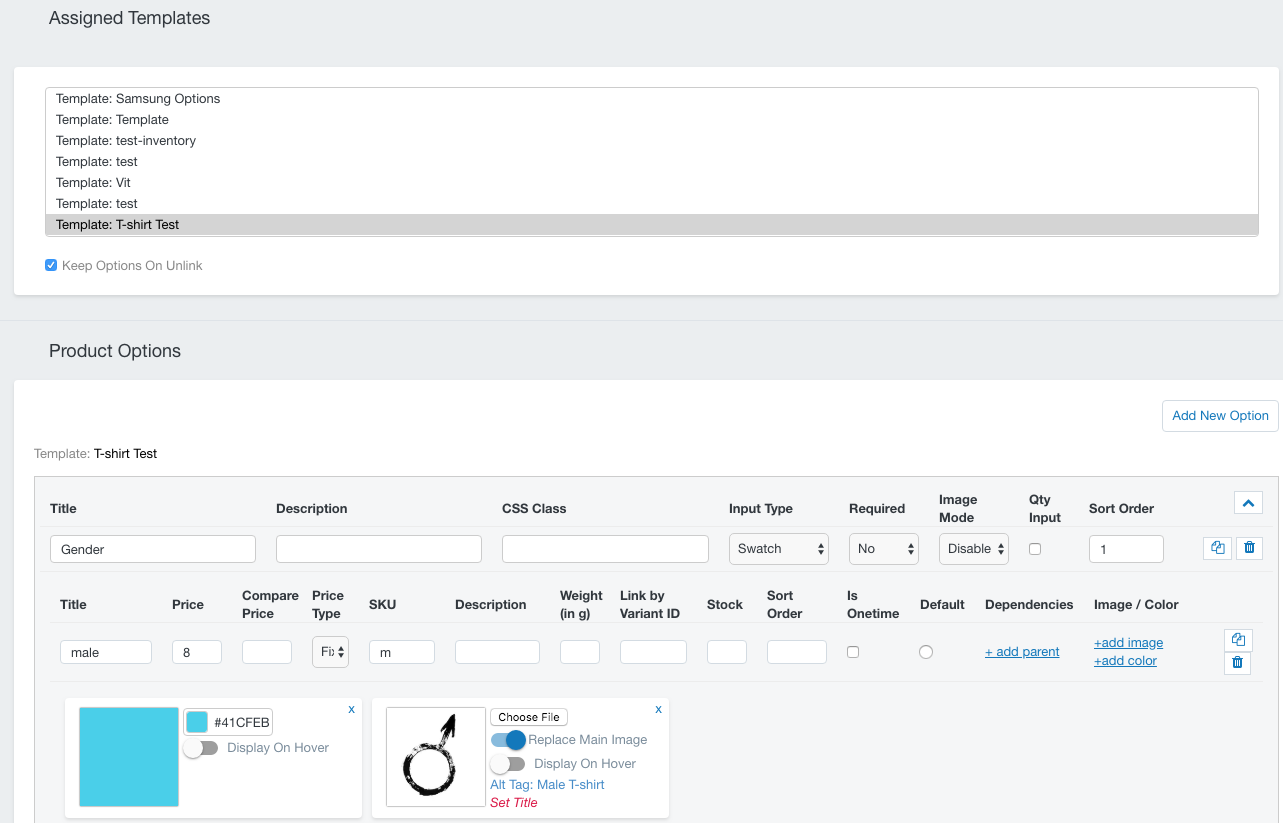
When this is done, you can upload the image or add the color. For this, click the +add image or +add color.
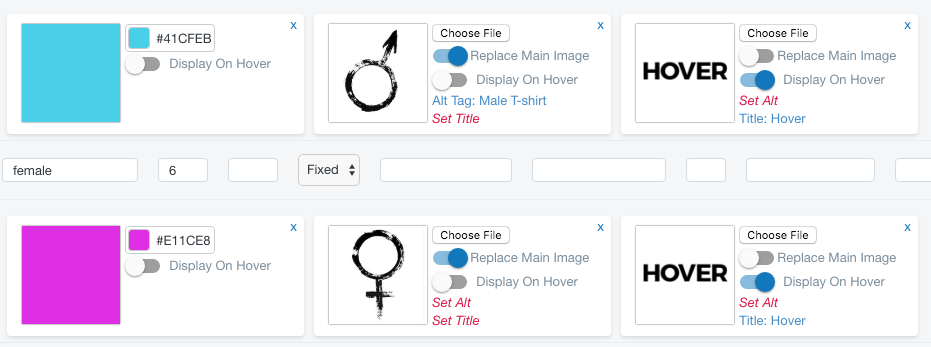
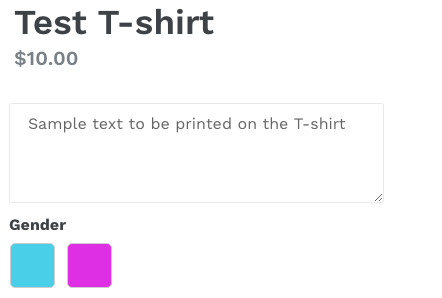
When the image is loaded or the color is picked, you can select how you should use this image. It can Replace Main Image (♂️ image), Display On Hover (Hover image), set alt tag or Title.
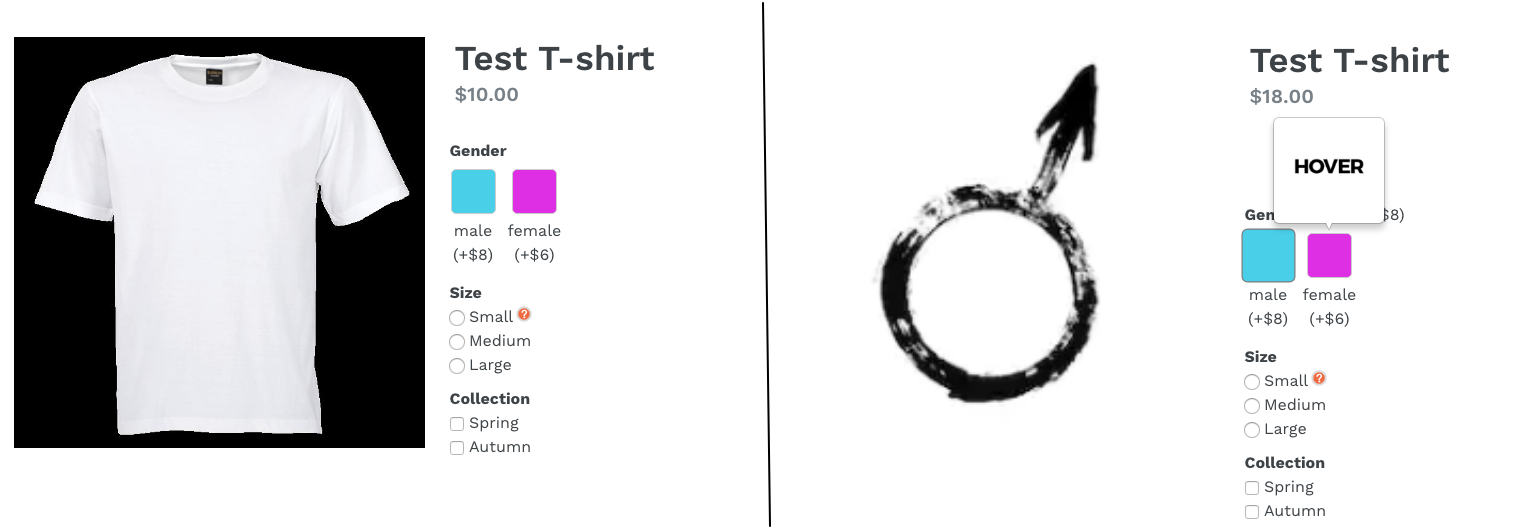
The image on the left shows the dummy product when no options are selected, the one on the right shows how our app handles the configuration that we've just set in the backend.
Associated Products
From here, you can select the products that should use this template.
Paid Options Modes
When the client purchases the product with the options created by means of our app, the app creates temporary products that are visible to both the clients and the website administrator. To tweak this setting, please go to Apps > Advanced Product Options, click the Configuration button and scroll down to the last, Display Paid Options Mode setting.
It has 3 options and we'll look through all of them one by one to see the differences.
Combined Items
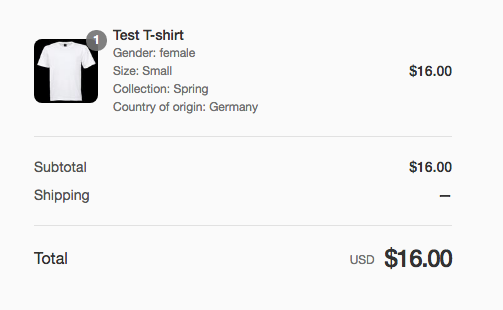
If we select the Combined Items mode, all the custom items will be added in one Custom Option product. On the checkout the customer will observe such product combination:
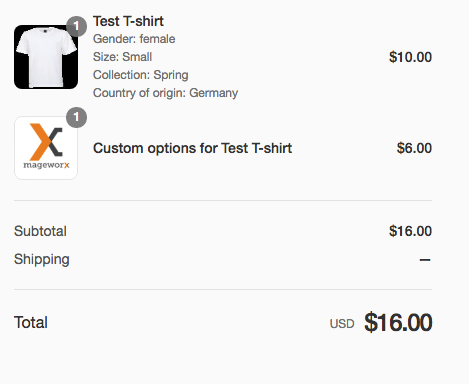
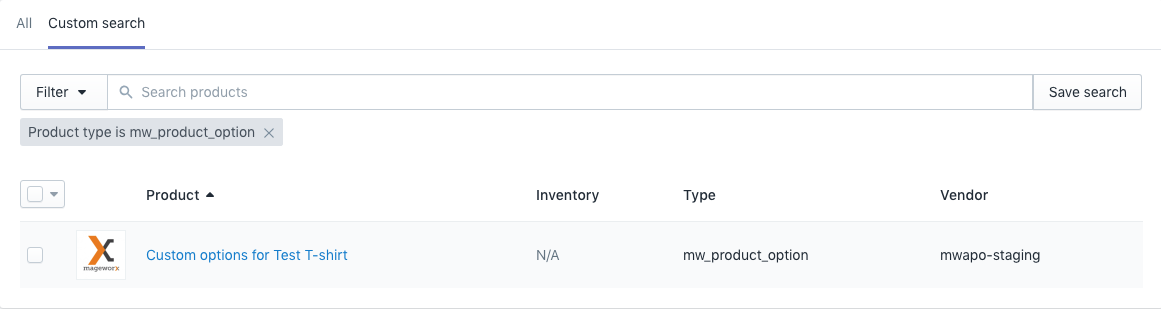
All the paid options will be added to one separate option. Its name will be Custom Options for [Product Name], where this tag [...] will be replaced with the real product name. The image will be shown from the uploaded custom template image.

The temporary product will be created. The image will be shown from the uploaded custom template image. The SKU will be the combination of all the product options without the product's SKU.
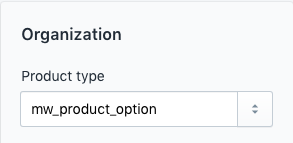
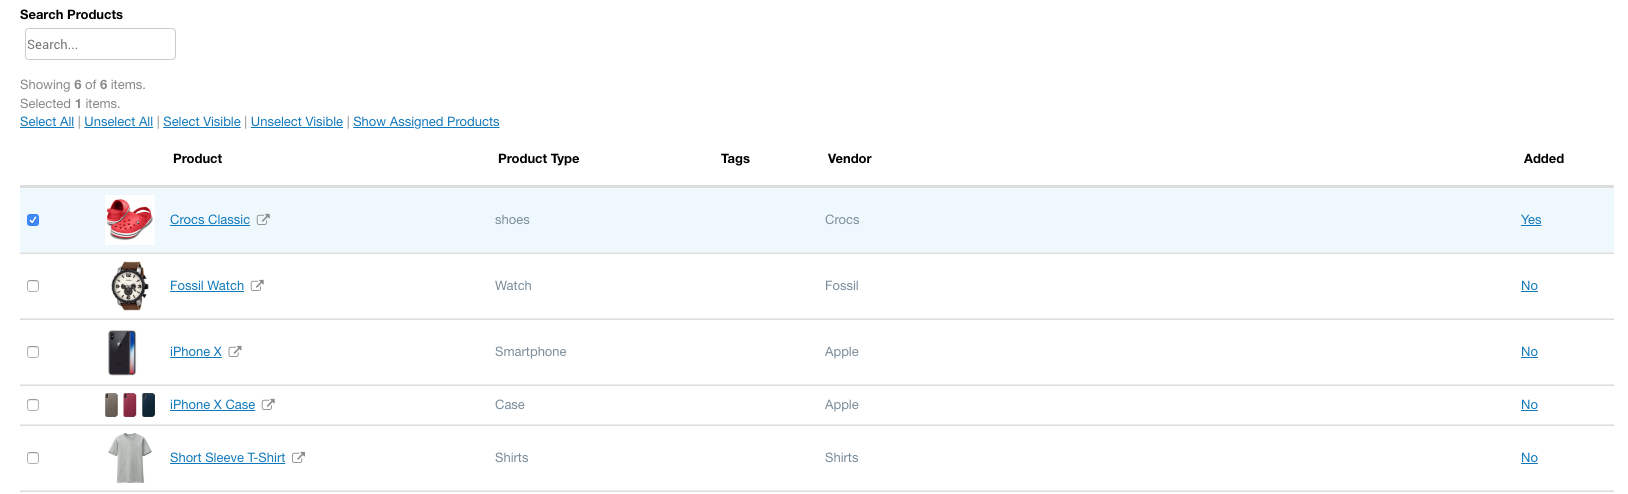
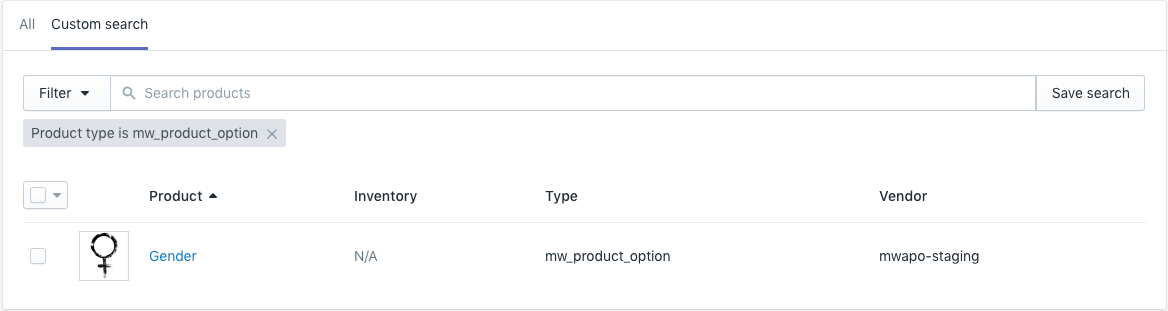
Our app creates the special product type for such products. Its name is mw_product_option. It may be useful for the website administrator to use this product type as the filter.
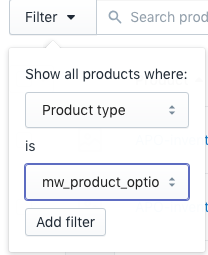
By means of this filter we can show only products that were created with our app:
Separate Items
With the Separate Items mode, all the custom items with the price will be added as independent products:
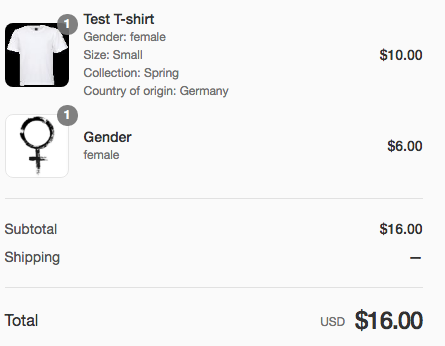
Note that if there had been several paid options, they will be shown here as separate products. The temporary products names will be the names of the particular product options.
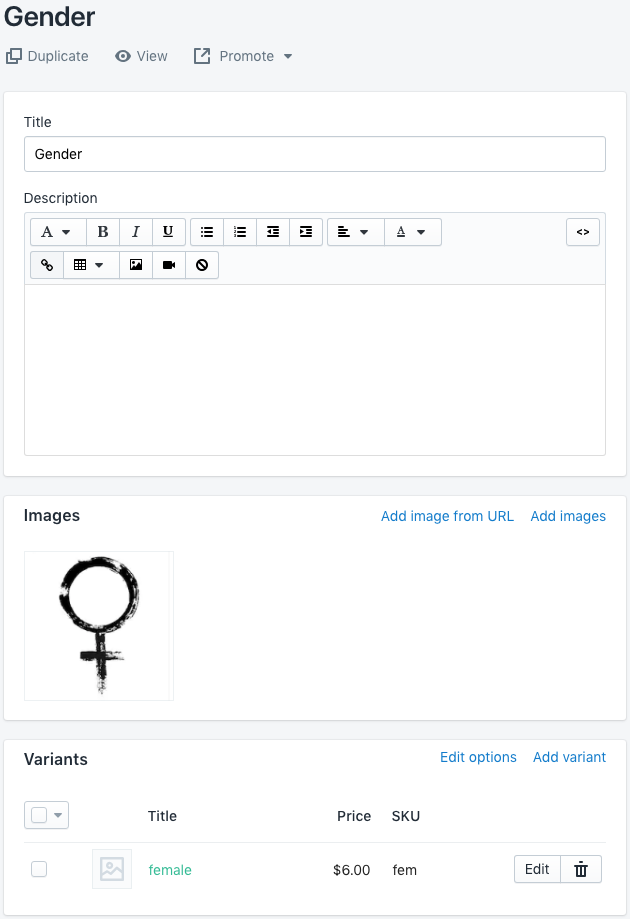
The temporary product will be created. The image will be shown from the uploaded option value.
Our app creates the special product type for such products. Its' name is mw_product_option. It may be useful for the website administrator to use this product type as the filter. By means of this filter we can show only products that were created by means of our app:
Product Variant
If we select the Product Variant mode, our app will create the temporary cloned product with the custom options combination that was used during the order placement. On the checkout the customer will observe:
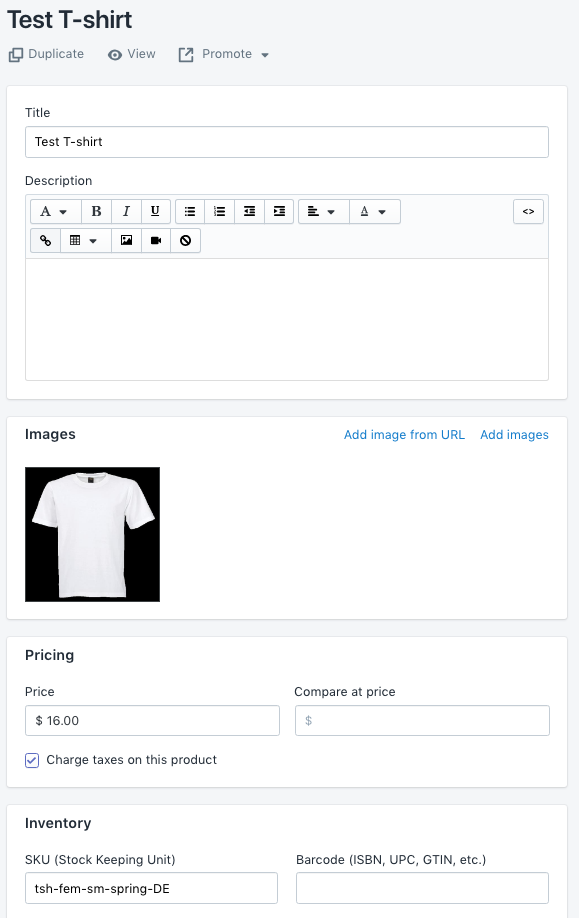
The temporary product will be created. The SKU will be the combination of all the product options with the initial product SKU as the prefix.
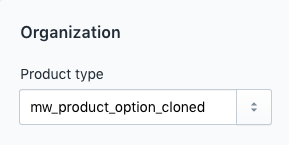
Our app creates the special product type for such products. Its name is mw_product_option_cloned. It may be useful for the website administrator to use this product type as the filter. By means of this filter we can show only products that were created by means of our app:
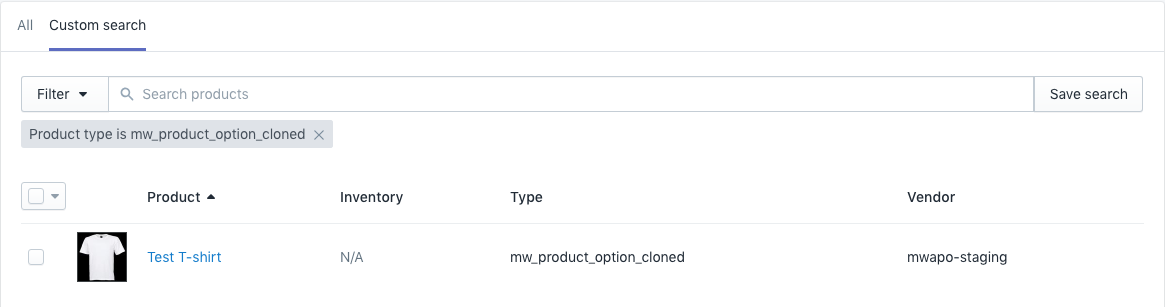
Backend Implementations
Individual Product Template
Go to Apps > Advanced Product Options and select the Product Options tab.
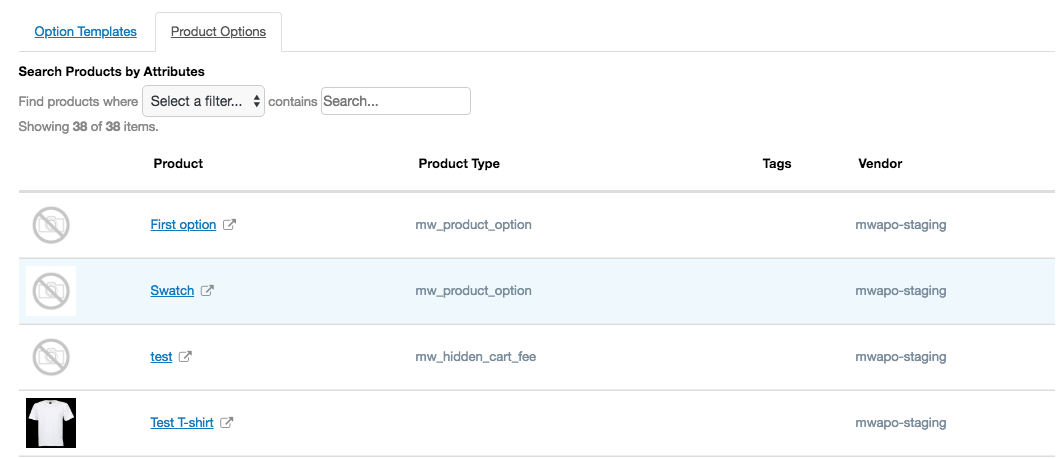
In the Product Options tab, you can conveniently sort any products by name, type, vendor or associated tags.
Also, by clicking on any product, you can view which template is assigned to its options or you can upload the new template.
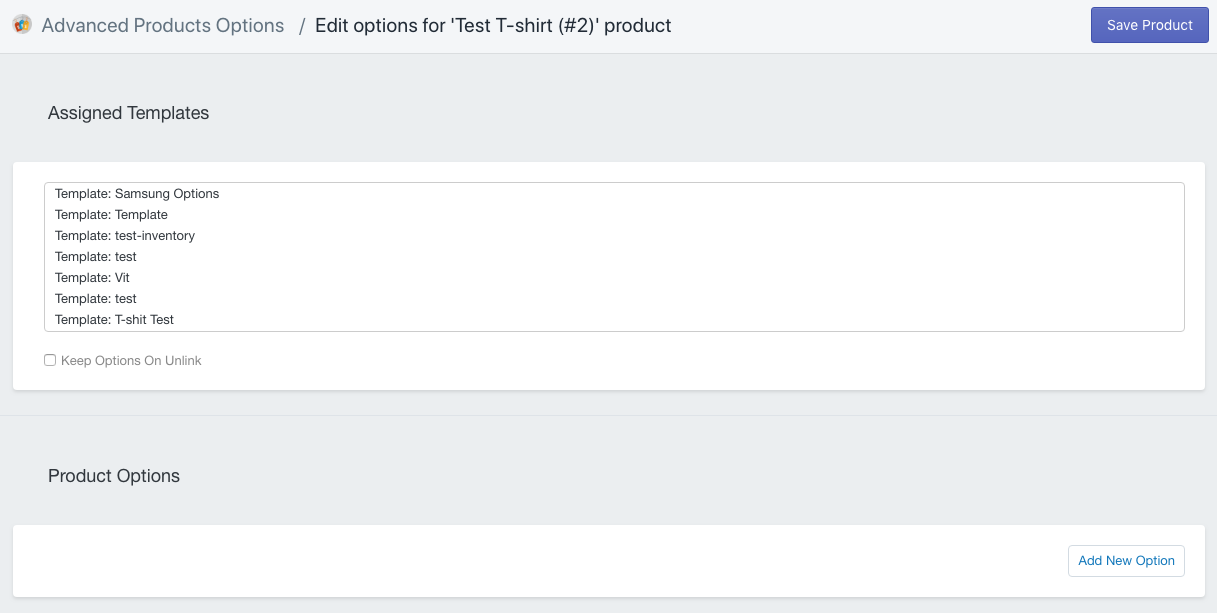
When you select the desired template to apply, click the Save Product button. The templates options will be automatically taken from this template.
Keep Options on Unlink checkbox is used when it’s necessary to keep all the options of an assigned template after removing the connection between a product and this template. If the store owner removes the product from the template, its options will be deleted, unless the checkbox is put.
Configuration
The basic app configuration provides the big number of the configurations that can be changed according to your business needs. Go to Apps > Advanced Product Options and click the Configuration button.
This workspace consists of several tabs.
General Settings

The app supports the special Turbo Mode which makes options load very fast. This enhances customers shopping experience and decreases your site bounce rate. The option doesn't work with the product variant option mode.
The options like Link by Variant ID, Enable Metafields (needed for the in-house customizations) and Enable SKU are made to hide these fields in the template configuration.
The Append SKU and SKU separator will work with combined items and product variant option modes.
Option Description Type and Option Value Description Type handle the design of the descriptions% as the tooltips or as the plain text.
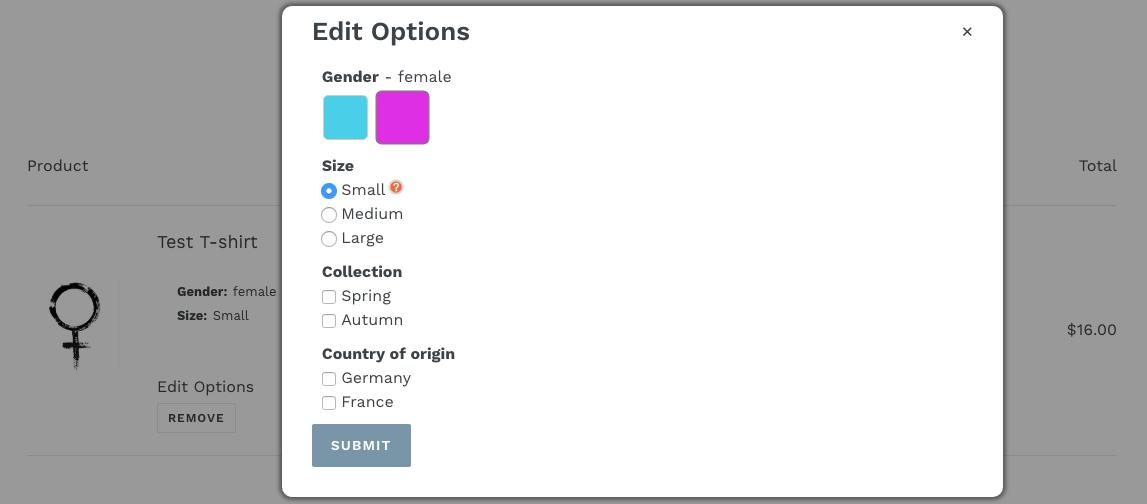
The Display «Edit options» link setting, if enabled, provides the possibility to change the desired product options on the cart. If enabled and the client clicks the Edit Options button, the popup with the product options will be shown:
Display Title Below Swatch Image and Display Options Prices allow to hide these values on the frontend:
To hide the hover element on the mobiles (it may be useful for some third-party themes) you may need to put the Enable Hover on Mobiles setting to No.
Our app allows to show the Option Label As Placeholder (not as the title):
To show the changing price only on the cart and not on the product, please Disable Price Calculation.
You can change the Date Format according to your regional standards as well.
Stock Settings
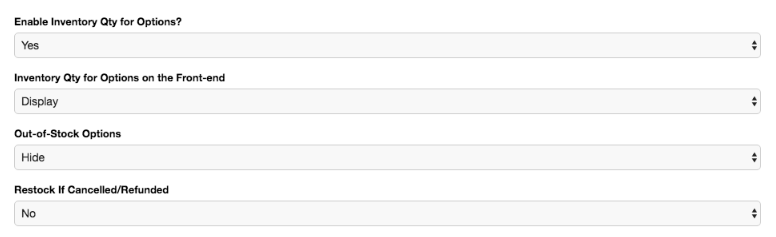
To enable the possibility to handle the custom option stock, select the Yes setting for the Enable Inventory Qty for Options configuration.
You may enable the Inventory Qty for Options on the Front-end to show the stock value for the clients.
If the product option becomes out of stock you may decide whether you wish to Disable, Disable and Display the "Out of Stock" Message or simply Hide this option.
Whether the Restock If Canceled/Refunded setting is enabled, the stock of options will be restored when the order is canceled or refunded.
Styling Settings
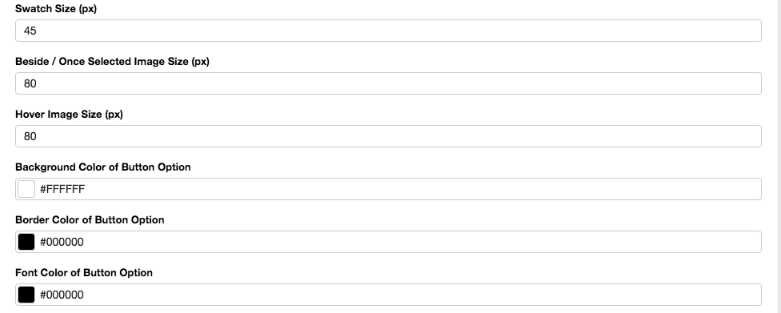
These settings provide the possibility to edit the desired design of the custom options.
Translations
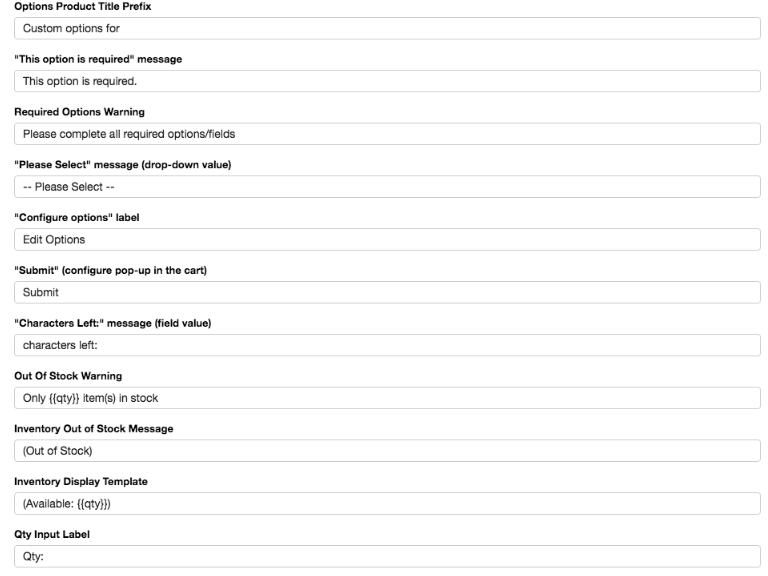
These settings provide the possibility to change the translations.
Developer Settings
These settings provide the possibility to edit the CSS selectors and the Paid Options Mode
Note
The app may not be compatible with the stores that use AJAX carts (pop-up, drawer, etc.).
Questions?
For any technical and pre-sale questions, feel free to contact us at apps@mageworx.com.