Order Surcharge & Product Fees
Order Surcharge & Product Fees
The app lets you create an unlimited number of the additional fees or charges and add them to any product in your store. You can include anything your customers may need to order such as:
- personalized options (e.g. installation, upgrade, premium version)
- rush delivery
- gift wrap
- some personalized print-out (images,photos,text) and others.
You can add the fees to some product or to the whole cart. The app lets you define a price of any product option. Product fee price can be set either as fixed ( so that you define the exact value) or percentage (the amount is calculated on the product price basis).
On the frontend, the fees can be shown in almost any design principle that is available in Shopify: checkboxes, dropdowns, radio buttons etc. The fee can be hidden so that the customer wouldn't be able to uncheck it.
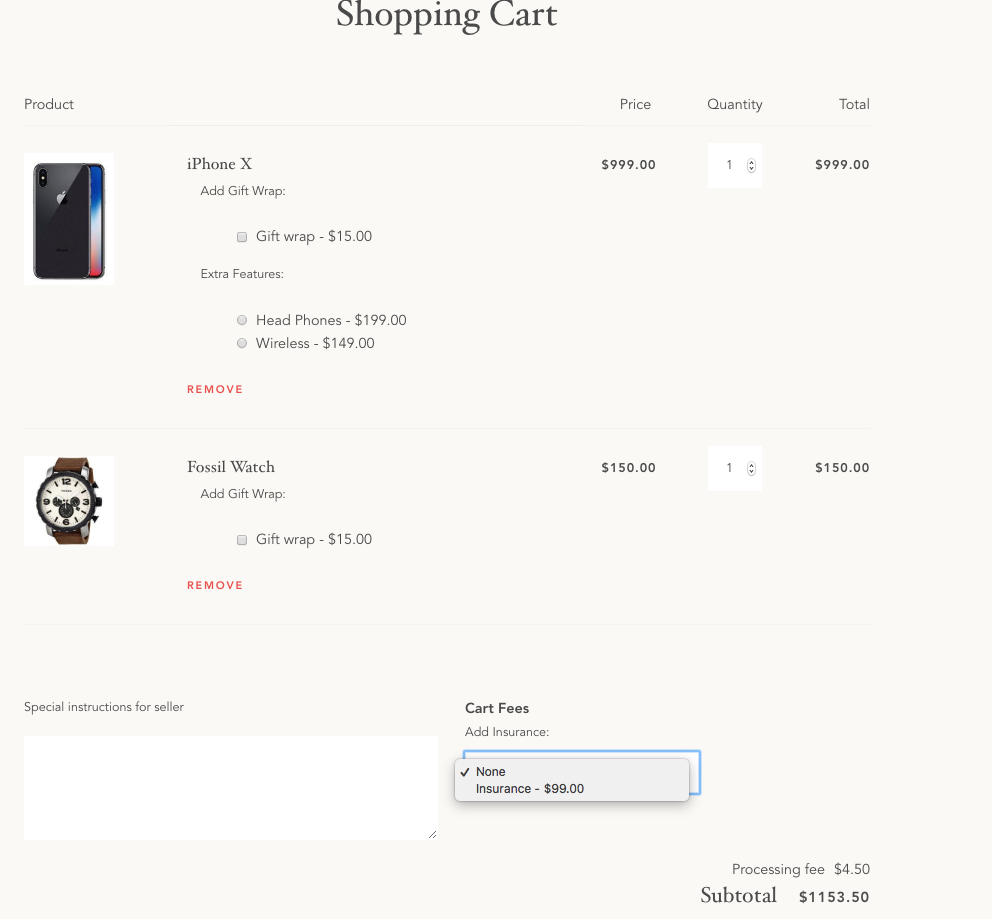
This screenshot shows the demo cart page with several fees: the checkbox and the radio button. The product fees can be applied per product. The cart fee (Add Insurance dropbox) handles the full cart. The hidden fee (Processing fee) cannot be unchecked.

You can display/hide product fees on the front-end only when certain conditions are met. Product fee conditions can be based on product attributes such as product type, price, SKU, weight etc.
Installation
Help
This app comes with FREE installation by the MageWorx Shopify professionals. All you need to do to get the app on your store is to submit a request by hitting the button below. Please, bear in mind that usually, we install the app within 24 hours (on business days). Alternatively, you can install the extension on your own, following the instructions in this user guide.
First, backup the copy of the current theme to discard the changes if needed.
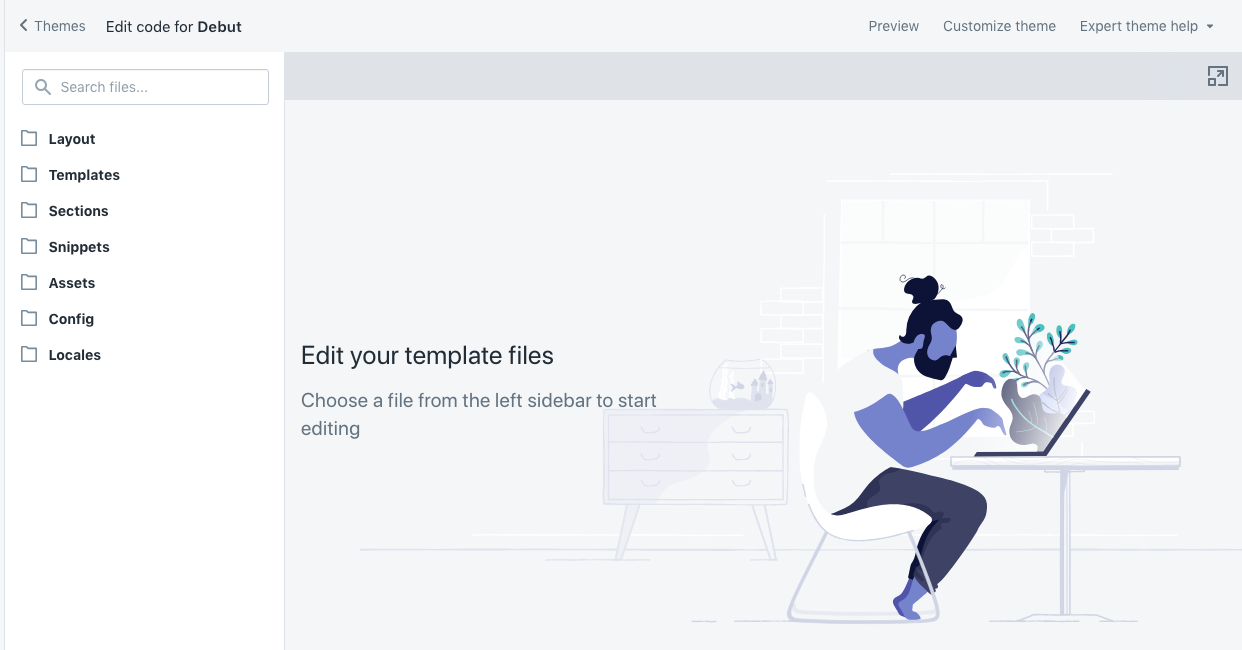
From your Shopify admin, go to Online Store > Themes, find the current theme and click the Actions > Edit code.

The code editor workspace shows the bunch of theme files logically sorted into several folders:
Edit Templates files
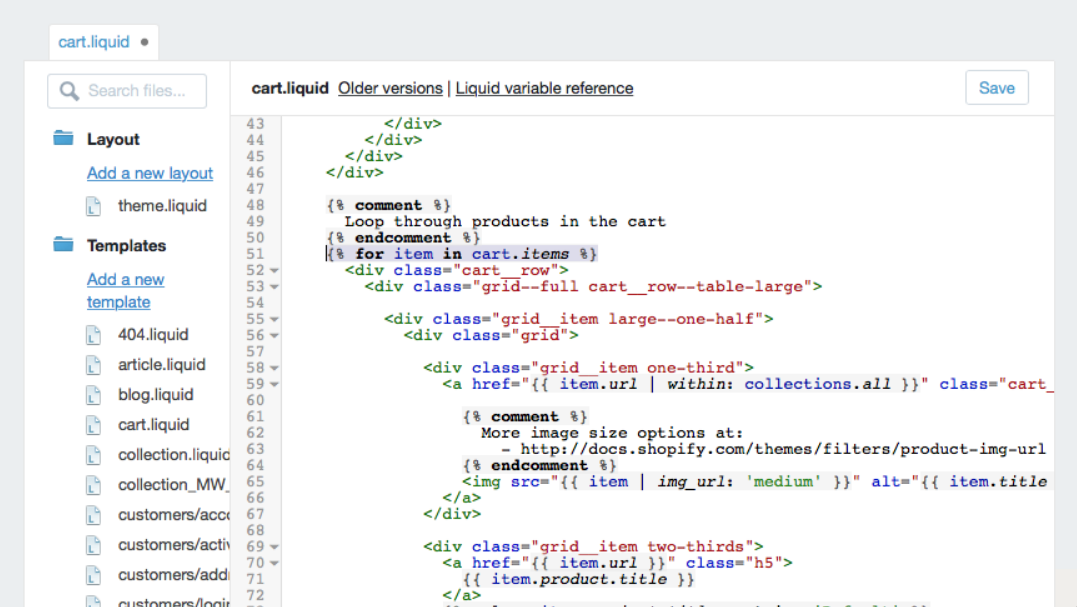
Open the Templates folder, and click the cart.liquid (or cart-template.liquid) file. You will need to change 4 things. Let's go through them one by one.
I Locate the piece of code responsible for displaying products in the cart. In the default theme, the code will look like:
{% for item in cart.items %}
...
{% endfor %}
After the line:
{% for item in cart.items %}
enter:
{% if item.product.type == 'mw_hidden_cart_fee' %}{% continue %}{% endif %}
II In the same file, locate subtotal cart block:
<span class="cart__subtotal-title">{{ 'cart.general.subtotal' | t }}</span>
and replace it with:
<span class="mw-hidden-fees"></span>
<span class="cart__subtotal-title">{{ 'cart.general.subtotal' | t }}</span>

III Next, we should find a piece of code that is responsible for building properties. Search cart-template.liquid for property or properties to find the block that builds properties in a cart. This is how this block looks like in the default theme:
{% assign property_size = item.properties | size %}
  {% if property_size > 0 %}
    {% for p in item.properties %}
        {% if forloop.first %}<br>{% endif %}
        {% assign first_character_in_key = p.first | truncate: 1, '' %}
        {% unless p.last == blank or first_character_in_key == '_' %}
          {{ p.first }}:

          {% if p.last contains '/uploads/' %}
            <a href="{{ p.last }}">{{ p.last | split: '/' | last }}</a>
          {% else %}
            {{ p.last }}
          {% endif %}

          <br>
        {% endunless %}
    {% endfor %}
  {% endif %}
{% if item.product.type != 'Product Fee' %} <span class="mw-product-fees" data-id="{{ item.id }}"></span> {% endif %}
IV In the same file, locate this block:
{% if settings.cart_notes_enable %}
  {% assign noteSize = cart.note | size %}
  <div class="grid__item large--five-twelfths">
    <button type="button" class="text-link cart__note-add{% if noteSize > 0 %} is-hidden{% endif %}">
      {{ 'cart.label.add_note' | t }}
    </button>
    <div class="cart__note{% if noteSize > 0 %} is-active{% endif %}">
      <label for="CartSpecialInstructions">{{ 'cart.general.note' | t }}</label>
      <textarea name="note" class="input-full" id="CartSpecialInstructions">{{ cart.note }}</textarea>
    </div>
  </div>
{% endif %}
After it, enter the code:
<span class="mw-cart-fees"></span>
That's all the fixes that you should do to implement the app on your website.
Extra Edits
Please note that these edits are needed in case you choose the theme after the installation of the app, because if you've installed the theme and then added the app (the default use case), these files will be added automatically. If that is exactly your case, please go to the next section. Otherwise, please follow these instructions:
Add mw_fees_objects snippet
Open the Snippets folder and click the Add a new snippet option. The snippet name should be: mw_fees_objects.
Fill it in with the code from below:
{% capture itemProducts %}{% for item in cart.items %}{{ item.product | json}}{% if forloop.last == false %}^|^MW^|^{% endif %}{% endfor %}{% endcapture %}
{% assign itemProducts = itemProducts | split: "^|^MW^|^" %}
<script type="text/javascript">
  window.mwProductFeesObjects = {
  product: {{ product | json }},
  cartItemsProduct: {{ itemProducts | json }},
  cart: {{ cart | json }},
  customerTags: {{ customer.tags | json }},
  template_name: {{ template.name | json }},
  shop: {
    domain: {{ shop.permanent_domain | json }},
    money_format : {{ shop.money_format  | json }},
    money_with_currency_format : {{ shop.money_with_currency_format | json }}
  }
};
</script>
When done, click Save.
Edit theme.liquid layout
Open the Layout folder, and click the theme.liquid file.
Before the line:
</body>
enter:
{% include 'mw_fees_objects' %}
Adding a New Fee
To create, view, edit or delete the fees, please, go to Apps > Order Surcharge & Product Fees.
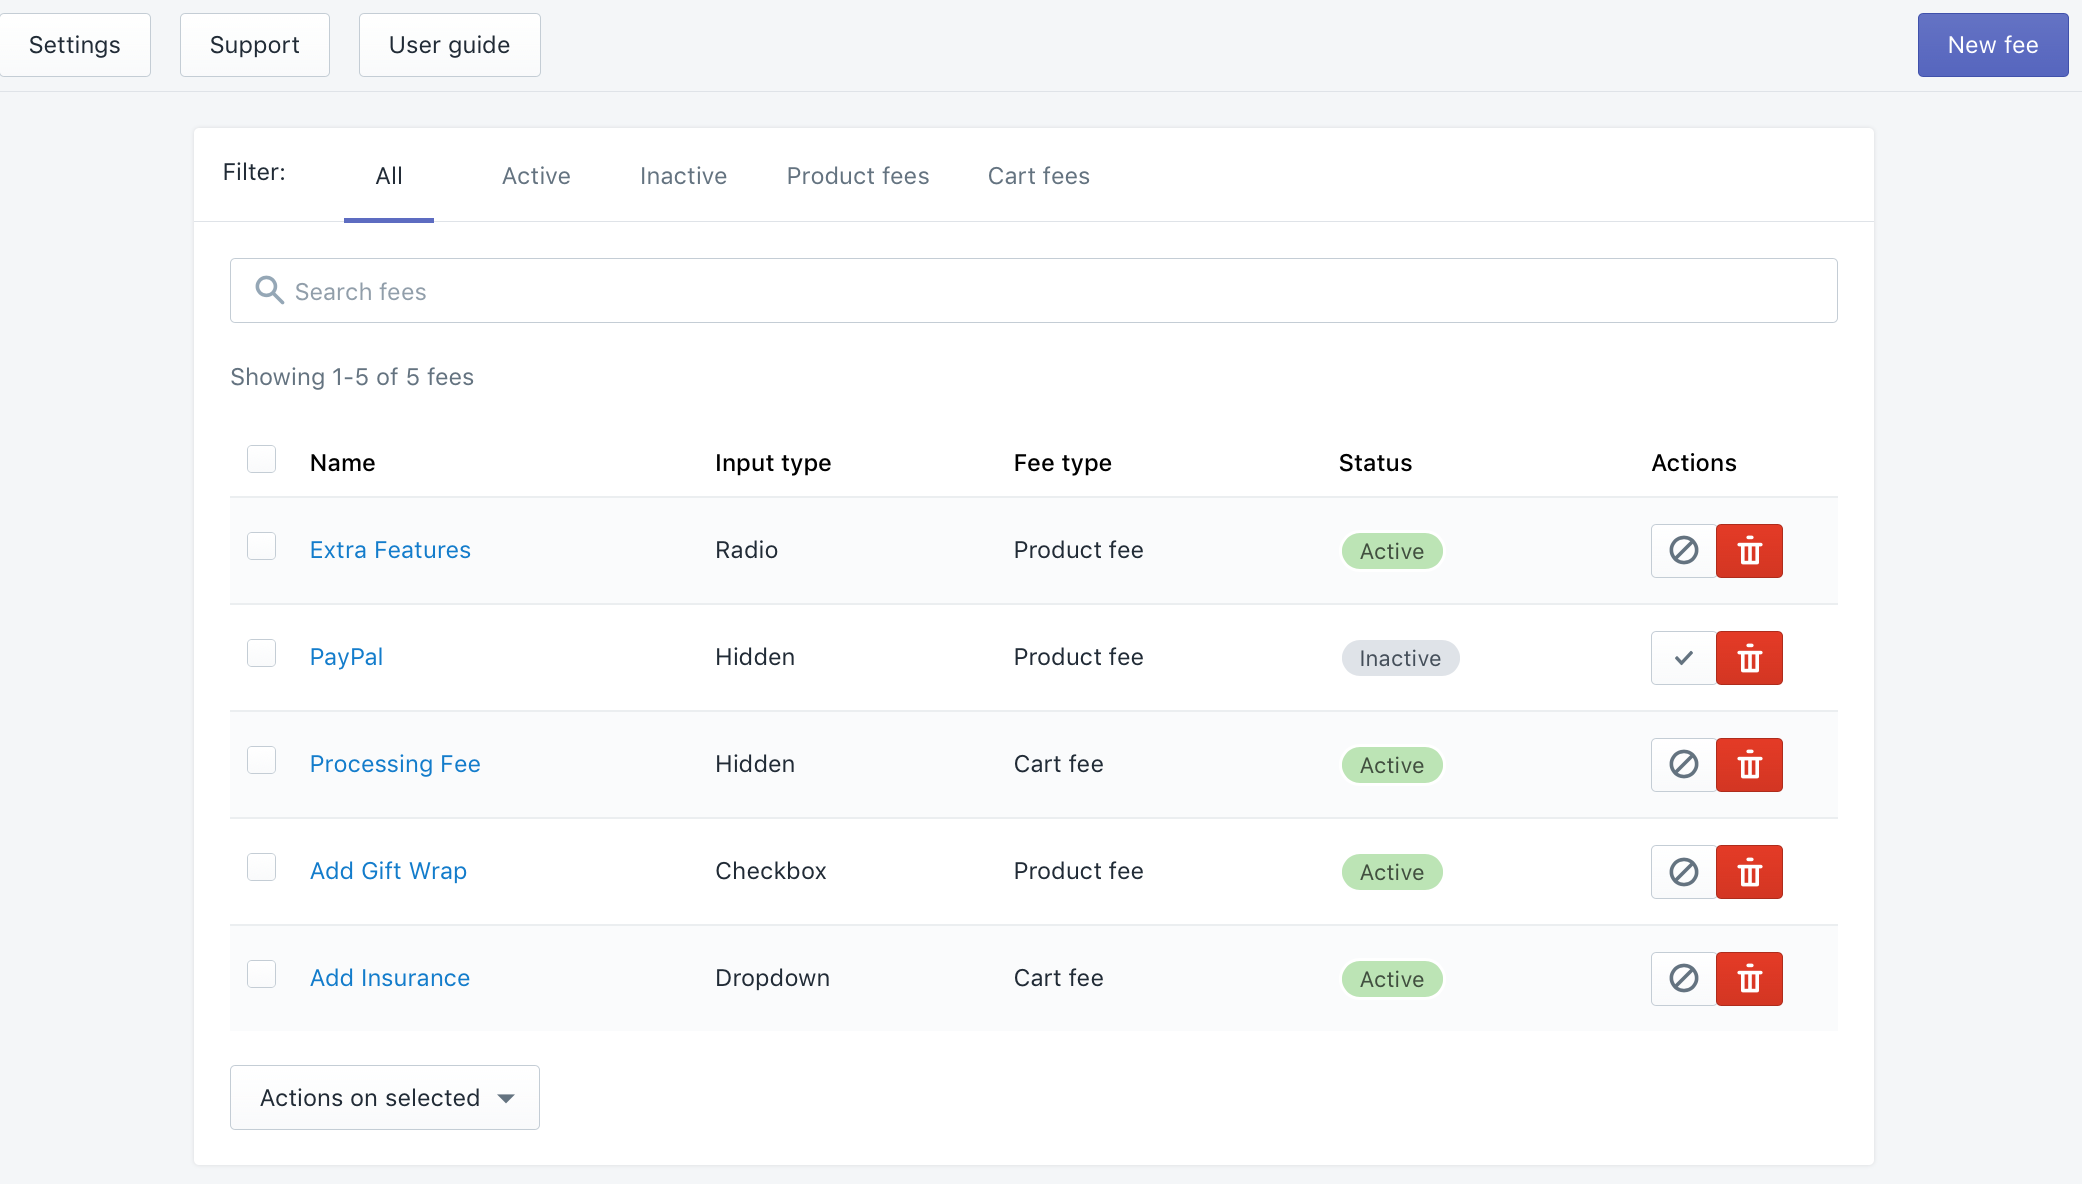
Please note that during the initial setup this grid will be empty.
You can easily filter all the fees to find the one that you need if the list is very long.
To create a new fee, click the New Fee button. The fee configuration consists of several tabs:

Fee Information
- Active/Disable - the first section allows you to enable or disable the particular fee.
- Fee name - the title of the fee. It will be visible on the frontend and after the fee is added.
- Fee type, you can select whether the fee will be applied to a separate product in the cart, or to the full cart subtotal.
- Input type - this setting manages the way how to display the fee options.
- Make the fee one-time - if this setting is enabled, the fee will be applied only once despite on the quantity of the products to the cart. If it is disabled, the fee will be applied to EVERY product quantity that is added to cart. For instance, this setting is disabled, the fee is the Gift Wrap for the iPhone X. If the customer added 3 iPhones to the cart, there would be 3 separate gift wrap products (the same quantity as the quantity of the main product). If the setting is enabled - it will be only one Gift Wrap.
- Fee requires shipping - Due to Shopify limitations, each new fee is created as a separate product item. The Requires Shipping featurs lets you make these items shippable.This is necessary to correctly process orders that require shipping.
- Make the fee required - if set to Yes, selecting the fee becomes mandatory for proceeding to the checkout.
- Add taxes to the fee - this setting you can define whether to make the fee subject to tax or not.
Input type manages the way how to display the fee options:
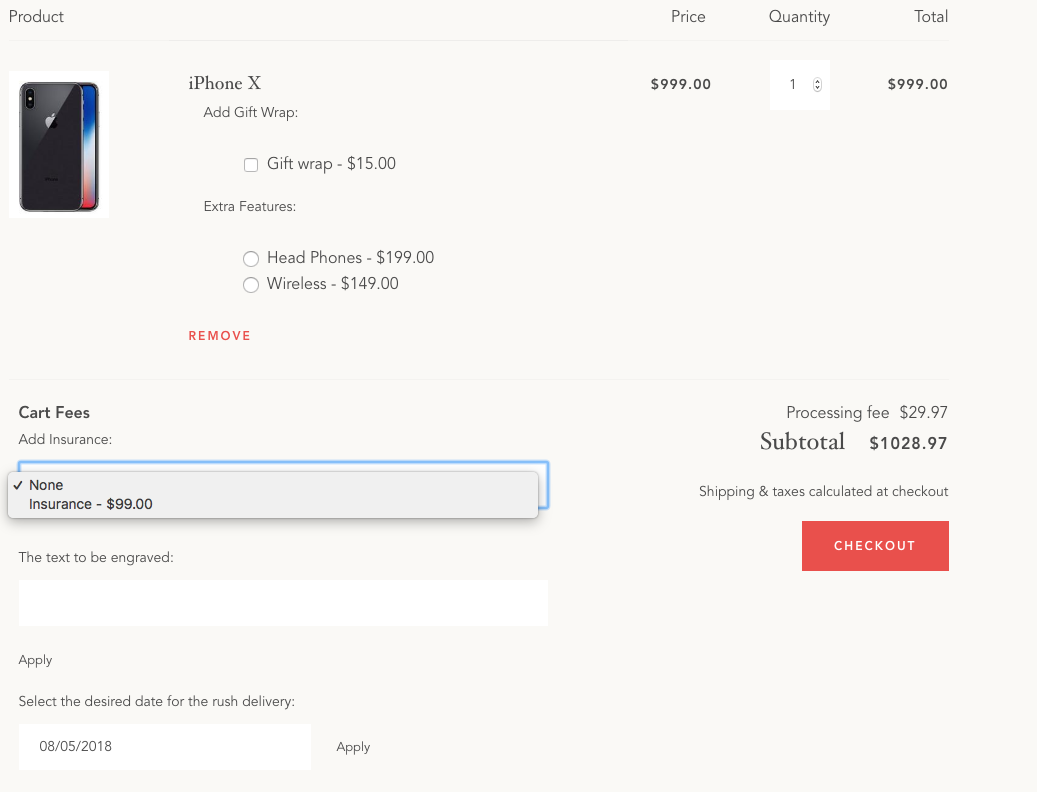
This screenshot shows all the possible input types available in our extension.
iPhone X Fees
The Add Gift Wrap fee is the checkbox.
The Extra Features is the radio button.
Cart Fees
The Add Insurance fee is the dropdown.
The Text to Be Engraved is the text input type. This type allows adding some personalization, like a personal message on a gift wrap or some engravement.
The Select the desired date for the rush delivery setting is the date input type. This can be used to define the time frames when implementing rush delivery.
The Processing Fee is the hidden fee. This can be useful for some mandatory regulator's fees like the recycle fee, local or state fees etc. The customer doesn't have the possibility to remove such fee.
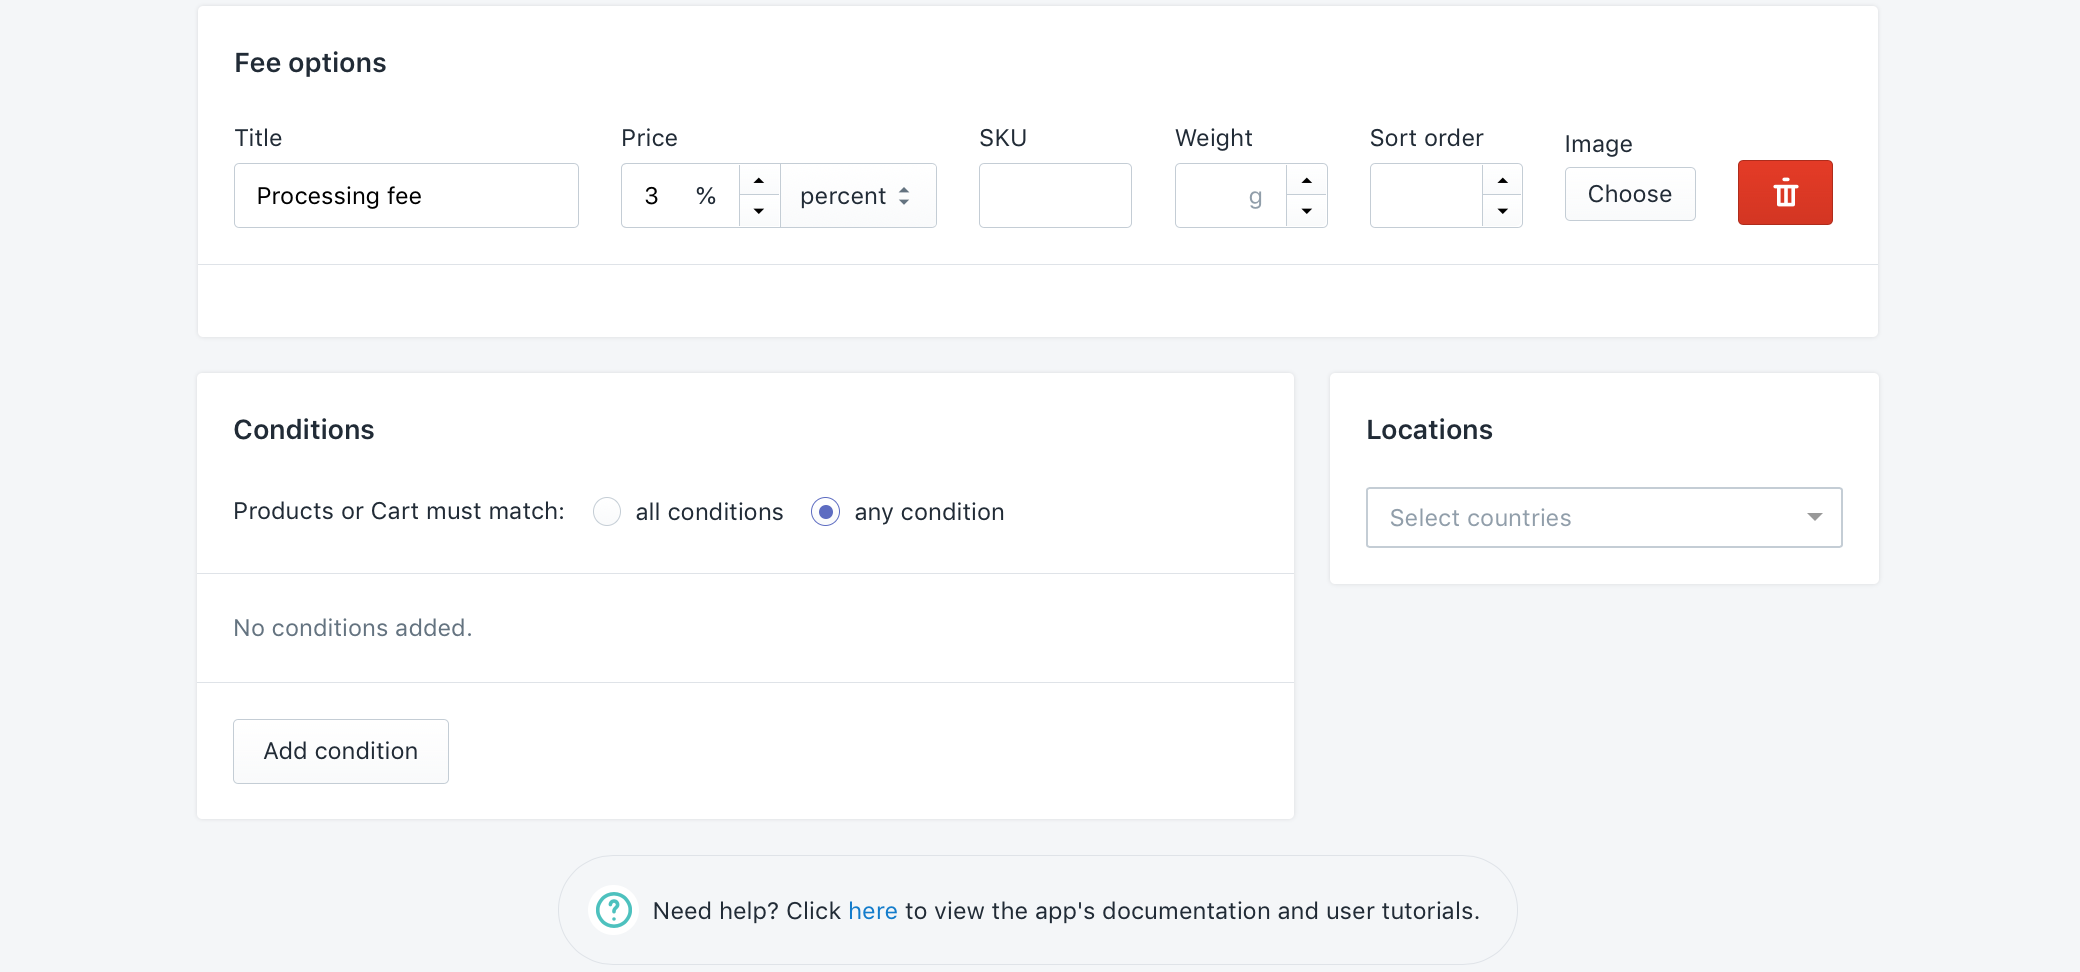
Fee Options

First of all, you need to click the Add Option button.
Next, add the fee option’s Name and Price. Note that the price can be set either to fixed or percent. In the former case, you specify a flat amount, e.g., $10, while in the latter one, you set a percent fee, e.g., 3% from the cart subtotal.
Also, under these settings, you need to specify the fee option’s SKU, add its Image (it will be actually visible in the cart after the fee is added), set some option fee as the Default and define the fee’s Sorting order.
If you need to affect the total cart weight by choosing the fee, you can specify the necessary weight for the fee's option. This weight will be added to the weight of all products in the cart. Please note that the weight is specified in grammas here.
Conditions & Locations
Conditions
Condition type provides the possibility to choose whether the fee should be applied if ANY of the created conditions are met (OR condition); or if ALL the created conditions are true (AND condition).
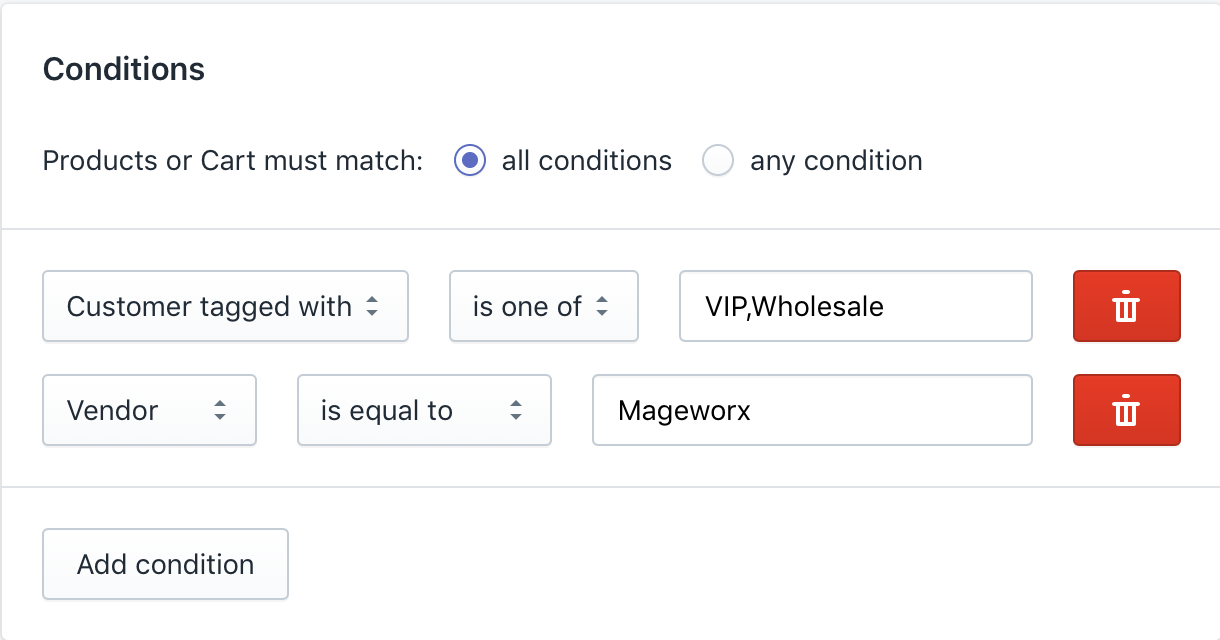
By creating conditions for your fees, you can:
- display fees depending on the product characteristics (product’s type, vendor, weight, price, SKU, title etc.)
- show fees depending on the cart subtotal or the total quantity of items added to cart
- customize your offers according to the segmented lists of customers (customers with tags).
These conditions will work on the AND/OR principle.
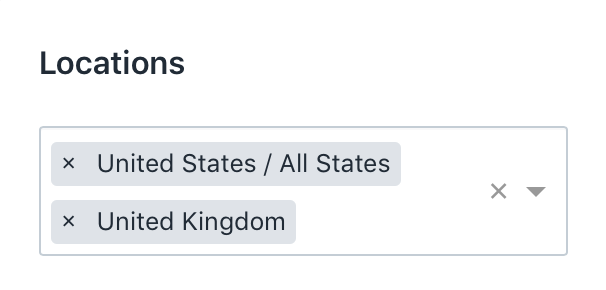
Locations
This field allows you to assign the fees to the necessary countries/states only. The locations are detected by the customers IP addresses.
Live Preview
When adding a new fee or editing an existing fee, you can preview how it will be shown in the cart using the Live preview block:
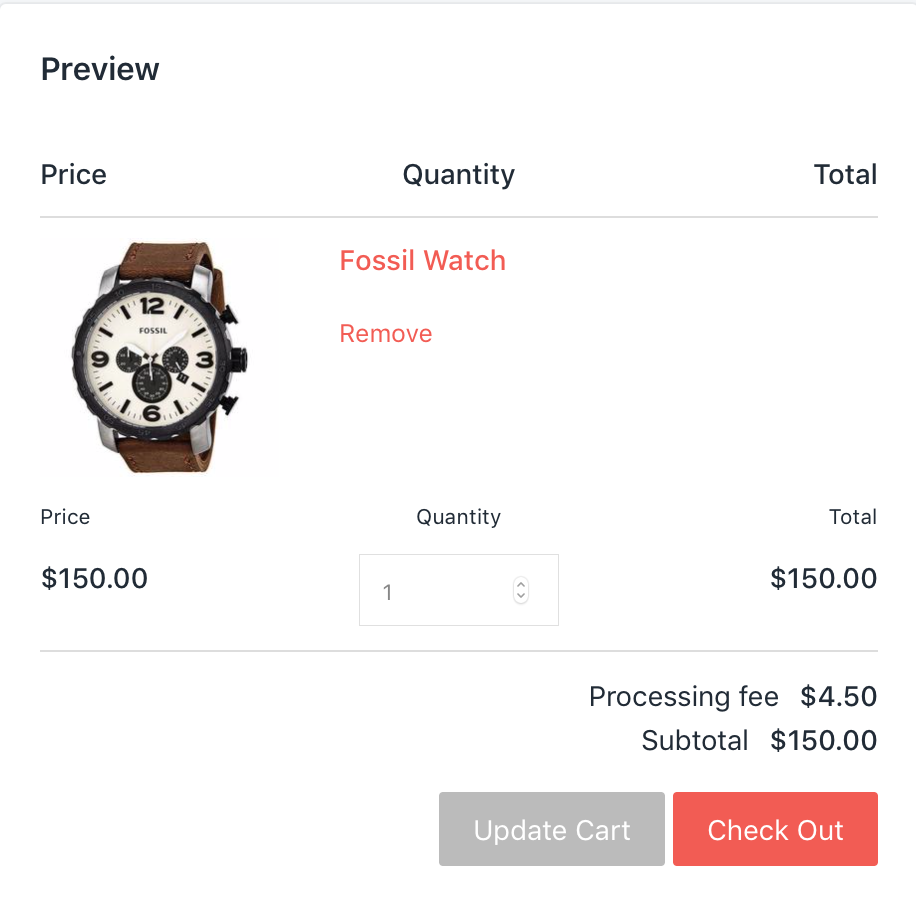
Note
This is the preview of your cart page. The default cart page layout is used. This preview is aimed to show you how the particular fee is added in the cart page.
Settings
The basic app configuration provides the big number of the settings that can be changed according to your business needs. Go to Apps > Order Surcharge & Product Fees and click the Configuration button.
This workspace consists of 3 tabs.
General Settings

This setting allows to choose whether the fees will affect the cart total or not.
Translations
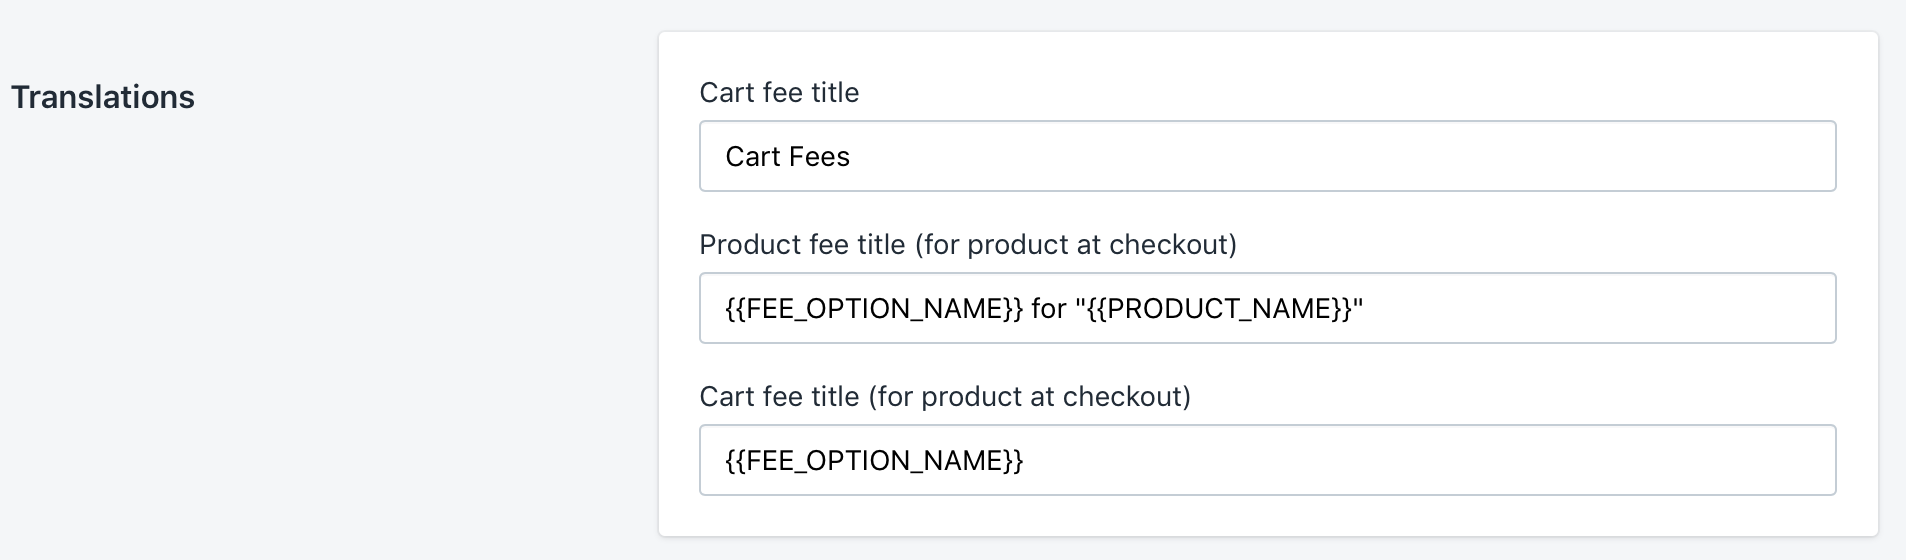
- Cart fee title - this setting determines the title of the block with the cart fees shown in the cart page.
- Product fee title (for product at checkout) - this setting defines how the name of the fee product will be formed.
{{PRODUCT_NAME}}is the name of the product you added the fee to (it is applicable to the product fees only). - Cart fee title (for product at checkout) - this setting defines how the name of the cart fee product will be formed.
{{FEE_OPTION_NAME}}is the name of the fee's option that is provided in the fee configuration. (it is applicable to the cart fees only).
Advanced Settings
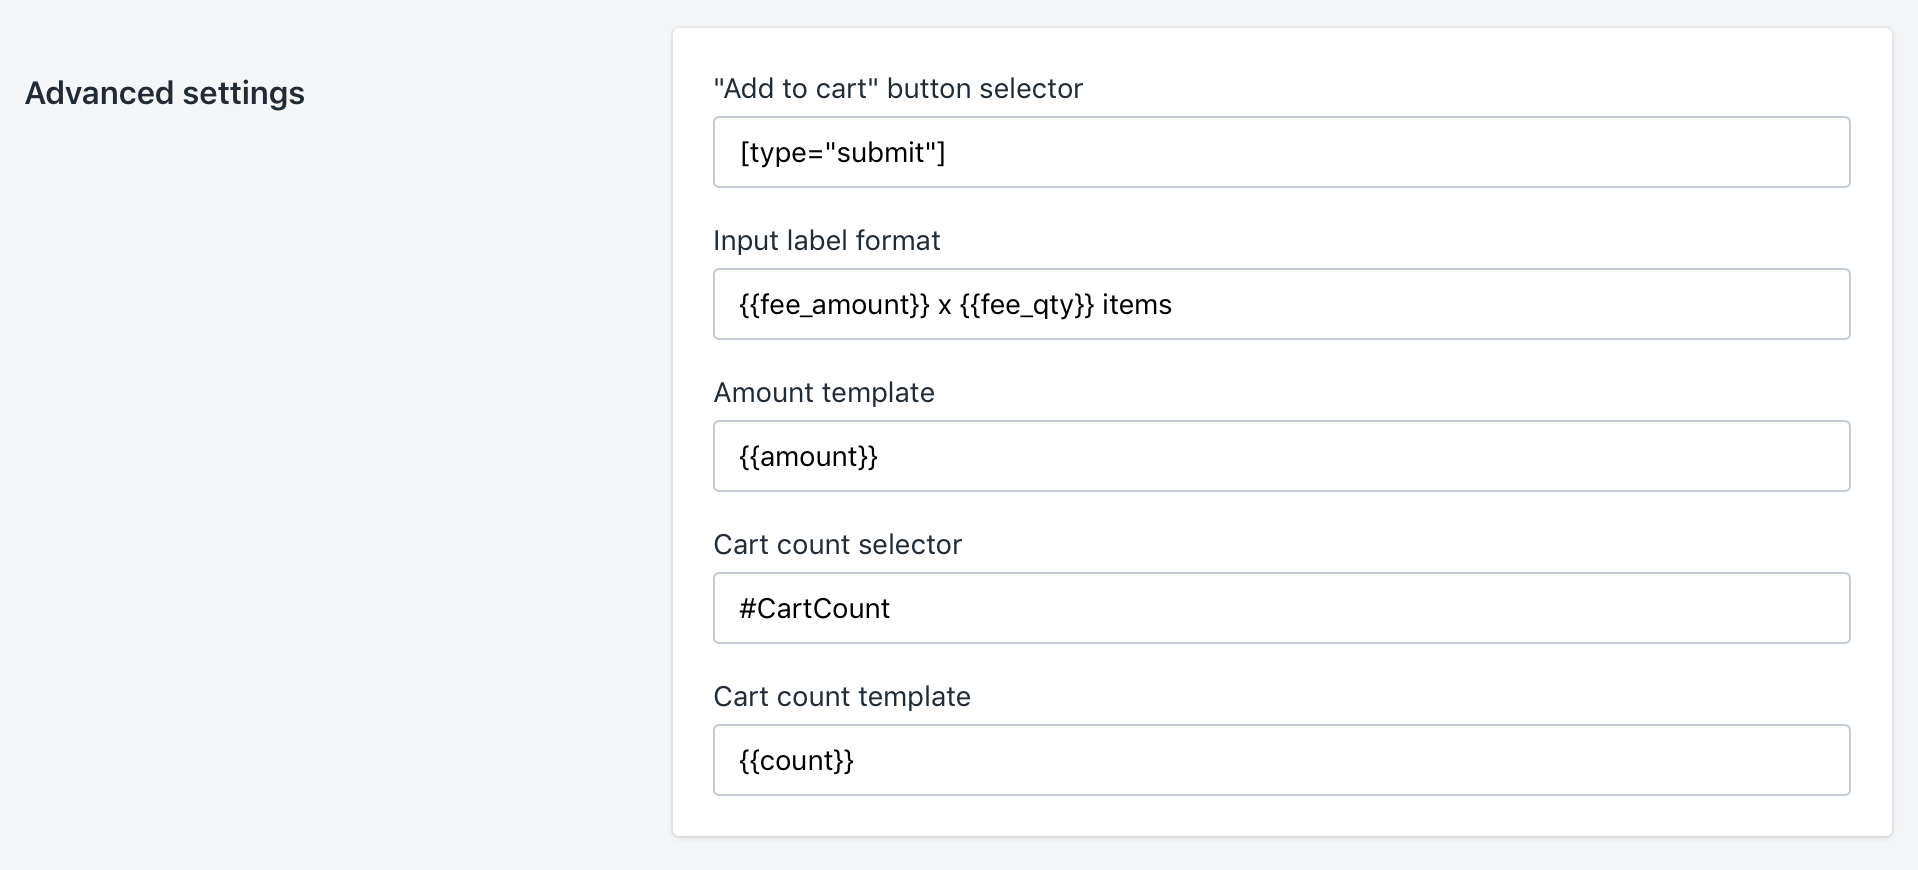
These settings allow to tweak the values for some selectors. This information is set mainly for our debug so please handle these settings with care as the incorrect configuration may lead to the problems with the website.
Depending on the theme, these modifications may vary.
| Theme Name | Product Form Filename | Form Code | Add To Cart Button Selector | Cart Count Selector |
|---|---|---|---|---|
| Narrative | product-form.liquid | {% form 'product', product, class:'product-form' %} | .product__add-to-cart-button | - |
| Minimal | product-template.liquid | {% form 'product', product, class:productform_class %} | #AddToCart | .cart-count |
| Debut | product-template.liquid | {% form 'product', product, class:form_classes %} | #AddToCart-product-template | .site-header__cart-count span:first |
| Supply | product-template.liquid | {% form 'product', product, class:form_class, id:form_id %} | #addToCart-product-template | .cart-count |
| Boundless | product-template.liquid | {% form 'product', product, id:form_id, class:form_class %} | #AddToCart-product-template | - |
| Pop | product-template.liquid | {% form 'product', product, id:form_id %} | #addToCart-product-template | #cartCount |
| Simple | product-template.liquid | {% form 'product', product, class:'product-form' %} | #AddToCart | #CartCount |
| Venture | product-template.liquid | {% form 'product', product, class:form_class, id:form_id %} | #AddToCart-product-template | - |
| Jumpstart | product-template.liquid | {% form 'product', product %} | #AddToCart-product-template | .btn__cart .icon |
| Brooklyn | product-template.liquid | {% form 'product', product, class:'product-form' %} | #AddToCart--product-template | - |
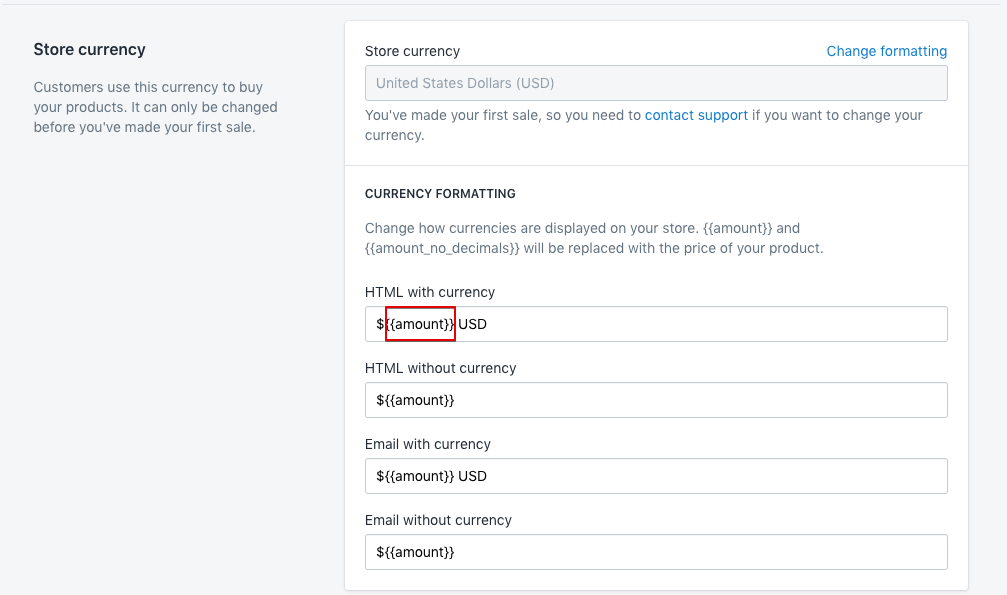
The Amount template value must match the currency format value under the Settings > General > Store Currency > Currency Formatting section of your store.
Note
The app may not be compatible with the stores that use AJAX carts (pop-up, drawer, etc.).
Notes
When the customers select the fees with extra charges in the cart, the temporary items are created in your Shopify back-end. It happens due to the Shopify API restrictions for the checkout process. Shopify doesn't allow adding extra fees as separate row in the checkout (similar to shipping charge). The only way update the final order total correctly is to add temporary items to the checkout if the fees with extra prices are chosen. These items are not visible on the front-end and they are removed automatically in 30 days (this removal period can be changed to 1 or any number of days if necessary upon request).
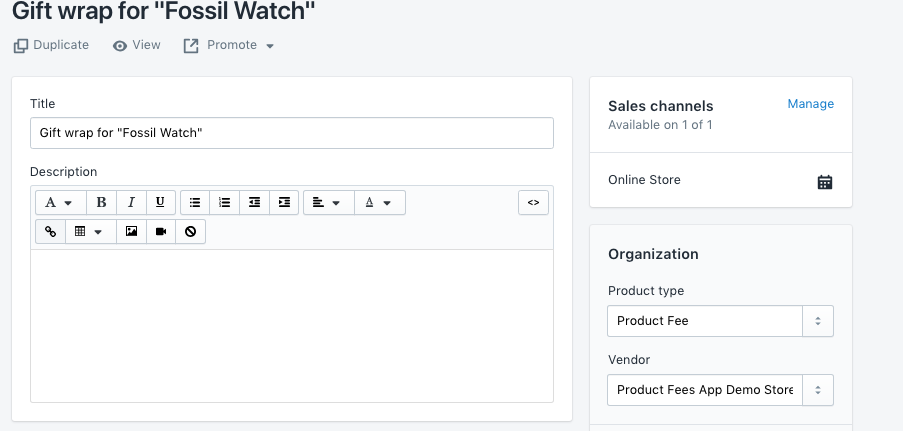
These temporary products have the special product type and vendor so you can easily filter them in the 3rd party apps if necessary.:
Questions?
For any technical and pre-sale questions, feel free to contact us at apps@mageworx.com.