Advanced Bundle Products
Installation
The Advanced Bundle Products app is a theme app extension. I.e it adds its dynamic elements to your theme without having to interact with Liquid templates or code.
The app contains the following resources:
- App embed block
- Asset
To get the app downloaded to your store, navigate to the app’s listing page on the Shopify app store, and click the Add app button.
You will be guided through the standard install process, where you’ll be asked to give the app certain access permissions, and then approve the charge. If you’ve never installed this app before, you will be given a free trial period, and the billing will start after the trial is over.
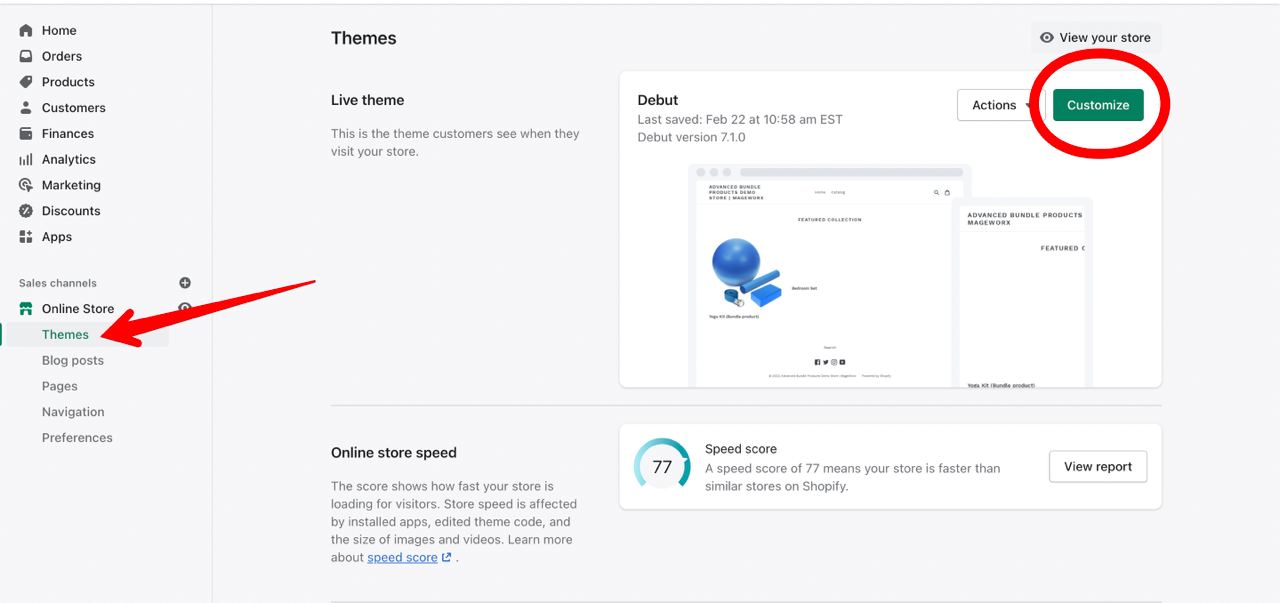
After the app is downloaded, you need to make sure it’s activated on the target theme you are going to use it for:
- Navigate to the Online Store >> Themes >> Customize:
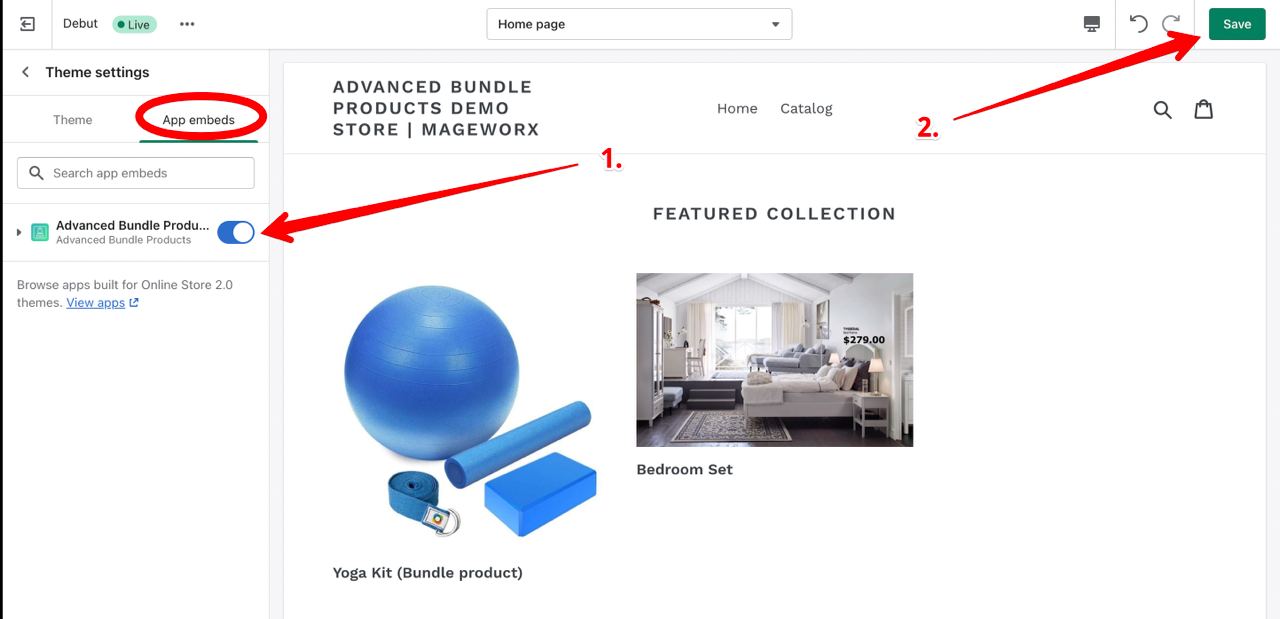
- Go to the Theme Settings >> App Embeds, enable the Advanced Bundle Products toggle and click
Save:
Edit cart template
You need to modify the cart template. Open the Sections folder. This can be either in the cart.liquid or cart-template.liquid files.
Find the lines:
{%- assign property_size = item.properties | size -%}
{% if property_size > 0 %}
    <div class="cart__meta-text">
    {% for p in item.properties %}
        {% unless p.last == blank %}
        {{ p.first }}:

        {% comment %}
            Check if there was an uploaded file associated
        {% endcomment %}
        {% if p.last contains '/uploads/' %}
            <a href="{{ p.last }}">{{ p.last | split: '/' | last }}</a>
        {% else %}
            {{ p.last }}
        {% endif %}
        {% endunless %}
    {% endfor %}
    </div>
{% endif %}
After the line {% for p in item.properties %}, add
{% assign first_character_in_key = p.first | truncate: 1, '' %}
{% if first_character_in_key == '_' %}
    {% continue %}
{% endif %}
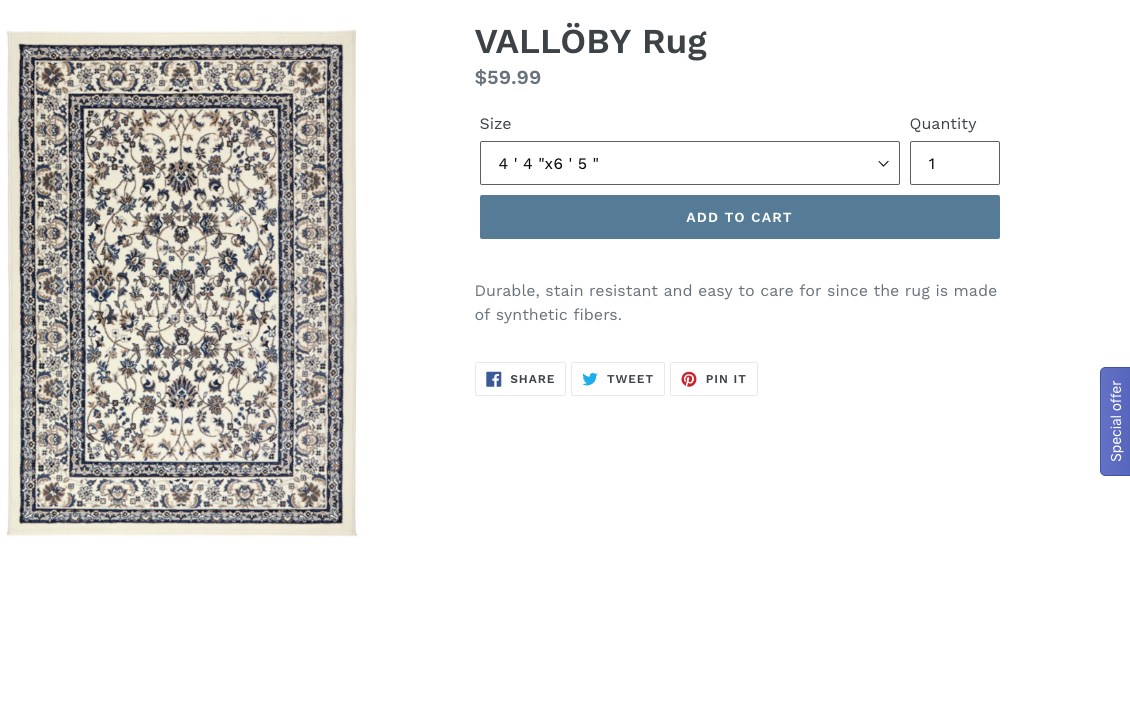
Bundle Product
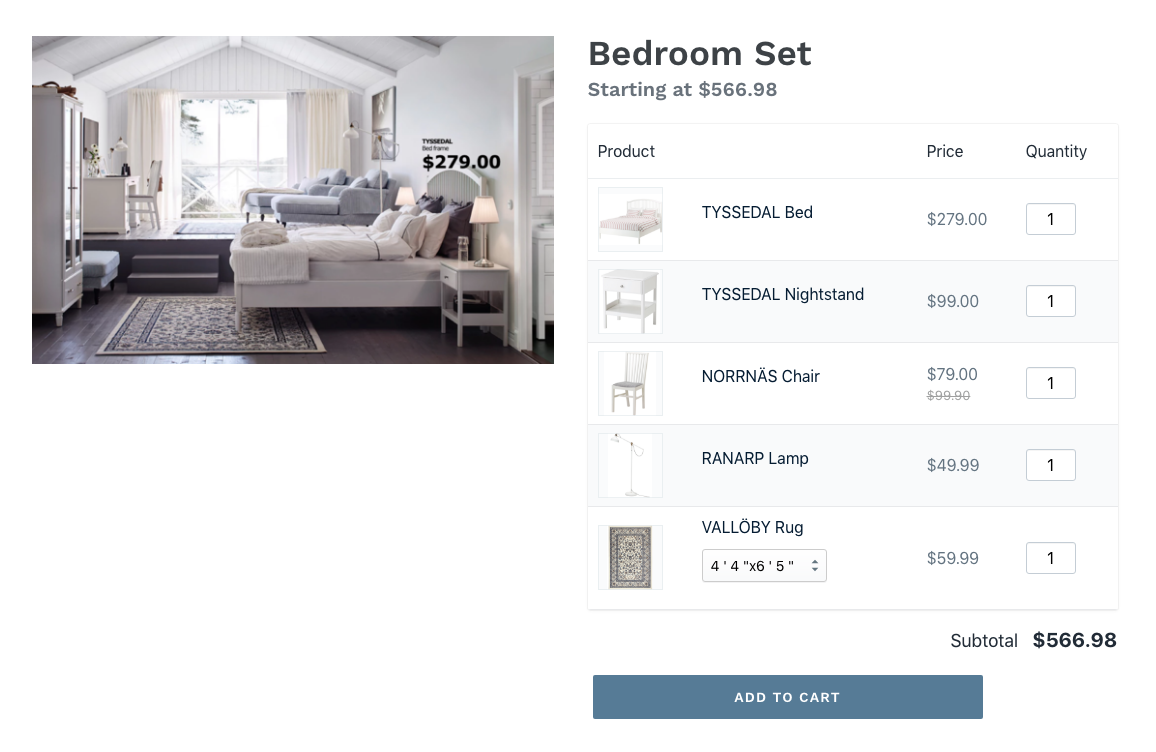
The Bundle product is made up of several items that are presented as a single unit (however, the quantity of each unit can be customized, and some can be excluded from the order). For instance, the customer might sell cutlery and provide every type of it like knives, forks, and spoons. Someone needs to purchase 2 forks, one spoon and no knives at all. Other customers might order just 1 fork and the fish knife. Customers can order as many of each item as they want.
What is more, the app does not create bundle product clones. With the app, you can display/add to cart/track bundle product items as individual products, which won’t affect your inventory tracking and shipping schemas.
To create the Bundle product or to edit some product to make it the bundle one, go to Products > All Products and either create a new product or click any to edit it. The tags block has the mw_grouped_product value.
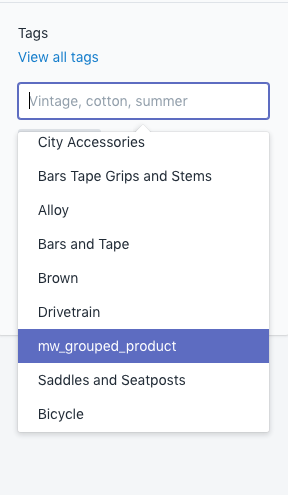
If this one is selected, this product can be managed as the Bundle one. This particular product will be the base one, and any other associated product can be added to it.
To view or edit the Bundle product, please, go to Apps > Advanced Bundle Products.
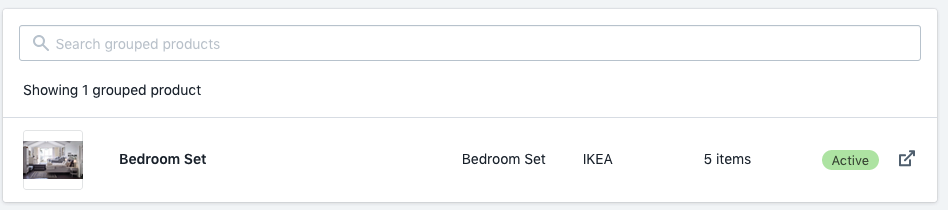
This grid shows the list of the Bundle products with the products images and the quantity of the associated products. The search box allows finding the desired product.
Also, from here, by clicking on the View icon, you can preview the created bundle product on the frontend.
Click any product to edit items associated with it.

The grid of the associated products allows the merchant to select multiple products easily. After that, they can be Removed from the list. Please note that during the initial configuration this grid will be empty. The View button shows the preview of the created Bundle product on the frontend.
To be able to add more associated products, please click the Select Products link.
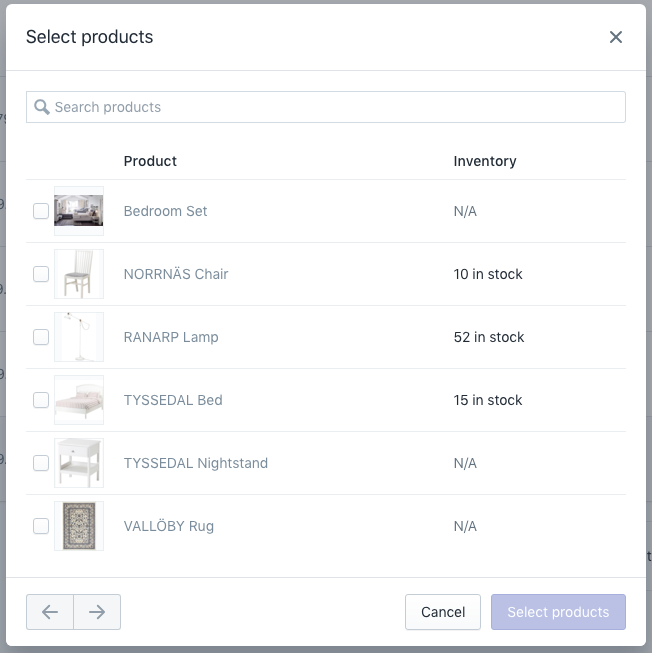
The arrows let you flip the pages. The search box allows finding the desired product.
The Reorder products link opens the popup with the possibility to change the sort order of the products.
To perform this operation, click the product and drag to the appropriate position. When the edits are made, click the Save button.
Let's check the grid configurations.
Bundle Quantity
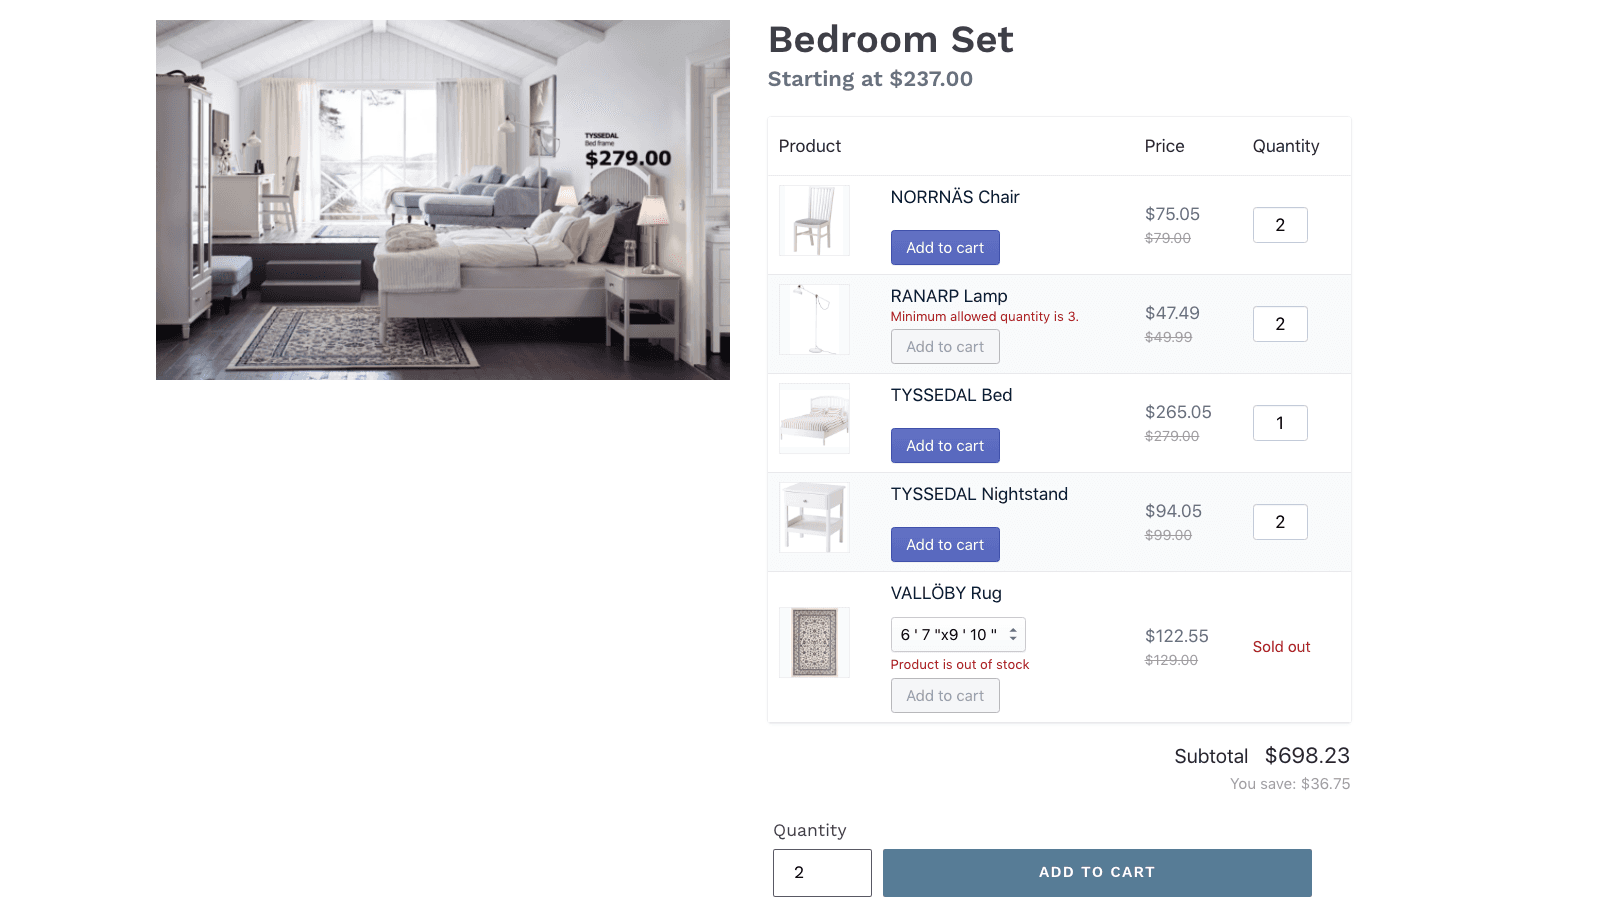
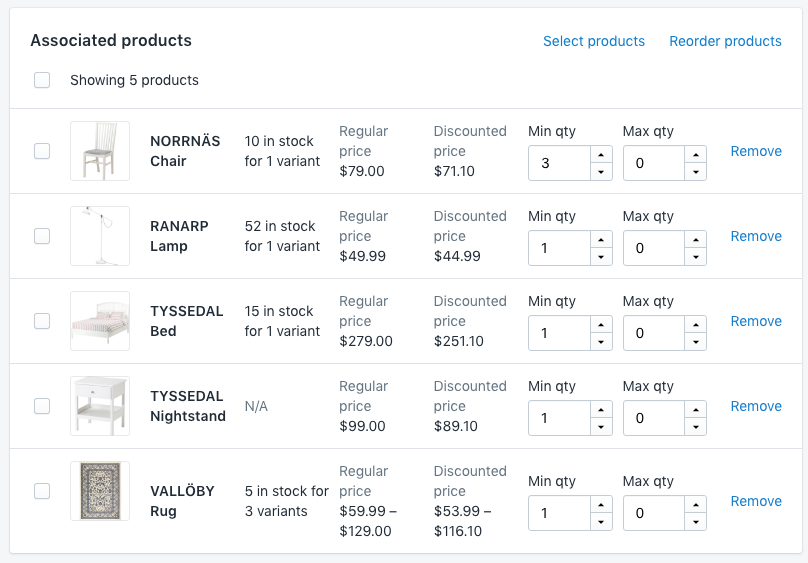
The Min QTY provides the possibility to manage the minimum product quantity to be added on the frontend. The client can see the default minimum value added when the frontend product page has been loaded.
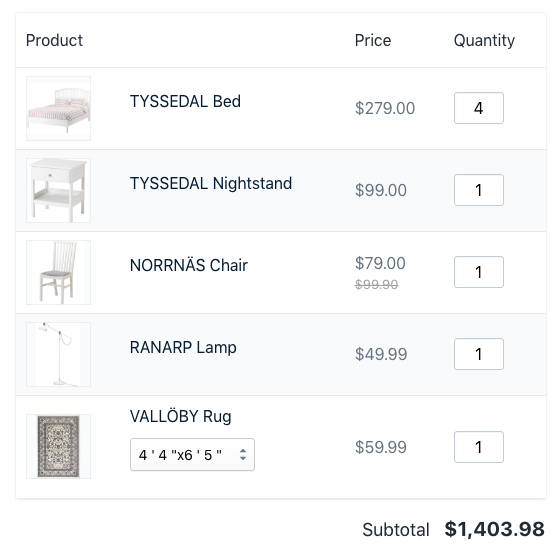
This screenshot shows the way how the product page is rendered for the client when the min qty for the first product (TYSSEDAL Bed) is set to 4 and 1 is set for the other products.
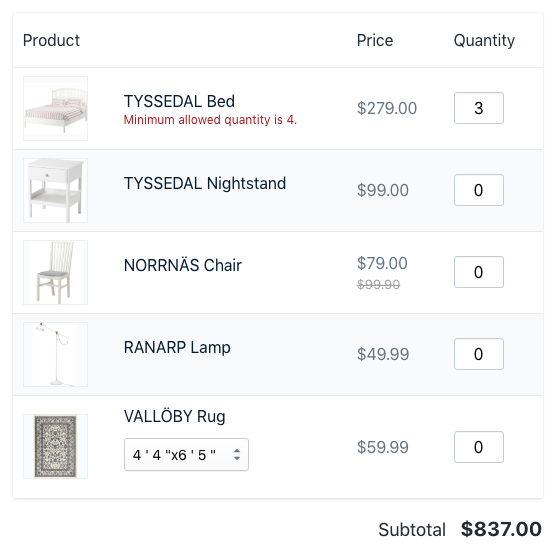
If the customer changes this value to any lower than the minimum, the product won't be added, and the note will be shown:
The Max QTY limits the biggest value to be added when the frontend product page is loaded.
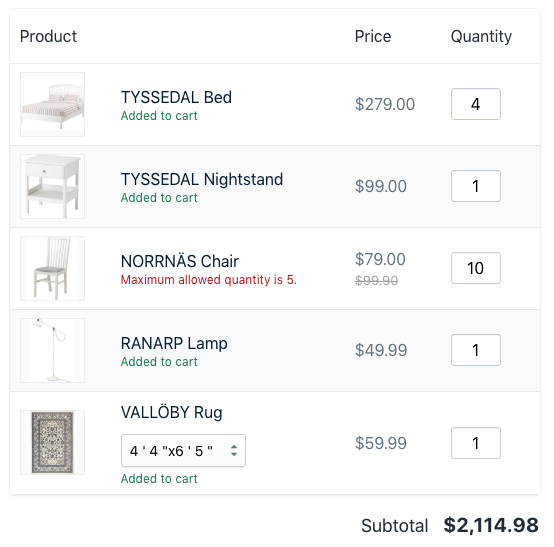
If the customer sets the quantity value that is more significant than the one specified in the app configuration, the product won't be added, and the note will be shown:
Tip
The note text can be changed in the app's configuration
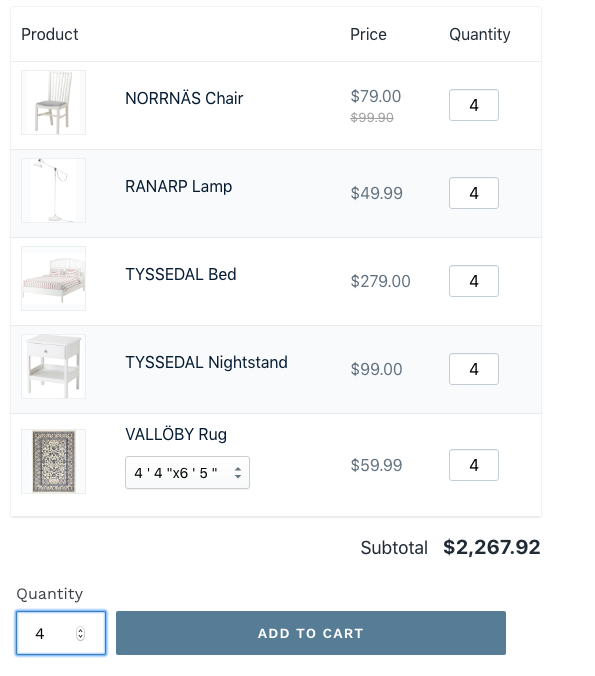
The Quantity box for the whole Bundle product automatically changes the quantity of all the single units. Please bear in mind that if the minimum qty of some single unit is bigger than the one selected in the qty box for the whole box, it will be considered as the preferred one:
In this example, the qty for the chair will remain equal to 3 if the qty of the whole Bundle price product will be 0, 1, 2 or 3 and will change automatically along with the other single units for the more significant values.
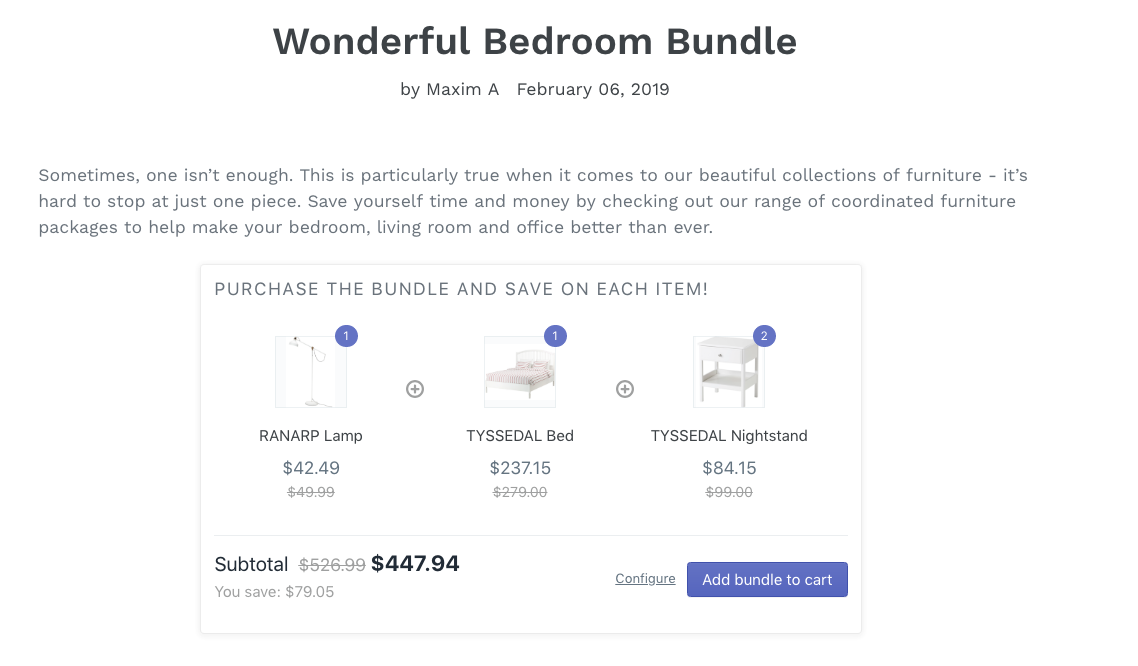
Bundle Discounts
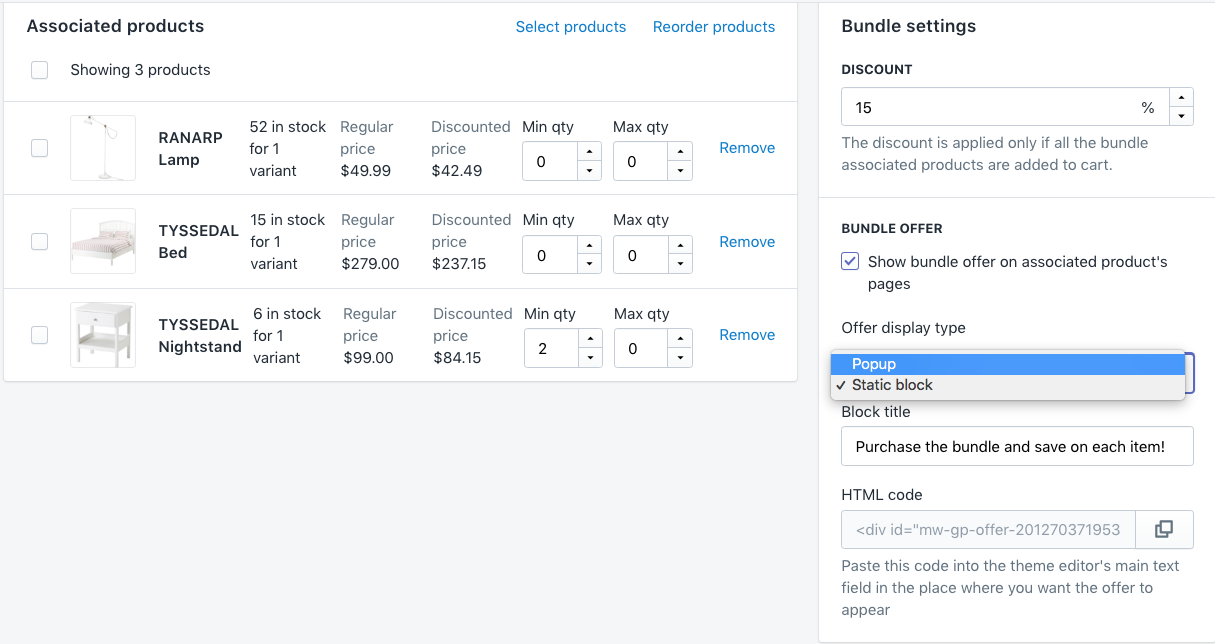
The app allows adding the discount to the child products. For this, set the desired discount percentage in the Discount box. The discounted price will be recalculated automatically for every product in the grid. This discount is applied on the cart page when all the child products are added to cart.
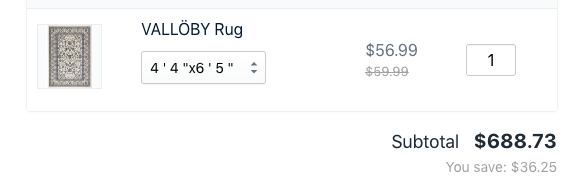
When the discount is set, on the fronted the customer observes the crossed out old price and the new one with the discount. Below the subtotal, the discount is shown in the website's currency. The You save text can be changed in the app configuration.
You can also enable the Add to cart button. This option allows the customer choosing the products to be added directly on the Bundle Product page. When the quantity of the product is 0, the Add to cart button is grayed out.
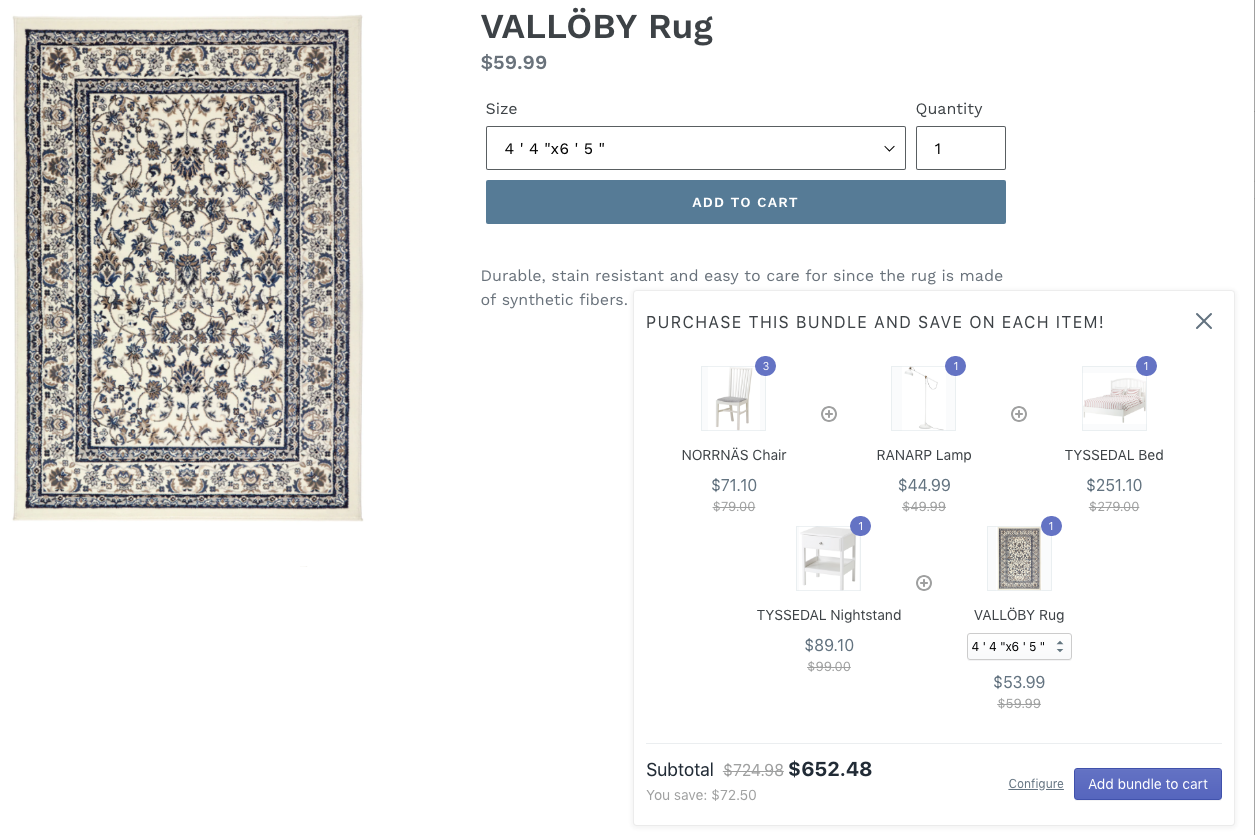
Bundle Offer
For every child product that is included in the bundle product, you can show the bundle offer that motivates the user to purchase it along with other ones.
Depending on the business case, this block can be shown as the HTML block or as a popup.
Bundle Popup
This screenshot shows the way how the product page is rendered for the clients if they open any child product individually.
Note that due to the fact that the min value for the NORRNÄS Chair is 3, this number will be shown on its' image inside this popup.
Clicking the Configure link here, sends the customer to the bundle product page. The popup allows selecting the products directly to the cart.
The customer may close this popup and in this case small button will be shown:
To enable this feature, open the bundle product, check the Show bundle popup on associated product's pages checkbox and select the Popup dropdown in the Offer display type configuration:
You can edit the Popup Title and the Popup Button Text (shown if the popup is closed). The popup design configuration can be modified in the app's configuration
Bundle HTML Block
This screenshot shows the way how the product page is rendered for the clients if they open any child product individually.
Note that due to the fact that the min value for the TYSSEDAL Nightstand is 3, this number will be shown on its' image inside this block.
Clicking the Configure link here, sends the customer to the bundle product page. The popup allows selecting the products directly to the cart.
To enable this feature, open the bundle product, check the Show bundle popup on associated product's pages checkbox and select the Static Block dropdown in the Offer display type configuration:
From here, you can edit the Block Title.
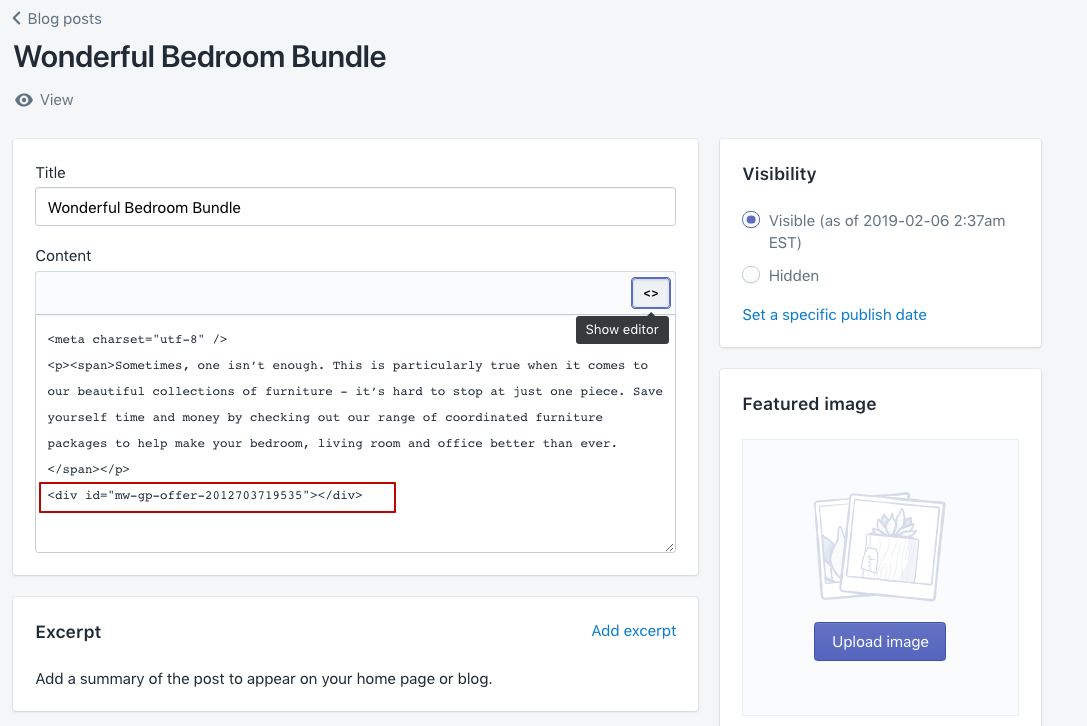
You can also show this block anywhere throughout your website. For instance, we'll show you how to display this block on the blog page.
First you need to copy the bundle HTML block code by clicking the ⧉ symbol.
Open the page where you wish to show this bundle, click the Show editor button and paste the code inside the document:
Click the Save button and check the fronend view:
Configuration
The basic app configuration provides a significant number of settings that can be changed according to your business needs. Go to Apps > Advanced Bundle Products and click the Configuration button.
This workspace consists of two tabs.
General Settings
The Show subtotal setting shows the price block below the bundle products grid on the frontend. This allows the customer to easily observe the final prices once the qty of the associated products is changed:
If you wish to send the customer directly to the cart after clicking the Add to Cart button, please enable the Redirect to cart page after adding to cart setting.
Additionally, under these settings, you can opt to display product images on small screens.
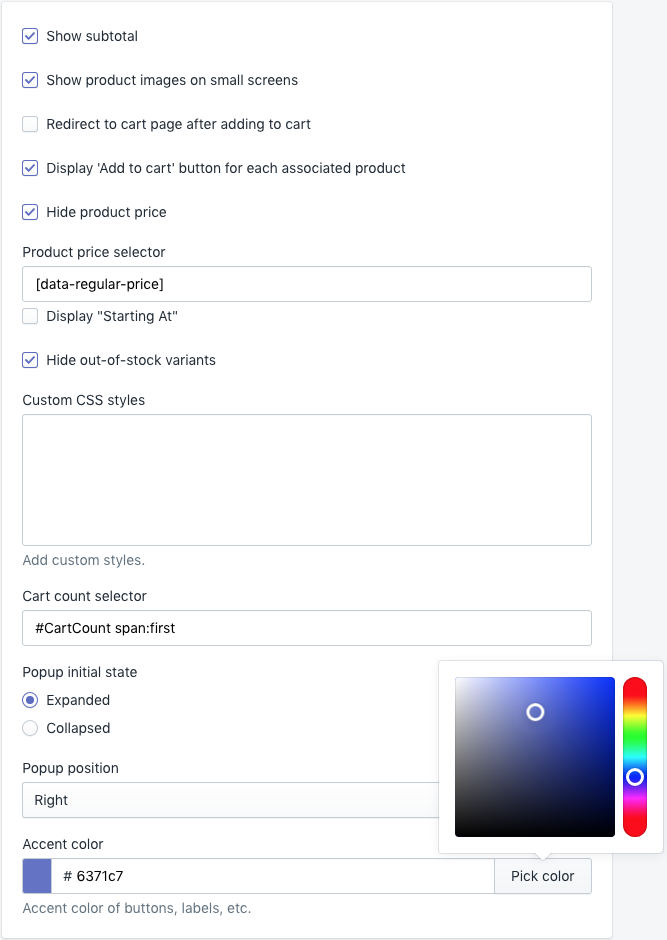
The Bundle product is actually the typical Shopify product; therefore it has the price attribute. This can be changed by clicking the Hide product price setting. Once you enable this setting, the Product price selector setting appears. To learn more about the selectors, follow this link. Selectors can be viewed in your browser Console. In most browsers, it is launched by this keyboard shortcut: ⌘ + SHIFT + I (for Mac) or CTRL + SHIFT + I (for Windows). To hide the product price correctly, you'll need to define the product price selector. For this, we open any product on the frontend and open the browser console.
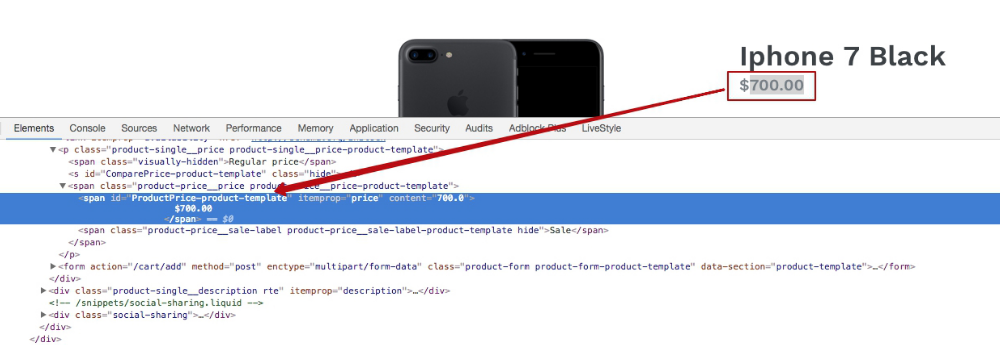
The selector name here is #ProductPrice-product-template and we put this value in the appropriate configuration box.
Same can be done if you encounter the incorrect value for the mini cart count selector. If you observe the wrong amount in the mini cart, please define the CSS Cart count selector for this block.
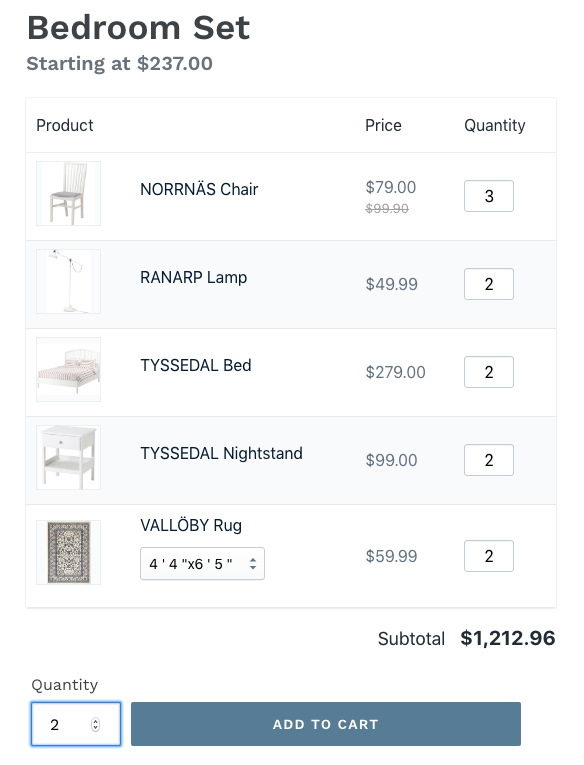
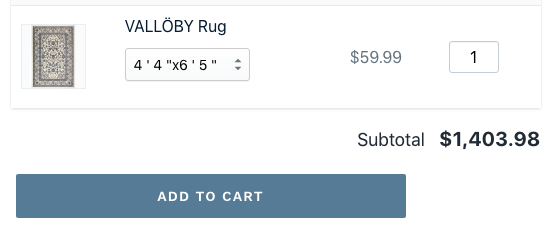
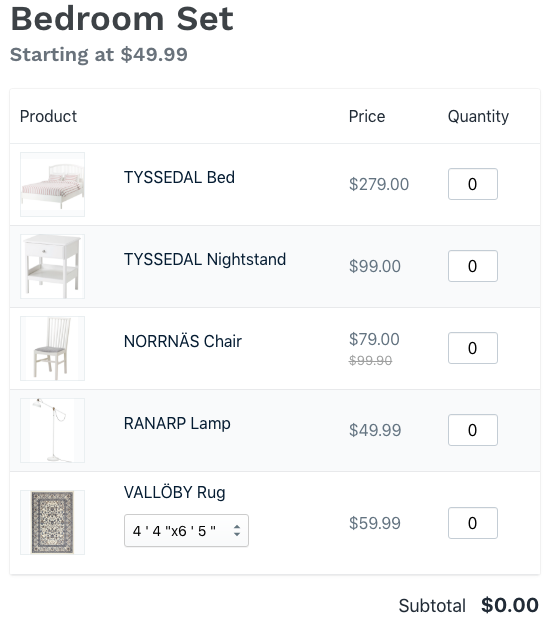
If you wish, the price block can still be visible but provide the more specific information. The Starting At configuration offers the lowest option for this bundle product.
-
If the min qty fields are not populated for all the associated products, the cheapest product price will be displayed:
-
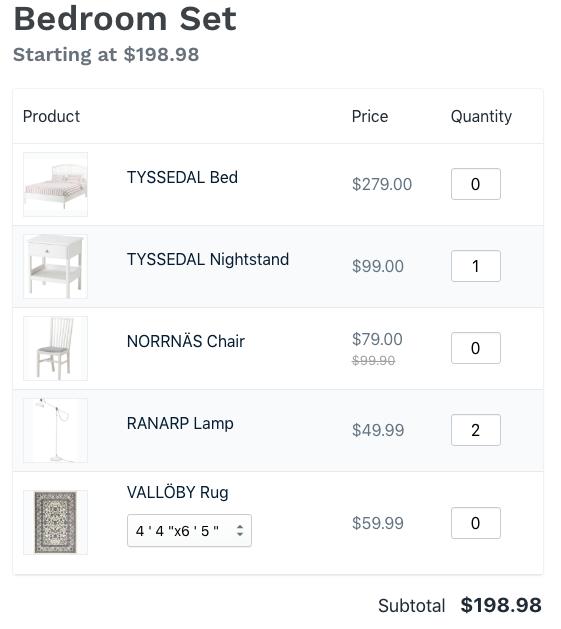
If some product (or products) has the minimum quantity entered, the Starting at value will be based on the price of this product (the sum of the products prices):
 .
.
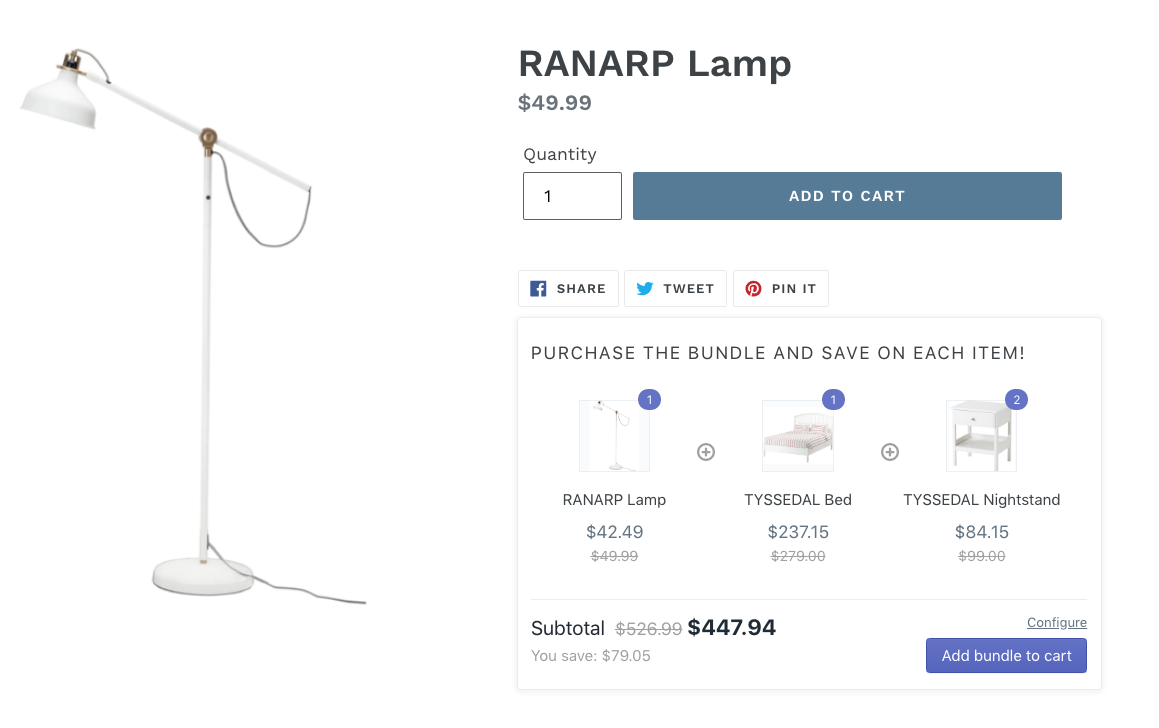
In this example, the min qty for the second product (TYSSEDAL Nightstand) is 1, and its cost is $99.00 per one, the min qty for the fourth one (RANARP Lamp) is 2, and its cost is $49.99. Therefore, the Starting At price is99.00 + 49.99 x 2 = 198.98.
The Display 'Add to cart' button for each associated product setting allows the customer choosing the products to be added directly on the Bundle Product page. When the quantity of the product is 0, the Add to cart button is grayed out:
The app allows inserting literally any CSS style customizations. For this, please, populate the Custom CSS styles according to your vision.
Below, you can edit the popup design:
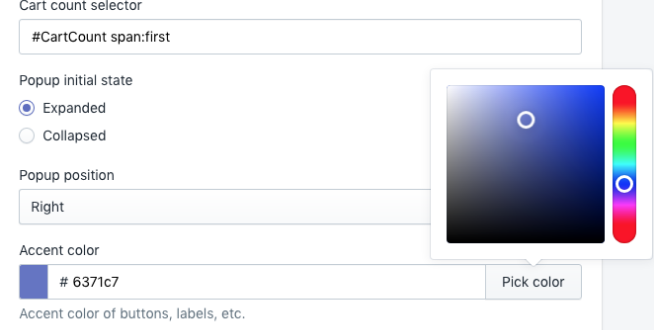
First of all, you can decide whether you wish the popup to be shown as opened (expanded) or closed (collapsed) by default. Then you can choose the Position of the popup to be displayed and the Accent Color (the color of the buttons and qty swatches).
Translations
This tab allows changing the default texts. For the convenience sake, this image shows the backend configuration and the frontend view at the same time:
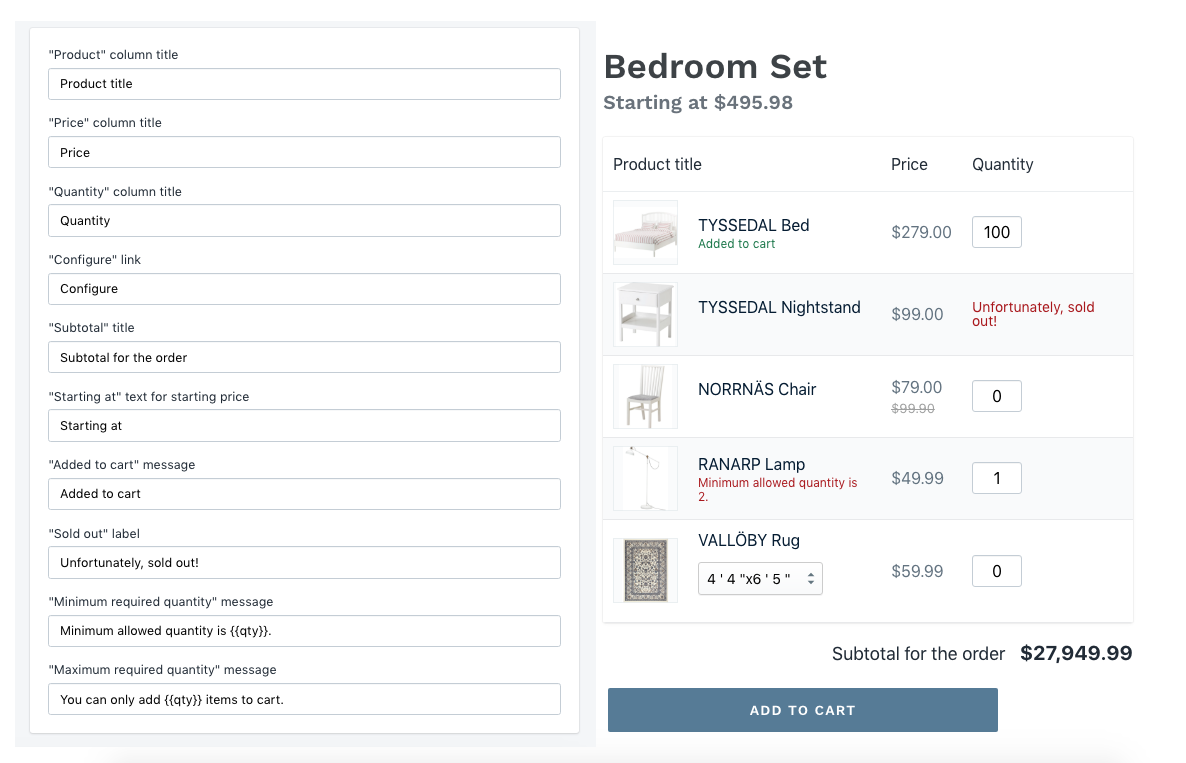
The Product, Price and Quantity column title are the titles of the bundle product grid.
The Subtotal title changes the products subtotal text. The Starting At text handles the title of the starting at price.
When the product is added to the cart, the text in green is shown below the associate product name. If it is not possible to add the associate product due to the min or max qty restrictions the corresponding texts will be shown below this particular product name.
For the out of stock products the Sold out label will be shown.
Uninstallation
From your Shopify admin, go to Online Store > Themes, find the theme you want to remove Advanced Bundle Products App from and click Actions > Edit code.
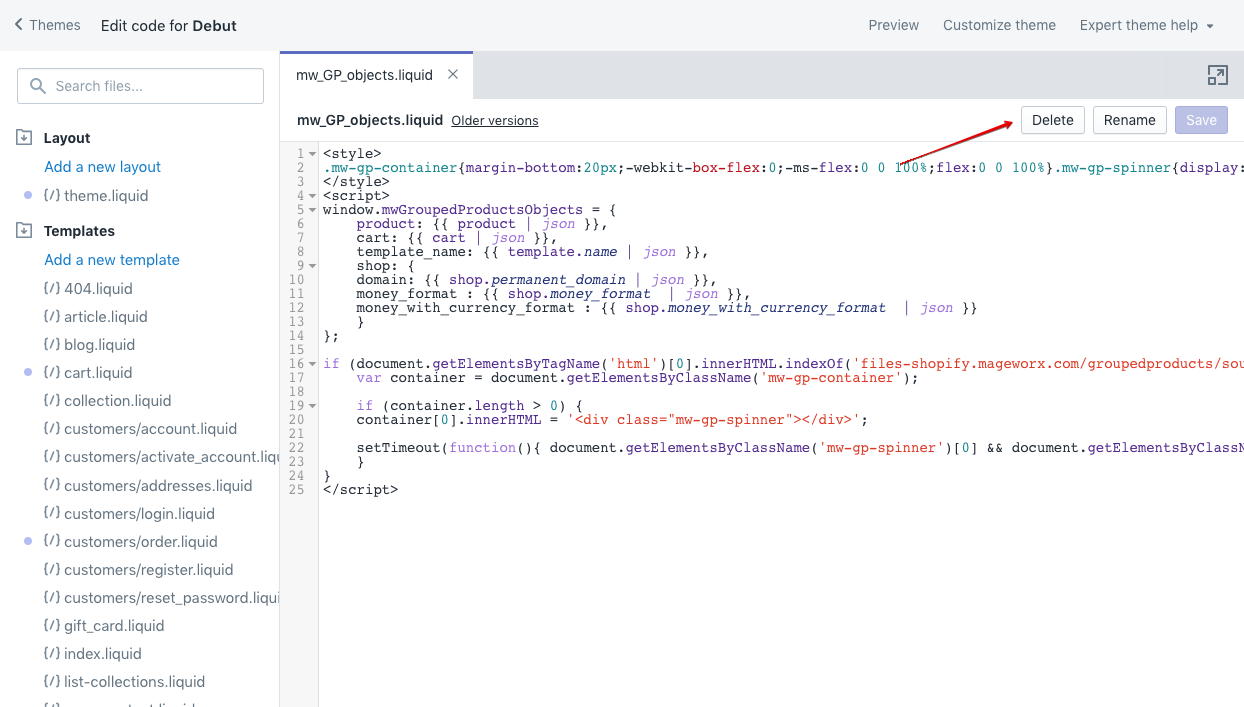
Delete mw_GP_objects.liquid snippet
Open the Snippets folder, locate the snippet named mw_GP_objects.liquid and click Delete button.
Remove code from theme files
Open the Layout folder, and click the theme.liquid file.
Find the code:
{% include 'mw_GP_objects' %}
Remove it and click Save button.
Then, you will need to remove additional code from the product form. Depending on the theme, you can find
it's code in product-form.liquid or product-template.liquid file.
Open one of the mentioned files and remove pieces of code:
{% if product.tags contains 'mw_grouped_product' %}<div class="mw-gp-container"></div>{% endif %}
{% if product.tags contains 'mw_grouped_product' %}disabled="disabled"{% endif %}
Questions?
For any technical and pre-sale questions, feel free to contact us at apps@mageworx.com.