Delivery Date & Time
About
The app lets you improve the user experience by giving your customers the option to choose a desired delivery date and time, when they want to receive the orders. The delivery date and time are added in the beautiful responsive design and it is fully tested in all 10 free themes available in Shopify Themes Store.
The app allows you to manage the orders quotes per each shipping day to make sure you won't exceed the possible limits to ship your products.
You can also define your working days to disable the shipping on your weekends and holidays.
The cutoff time allows you to disable the same day delivery after certain time.
The advanced settings allow you to configure the app to suit all your business needs and requirements and give your customers the most pleasant shopping experience.
How to use the app
Our team is always working hard to make our apps easy-to-install and easy-to-use. We optimized the installation and onboarding processes in this app to make sure you won't need to spend your time on reading the numerous steps of the installation and user guides.
The app is equipped with fully automatic installation process, that will add the necessary code snippets to your theme so you won't need to edit the code.
The onboarding process will guide you throught the questions regarding your shipping configuration and the smart algorithms will configure the app in the background based on your answers.
Briefly, the steps are as follows:
- Install the app from the Shopify Apps Store;
- The automatic installation process inside the app will add the necessary code to the right places in your theme;
- Configure the app following our beautiful onboarding process (the configuration wizard will configure the app automatically based on your answers on simple questions regarding your shipping process) OR adjust the settings manually in the configuration page;
- Check the result and that's it.
Installation
Automatic installation
This app comes with automatic installation. The automatic installation adds the code snippets to your current published theme and it was fully tested on all 10 free themes from Shopify Themes Store. If you use a custom theme, you can install the app on your own, following the instructions in this user guide.
Feel free to drop us a line if you have any questions. Our team will be happy to assist you.
Manual installation
If the automatic installation failed due to a custom theme you are using OR if you need to install the app to a different theme, you can install the app manually, following these two easy steps:
1) Open the Snippets folder, and click the Add a new snippet option. The snippet name should be mw_DD_objects.liquid.
{% assign cart_tags = '' %}
{% for item in cart.items %}
    {% assign tags = item.product.tags | join: ',' %}
    {% assign cart_tags = cart_tags | append: ',' | append: tags %}
{% endfor %}

<script>
    window.mwDeliveryDateObjects = {
        template: {{ template.name | json}},
        cart: {{ cart | json }},
        cartTags: {{ cart_tags | remove_first: ',' | split: ',' | uniq | json }},
        shop: {
            domain: {{ shop.permanent_domain | json }},
            money_format : {{ shop.money_format  | json }},
            money_with_currency_format : {{ shop.money_with_currency_format | json }}
        }
    };
</script>
2) Edit theme.liquid layout
Open the Layout folder, and click the theme.liquid file.
Before the line:
</body>
enter:
{% include 'mw_DD_objects' %}
Delivery info in order emails
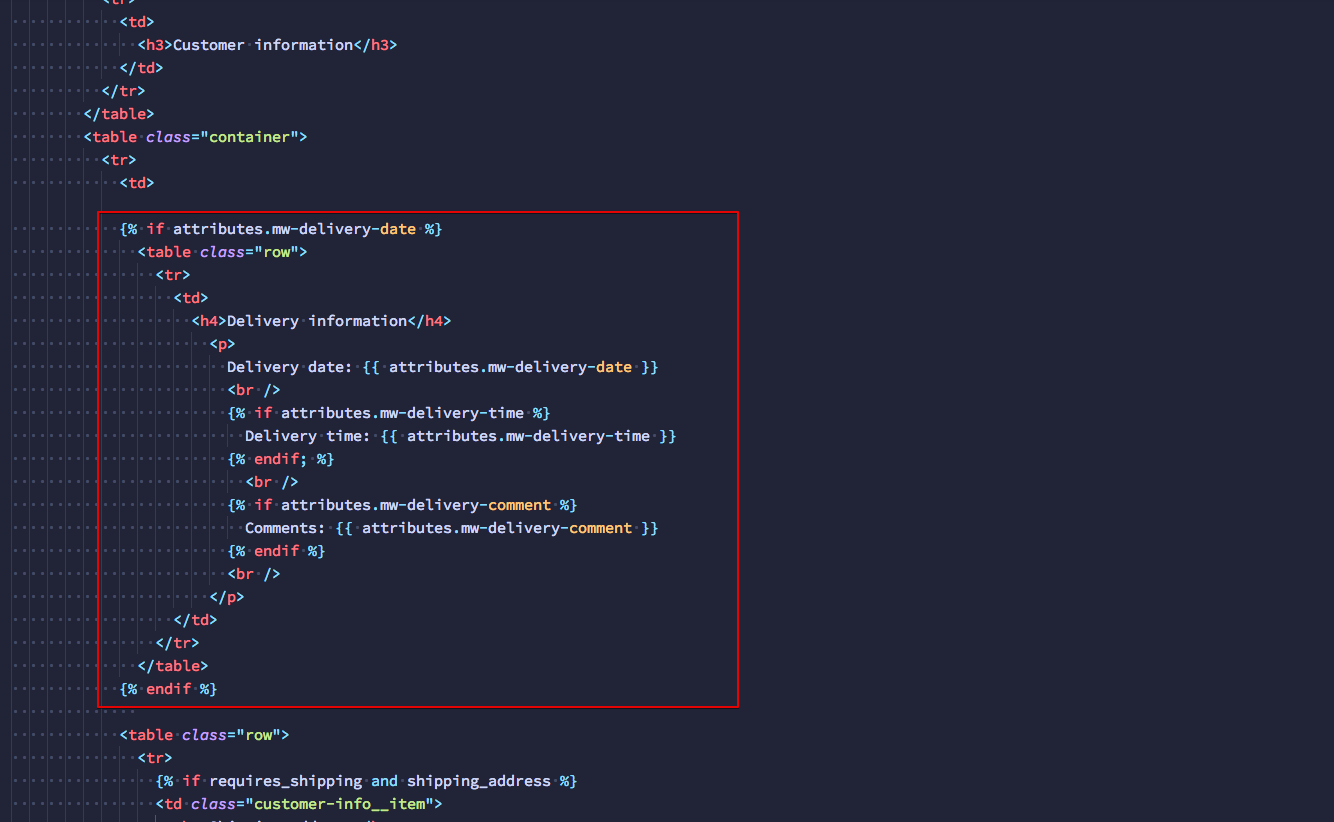
In order to display the delivery date & time and the comments, specified during the order flow, in the order confirmation email, you should go to Settings ⟶ Notifications ⟶ Order confirmation ⟶ and add the following code snippet to the place, where you want to display the chosen delivery date details.
{% if attributes.mw-delivery-date %}
              <table class="row">
                <tr>
                  <td>
                    <h4>Delivery information</h4>
                      <p>
                        Delivery date: {{ attributes.mw-delivery-date }}
                        <br />
                        {% if attributes.mw-delivery-time %}
                          Delivery time: {{ attributes.mw-delivery-time }}
                        {% endif; %}
                          <br />
                        {% if attributes.mw-delivery-comment %}
                          Comments: {{ attributes.mw-delivery-comment }}
                        {% endif %}
                        <br />
                      </p>
                      <br />
                  </td>
                </tr>
              </table>
            {% endif %}
Here is the example for standard order confirmation email:
This is the example of how it looks in the email after adding the code:
Delivery info in customer order
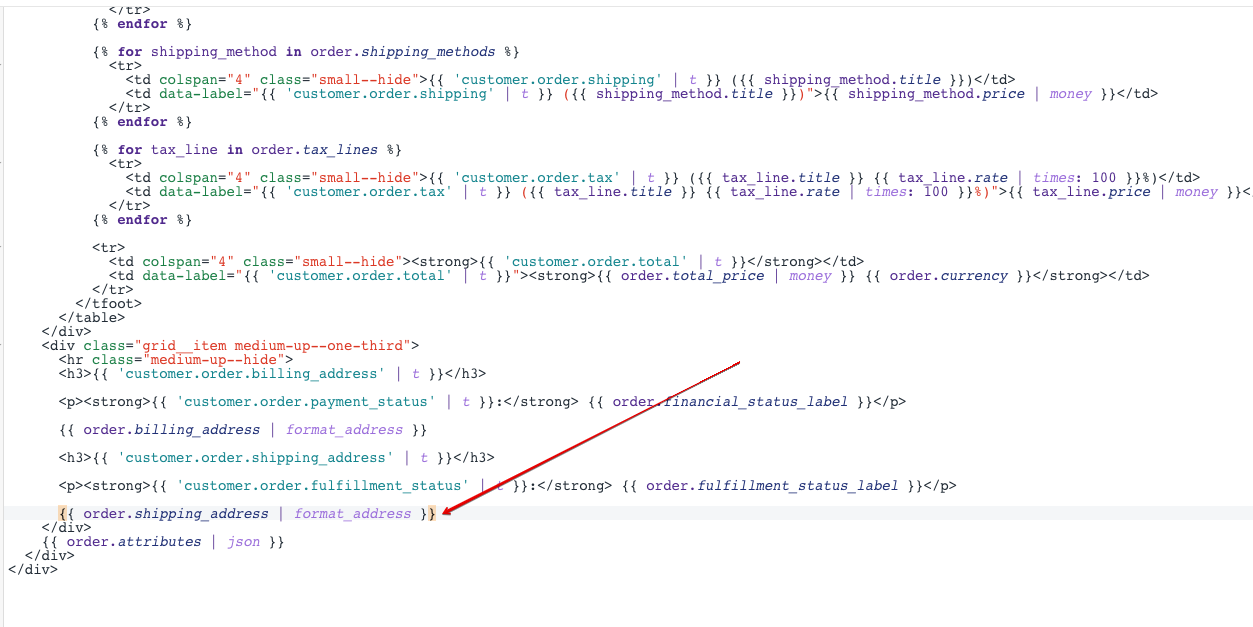
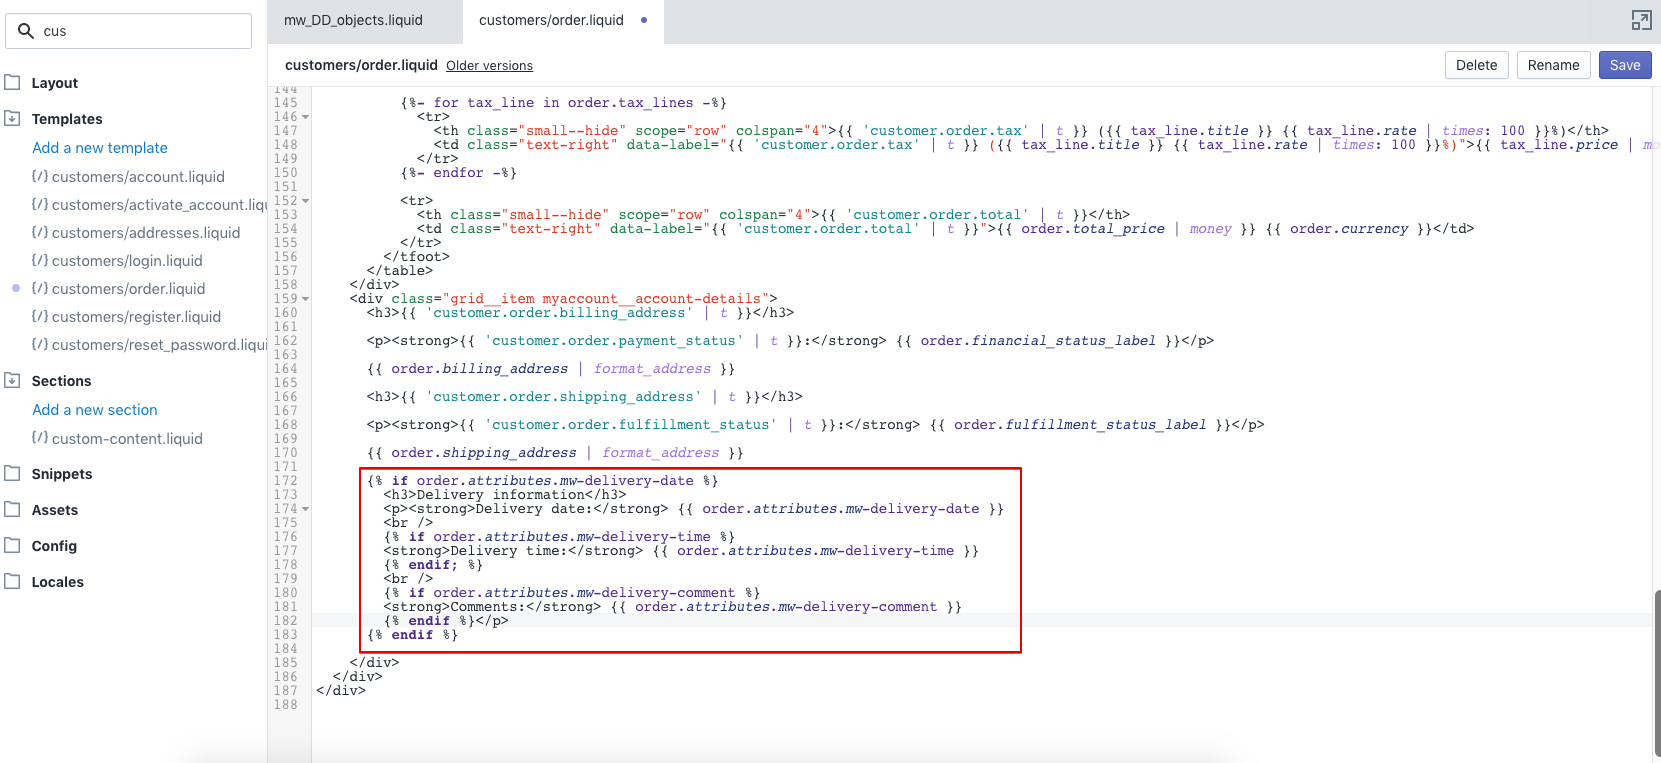
In order to display the chosen delivery date details in the order view in the customer's account on the front-end, you should edit the code of the customers/order.liquid in your theme: go to Online Store⟶ Themes ⟶ click Actions and Edit code for the necessary theme ⟶ find the file customers/order.liquid - add the following code snippet to the place, where you need to display the chosen delivery date details.
      {% if order.attributes.mw-delivery-date %}
        <h3>Delivery information</h3>
        <p><strong>Delivery date:</strong> {{ order.attributes.mw-delivery-date }}
        <br />
        {% if order.attributes.mw-delivery-time %}
        <strong>Delivery time:</strong> {{ order.attributes.mw-delivery-time }}
        {% endif; %}
        <br />
        {% if order.attributes.mw-delivery-comment %}
        <strong>Comments:</strong> {{ order.attributes.mw-delivery-comment }}
        {% endif %}</p>
      {% endif %}
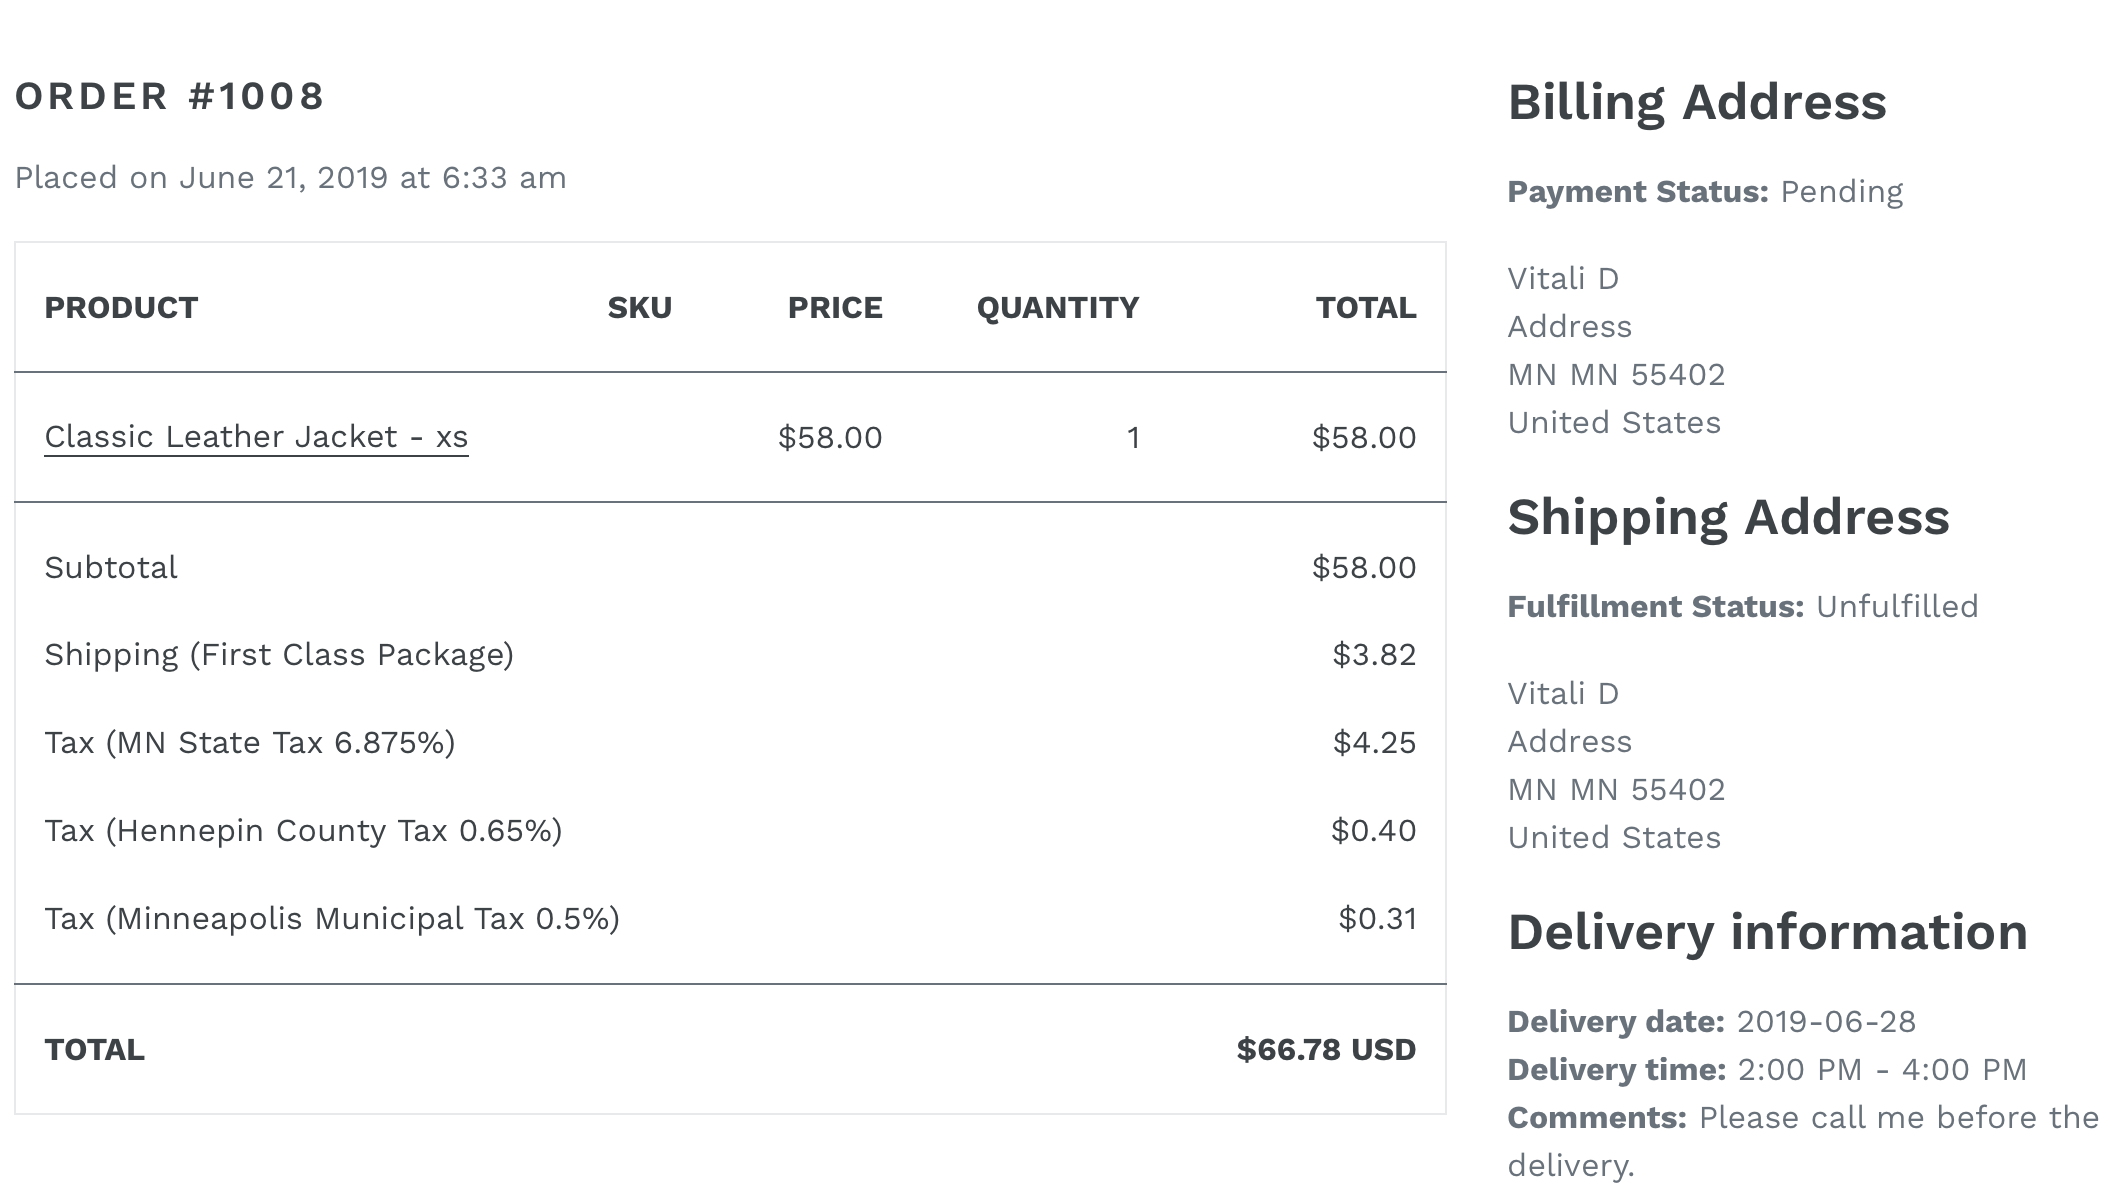
Here is the example for the Debut theme: we added the delivery date details right after the shipping details. In this case, the code should be added after the {{ order.shipping_address | format_address }} line.
Before adding the code:
After adding the code:
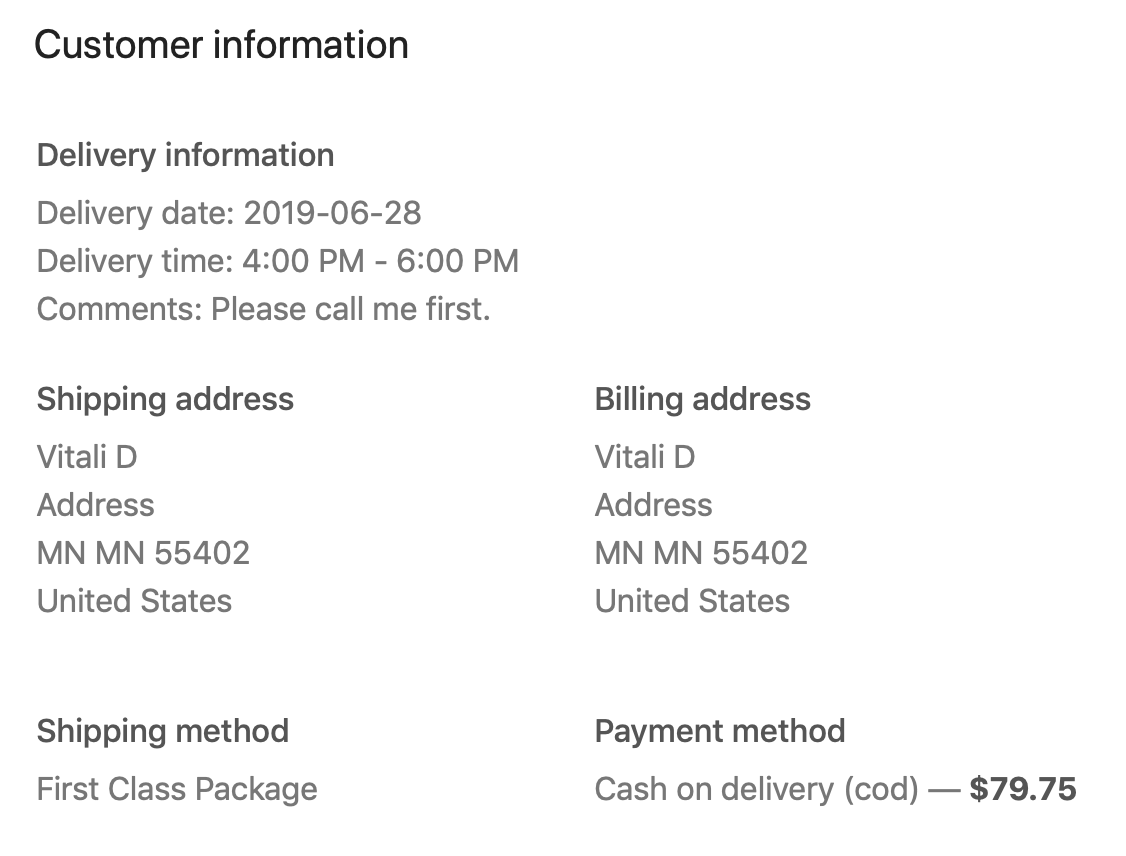
This is the example of how it looks on the front-end after adding the code:
Delivery info on Thank You page
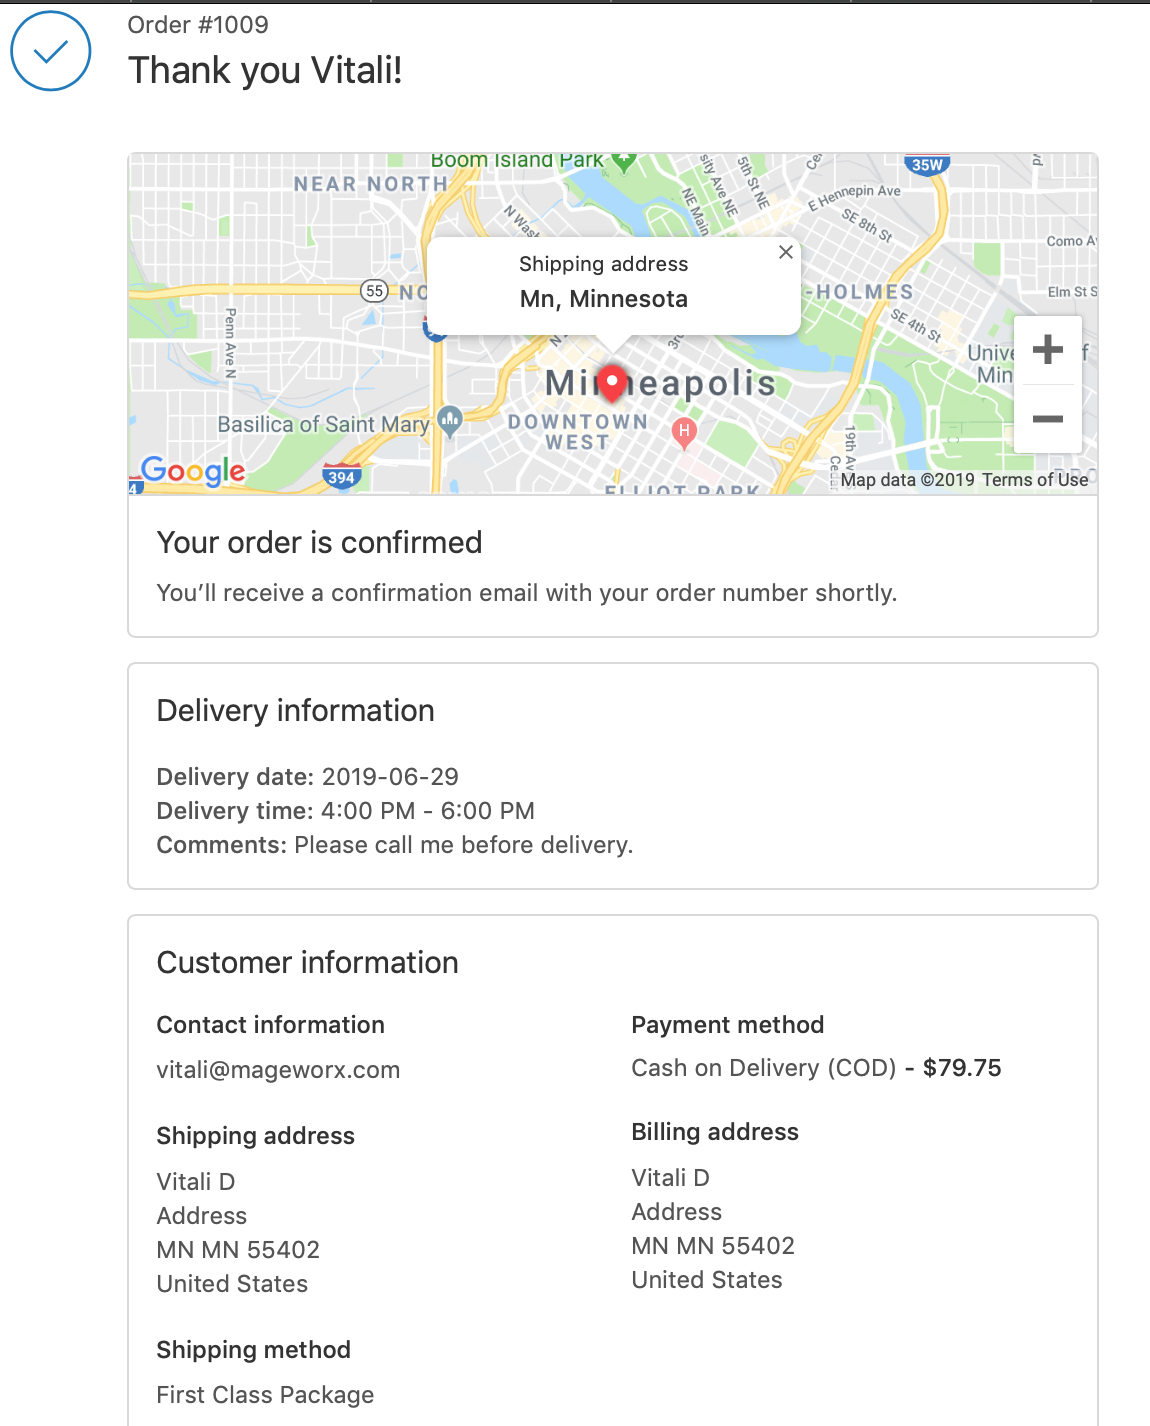
In order to display the chosen delivery date & time and the comment on the order success page, you should go to Settings ⟶ Checkout ⟶ Order processing section ⟶ add the following code snippet to the Additional scripts field:
<script>
  {% if order.attributes.mw-delivery-date %}
    Shopify.Checkout.OrderStatus.addContentBox(
      '<h2>Delivery information</h2><br><p><strong>Delivery date:</strong> {{ order.attributes.mw-delivery-date }}</p>{% if order.attributes.mw-delivery-time %}<p><strong>Delivery time:</strong> {{ order.attributes.mw-delivery-time }}{% endif %}{% if order.attributes.mw-delivery-comment %}<p><strong>Comments:</strong> {{ order.attributes.mw-delivery-comment }}</p>{% endif %}'
    )
  {% endif %}
</script>
This is the example of how it looks on the front-end after adding the code:
App Configuration
Right after the installation, you should configure the app to match your business requirements. Most likely, this configuration will be done only once if your business rules are not changed.
The app configuration is located in Settings page.
General
- Active/Disable - the first section allows you to enable or disable the entire app on the front-end.

Front-end experience
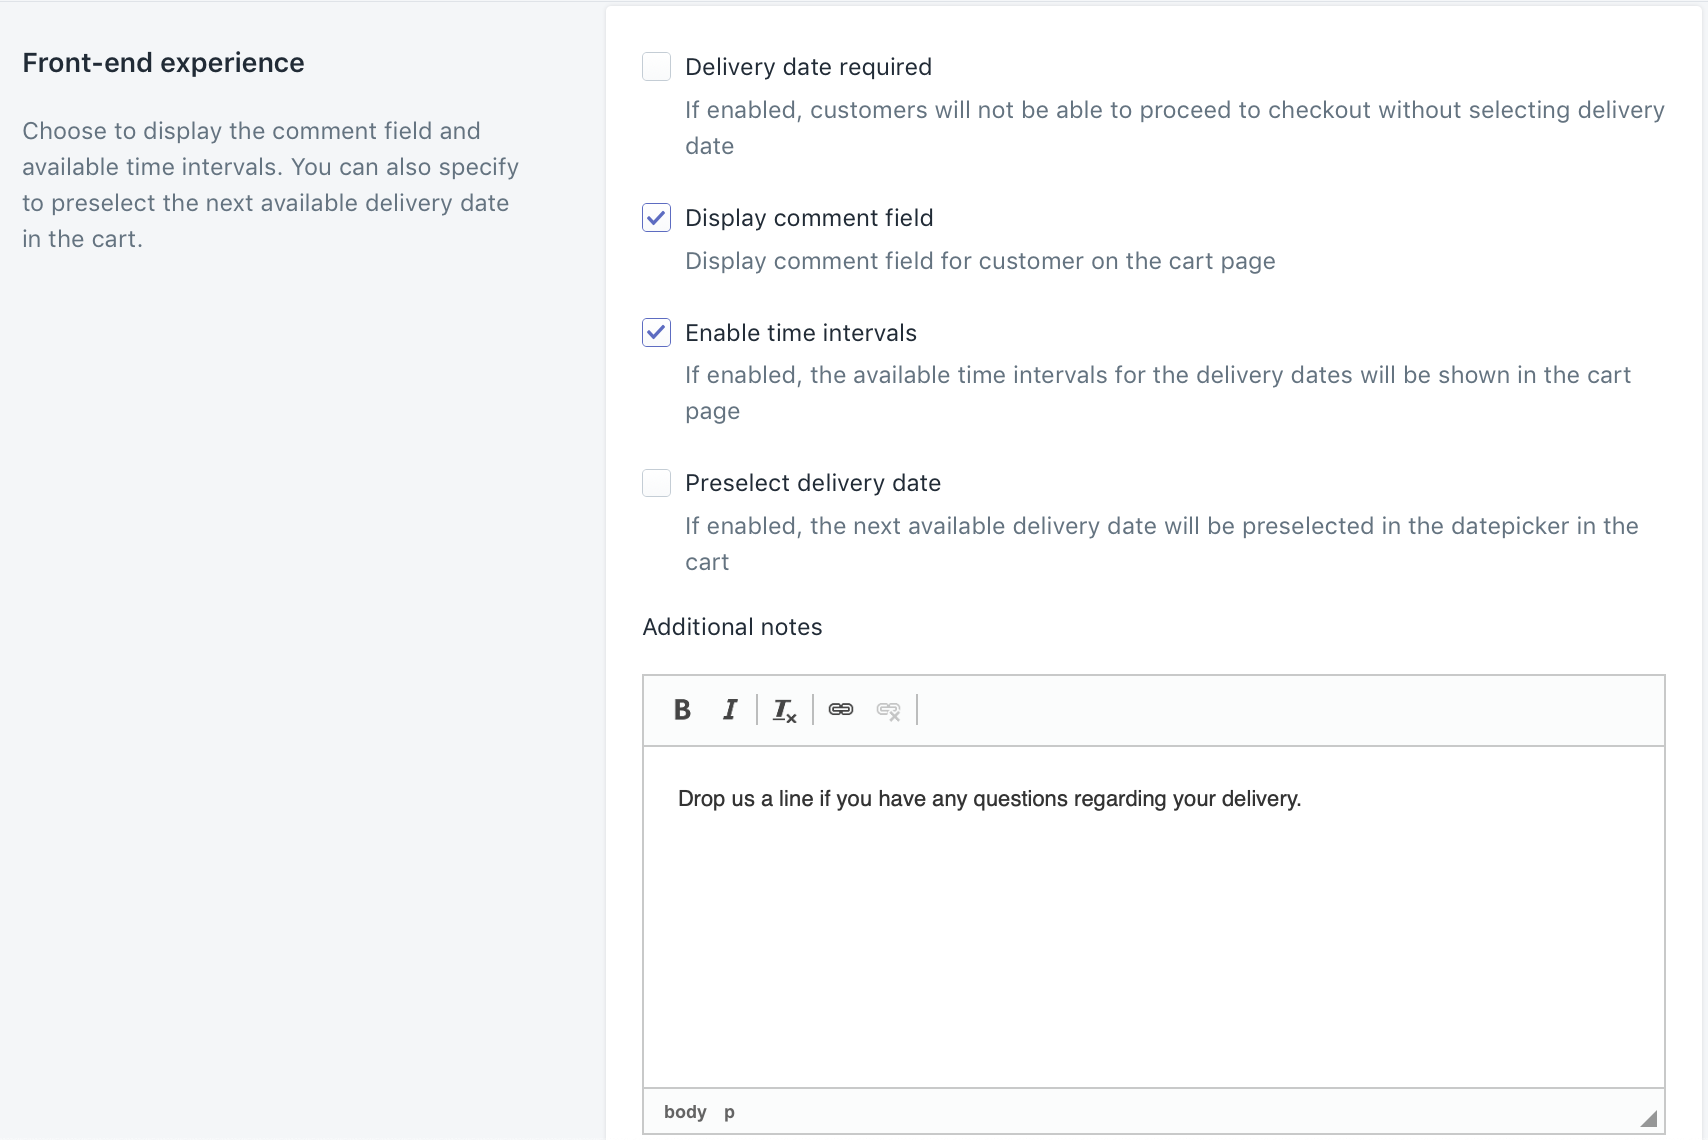
- Delivery Date Required - this setting defines if the selection of the delivery date should be required to place the order. We recommend to have this setting selected to make sure all your orders will have the delivery information.
- Display Comment Field - this setting allows you to display the field in the cart, where your customers can add any information, that might be important regarding their deliveries.
- Enable Time Intervals - this setting enables or disables the delivery time periods on the front-end.
- Preselect Delivery Date - this setting preselects the next available delivery date automatically, when a customer gets to the cart. The customer can change the delivery date.
- Additional Notes - this setting allows you to add any additional notes regarding the shipping options that might be important for your customers. These notes will be shown in the cart for all your customers.
Shipping Configuration
The shipping configuration section allows you to select your working days and to choose the days of week, which are the holidays for you. You can also specify the time, after which the same-day-delivery will be disabled and add the available time periods if any.

- Day - this column allows you to select the days of week, which are working days. If you do not check the day here, it will mean that this day of week will be unavailable for the delivery. The customers won't be able to choose it on the front-end.
- SSD - same-day-delivery. This field determines the time during the day, after which the customers won't be able to choose today as the delivery day on the front-end.
- Orders Limit - this column defines the number of orders you can process / ship each day. Let's say, you can process and ship 20 orders per day. You enter 20 here for each working day. It means that when your customers place 20 orders, the current day will become occupied and the customers won't be able to choose it when placing the 21th and further orders. The next available day can be chosen instead. This setting is necessary to manage your shippments in order and not to overload your process to give your customers the better experience.
- Delivery Time - this column has the "Manage periods" button. This allows you to add the time intervals that can be chosen by your customers as the most preferrable delivery time periods. This functionality allows you to better schedule your deliveries and give your customers the opportunity to choose the most convinient time to get their orders. The time ranges have the following format: hours : minutes
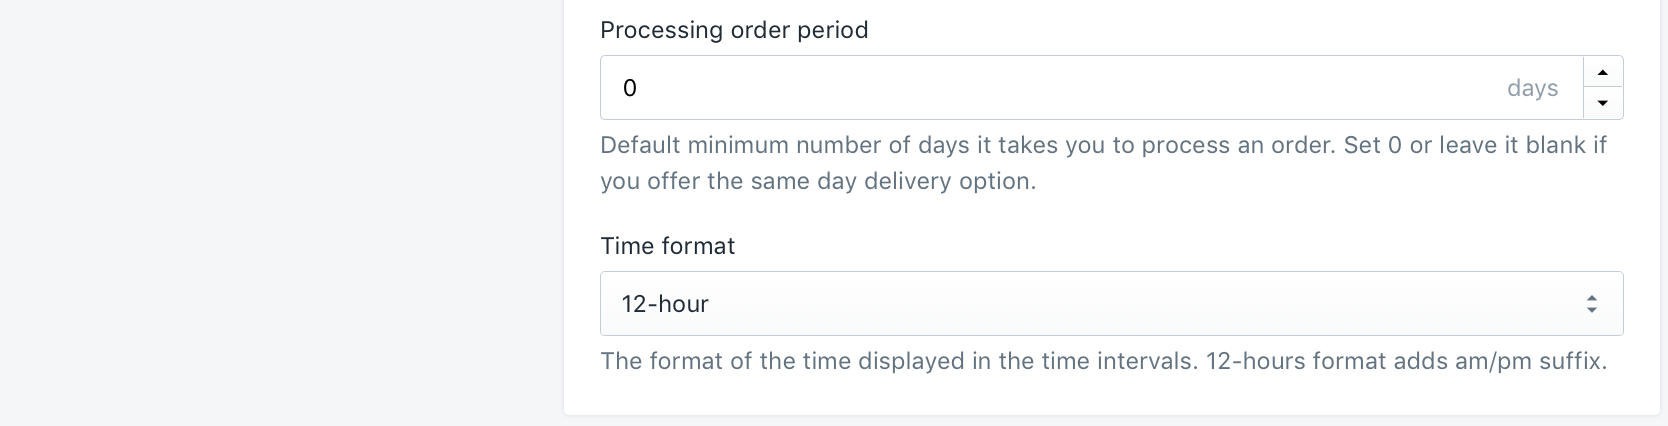
- Processing order period - this is the period in days that defines the number of day(s) you need to process your order. If you set 0 here, it means that you can ship the orders at the same day and the customers will be able to choose today as the delivery day (the SSD time is used here as well). If you set 1 day here, it means that you can ship the orders the next day only and the customers won't be able to choose today as the delivery day.
- Time format - this setting defines the format of the time intervals displayed on the front-end. 12-hours and 24-hours formats are supported. The 12-hours format will show the time intervals as 10am - 2pm. The 24-hours format will show this as 10 - 14.
Shipping restrictions
This section allows you to add certain restrictions to your shipping configuration if necessary.
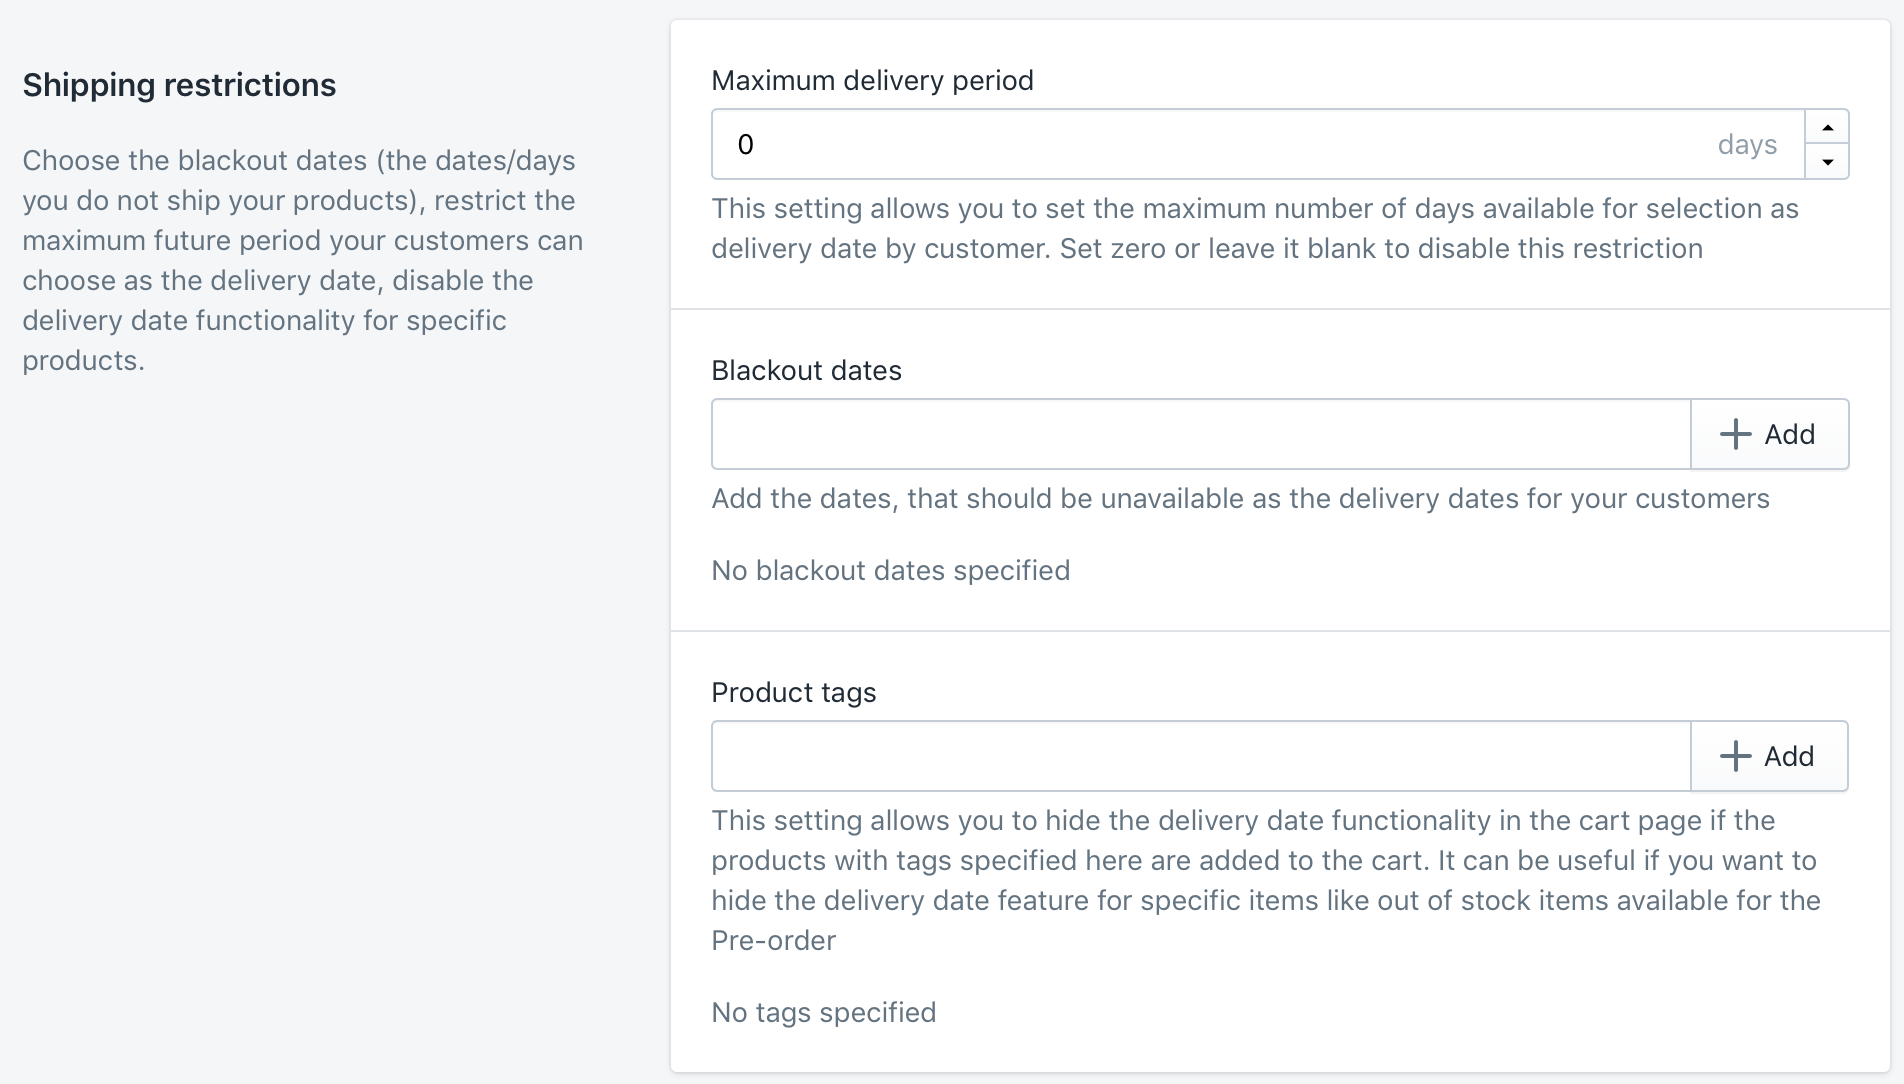
- Maximum delivery period - this setting allows you to restrict the maximum date in future, which will be possible to be chosen as the delivery date. Other words, this period specifies the number of days from the current date available for selecting as the delivery date.
- Blackout dates - the dates, that will be disabled as the available delivery dates such as national holidays, your personal holidays, non-working days of your shipping service etc. You can add the periods here as well.
- Product tags - this setting allows you to hide the delivery date functionality in the cart page if the products with specific tags are added to the cart. It might be useful if you want to hide the delivery date feature for specific items like out of stock product available for the Pre-order etc.
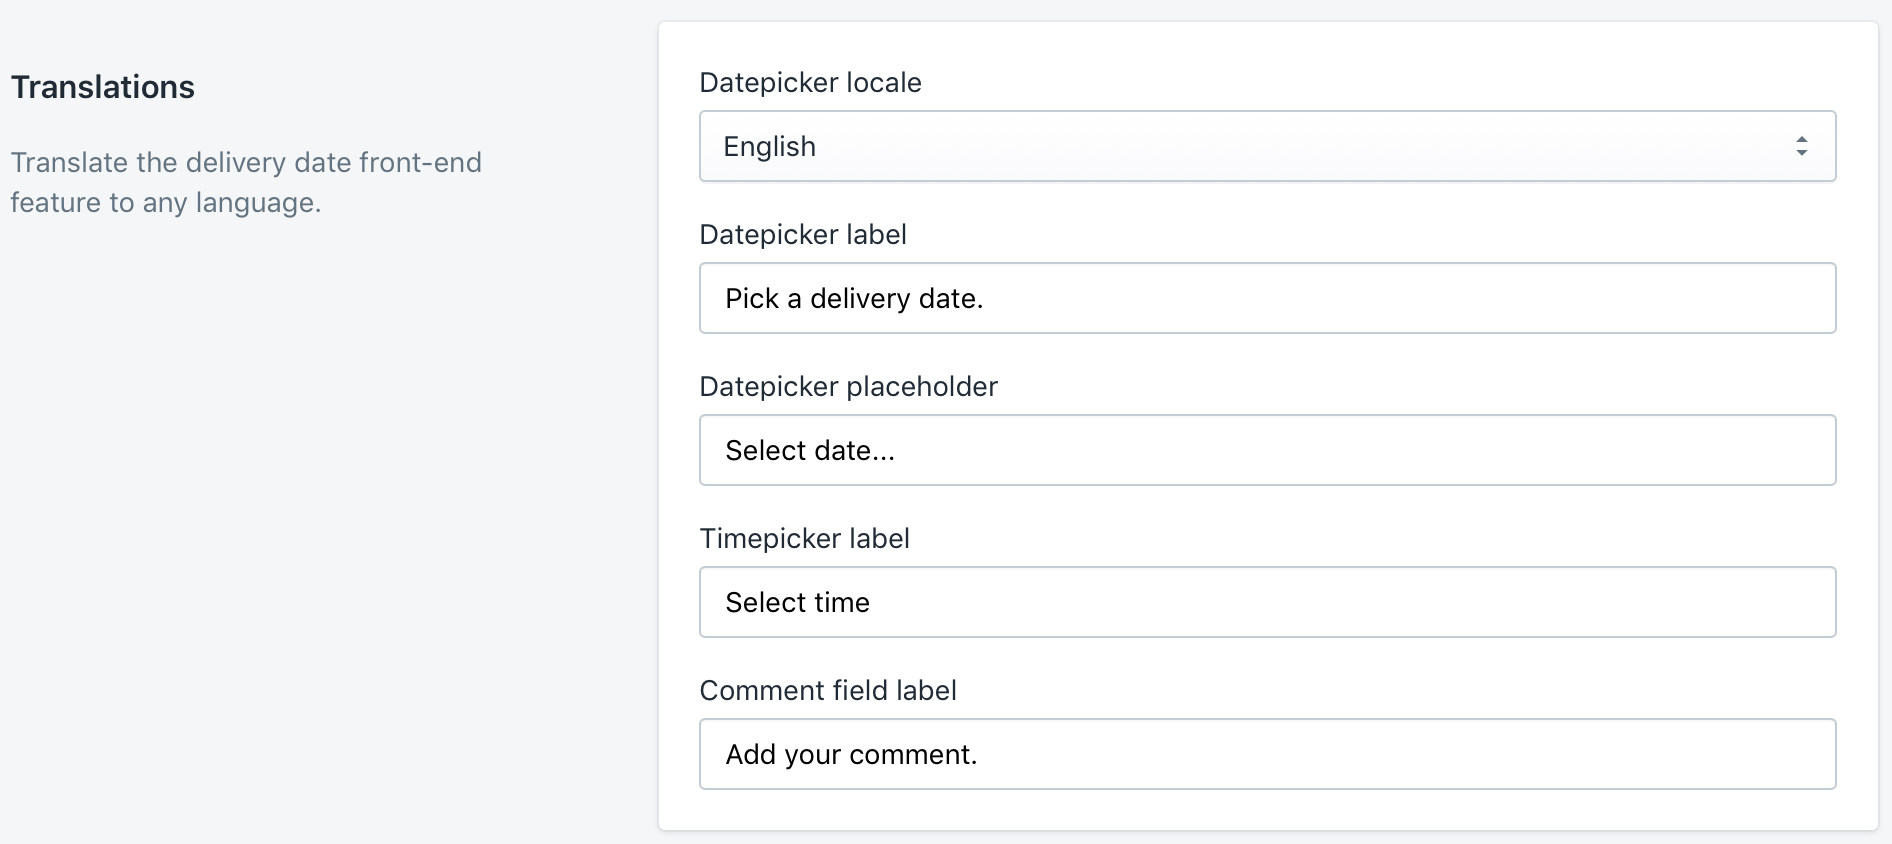
Translations
This section allows you to rename or translate the texts and phrases your customers see on the front-end.
Styling
This section allows you to change the look of the delivery date block on the front-end and adjust its color if necessary.
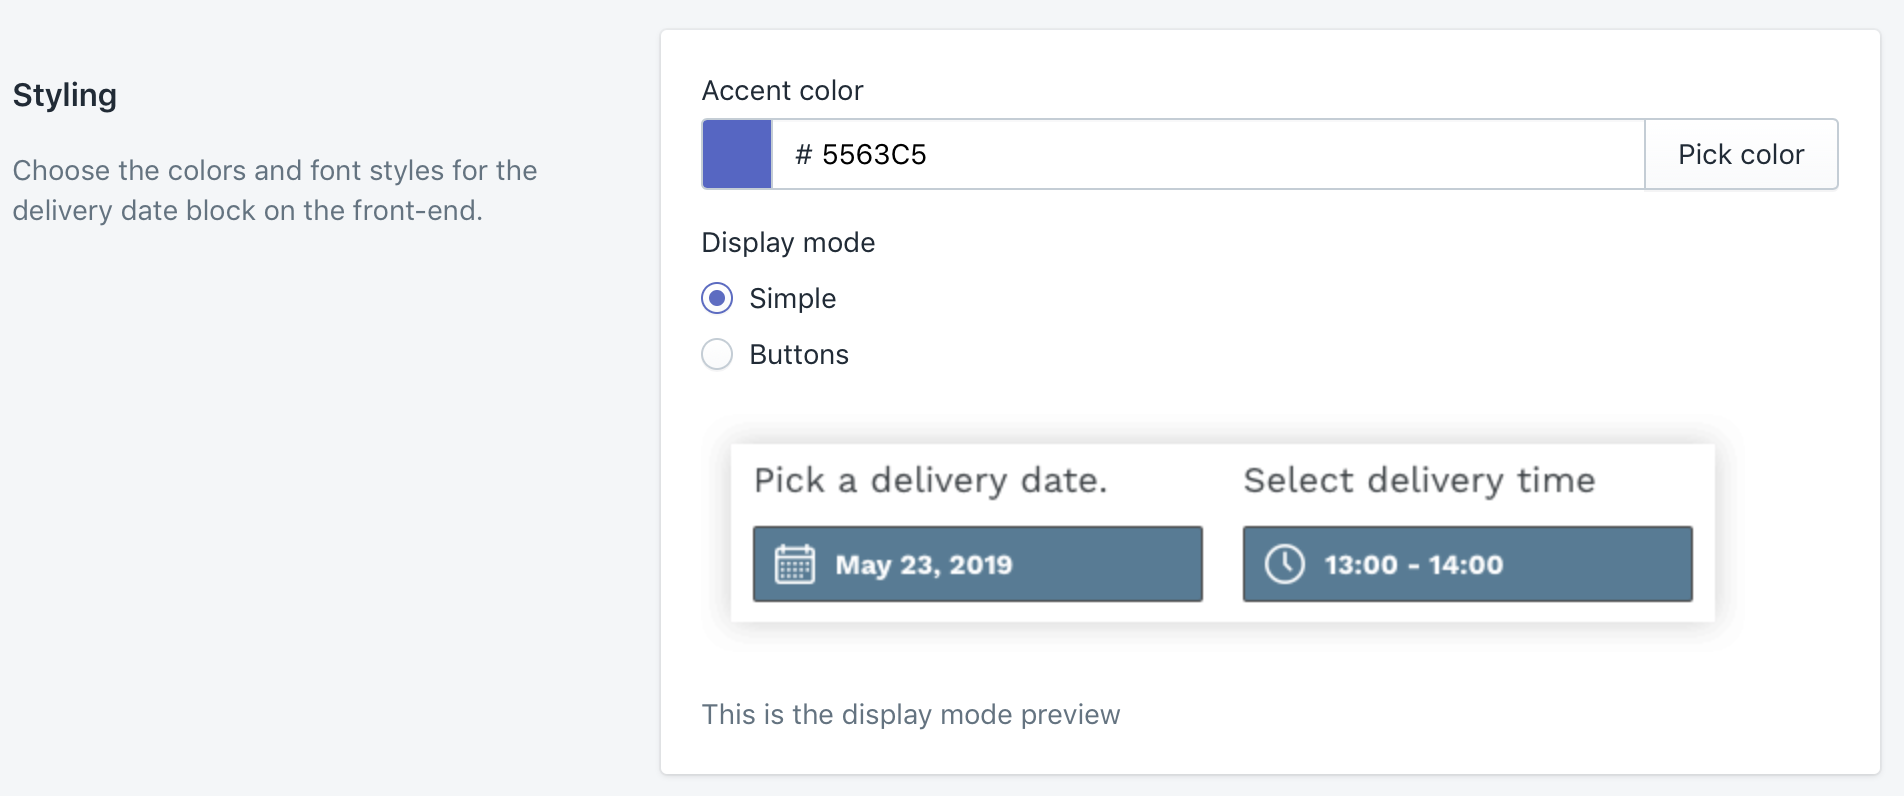
The two display modes are supported:
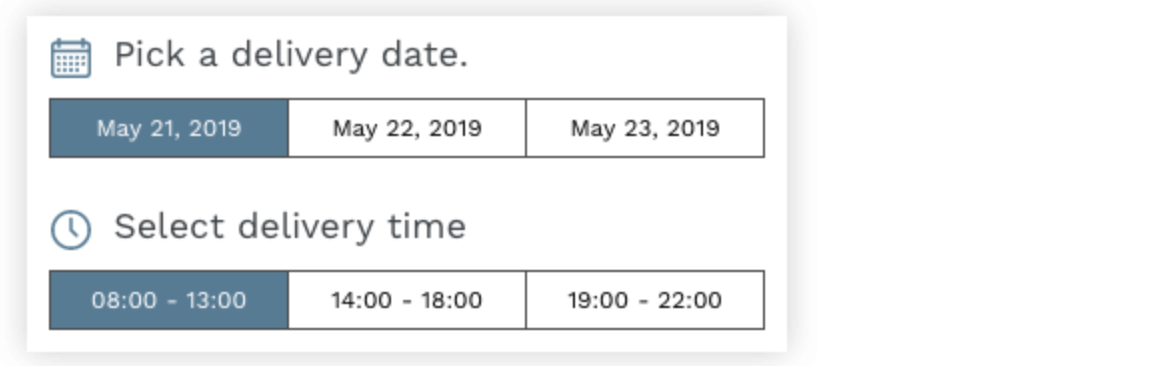
Simple mode The date picker is shown as the calender and the time periods field is shown as a custom drop-down.
Buttons mode
The date and time picker is shown as the buttons.
Orders Management
The delivery date information is added to every order, where it was chosen. You can view it from the order view in your store:
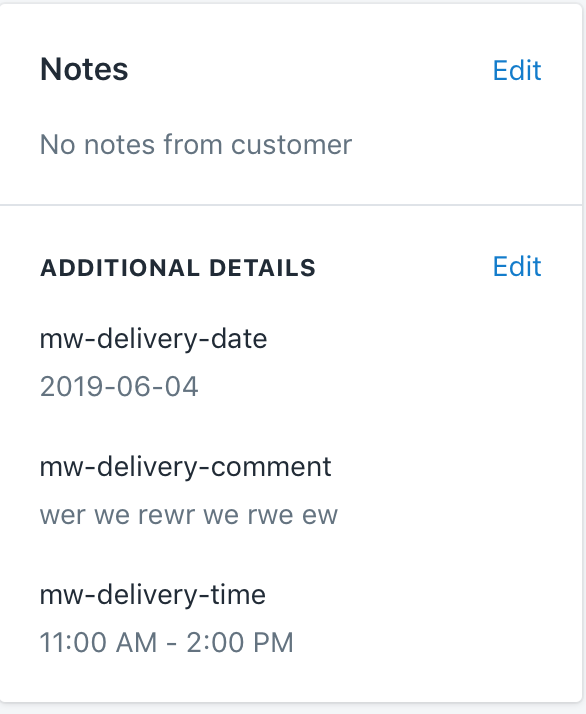
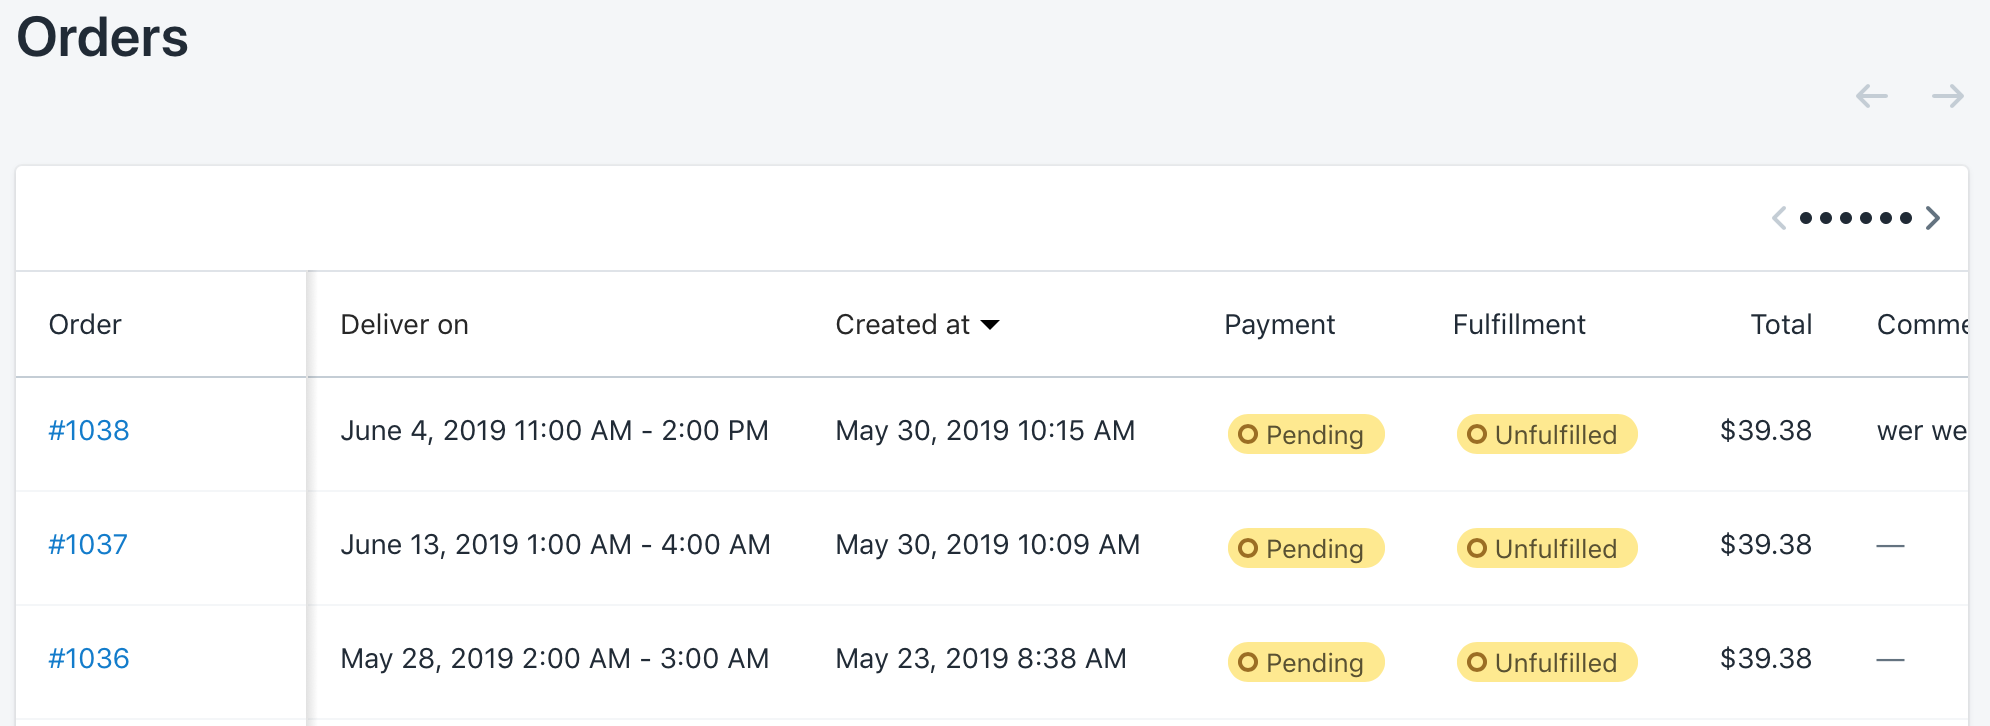
We also understand that open every new order to see the delivery information might be the time consuming task. That's why we added a separate orders grid with all necessary details available right from the grid. This orders list is available in the app's first screen:
Uninstallation
If you need to remove the app from your store, please follow these 2 steps:
1) Remove the app from the Apps section in your Shopify back-end. This will cancel the subscription and remove the app from your store.
From your Shopify admin, go to Online Store > Themes, find the theme you want to remove the Delivery Date & Time App from and click Actions > Edit code.
2) Delete mw_DD_objects.liquid snippet
Open the Snippets folder, locate the snippet named mw_DD_objects.liquid and click Delete button.
3) Remove code from theme files
Open the Layout folder, and click the theme.liquid file.
Find the code:
{% include 'mw_DD_objects' %}
Questions?
For any technical and pre-sale questions, feel free to contact us at apps@mageworx.com.