Sales Motivator - Promo Bars
Installation
Help
This app comes with FREE installation by the MageWorx Shopify professionals. All you need to do to get the app on your store is to submit a request by hitting the button below. Please, bear in mind that usually, we install the app within 24 hours (on business days). Alternatively, you can install the extension on your own, following the instructions in this user guide.
Add snippet File
In your theme, open the Snippets folder, and add a new snippet named mw_CMB_objects. Fill it in with the code from below and save.
<script>
  window.mwMotivatorObjects = {
    product: {{ product | json }},
    cart: {{ cart | json }},
    template_name: {{ template.name | json }},
    shop: {
      domain: {{ shop.permanent_domain | json }},
      money_format : {{ shop.money_format  | json }},
      money_with_currency_format : {{ shop.money_with_currency_format  | json }}
      }
  };
</script>
When done, click Save.
Edit Layout/theme.liquid
At the next step, jump to Layout/theme.liquid file and search the code. Before the line:
</body>
enter:
{% include 'mw_CMB_objects' %}
Integrating the app into the theme
To hide the gift product form customers on the frontend, implement the actions described below.
Help
We would be happy to install and configure the app for you — FREE of charge. Just drop us a line. If you would like to install it yourself, below you will find some instructions to help you get started.
In the Shopify admin panel, navigate to Online Store → Themes.
Here, choose the Edit code option from the Actions dropdown of the theme.
Open the template named Templates/product.liquid or Sections/product-template.liquid.
Locate the piece of code responsible for displaying the product. In the default theme, the code will look like
<div class="product-template__container page-width" id="ProductSection-{{ section.id }}" data-section-id="{{ section.id }}" data-section-type="product" data-enable-history-state="true">
Right after this line, enter:
{% if product.type == 'mw_motivator_product' %}
  <p>This product is not available.</p>
  {% continue %}
{% endif %}
Open the template named Templates/cart.liquid or Sections/cart-template.liquid.
Locate the piece of code responsible for displaying products in cart. In the default theme, the code will look like:
{% for item in cart.items %}
...
{% endfor %}
After the line
{% for item in cart.items %}
enter:
{% if item.product.type == 'mw_motivator_product' %}{% continue %}{% endif %}
Integrating Free Gift link
Locate the subtotal cart block:
<span class="cart__subtotal-title">{{ 'cart.general.subtotal' | t }}</span>
Replace it with:
<span class="mw-motivator"></span>
<span class="cart__subtotal-title">{{ 'cart.general.subtotal' | t }}</span>
Configuring the app
The app aims to help merchants motivate hesitating shoppers. It entices store visitors to make a purchase by offering free shipping options or presenting a gift for placing an order.
To configure the app, please go to Apps and select the Sales Motivator - Promo Bars.

The app's configuration consists of 5 sections.
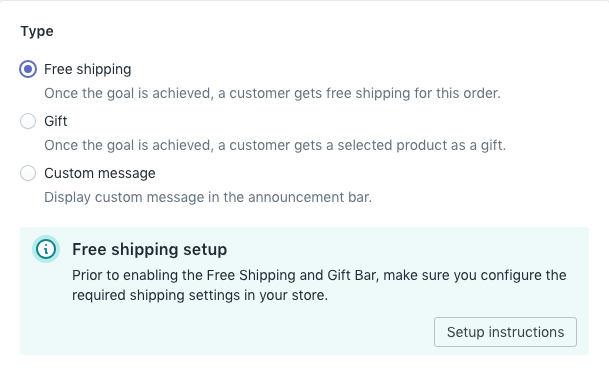
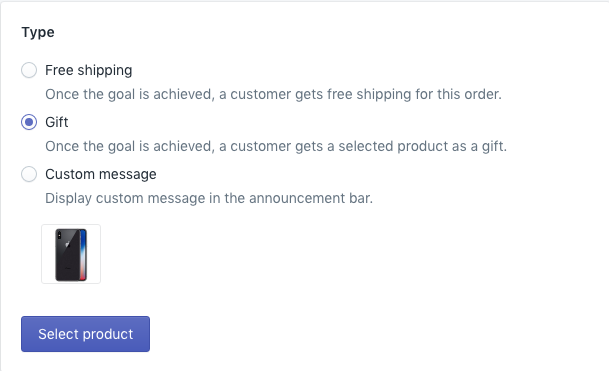
Goal
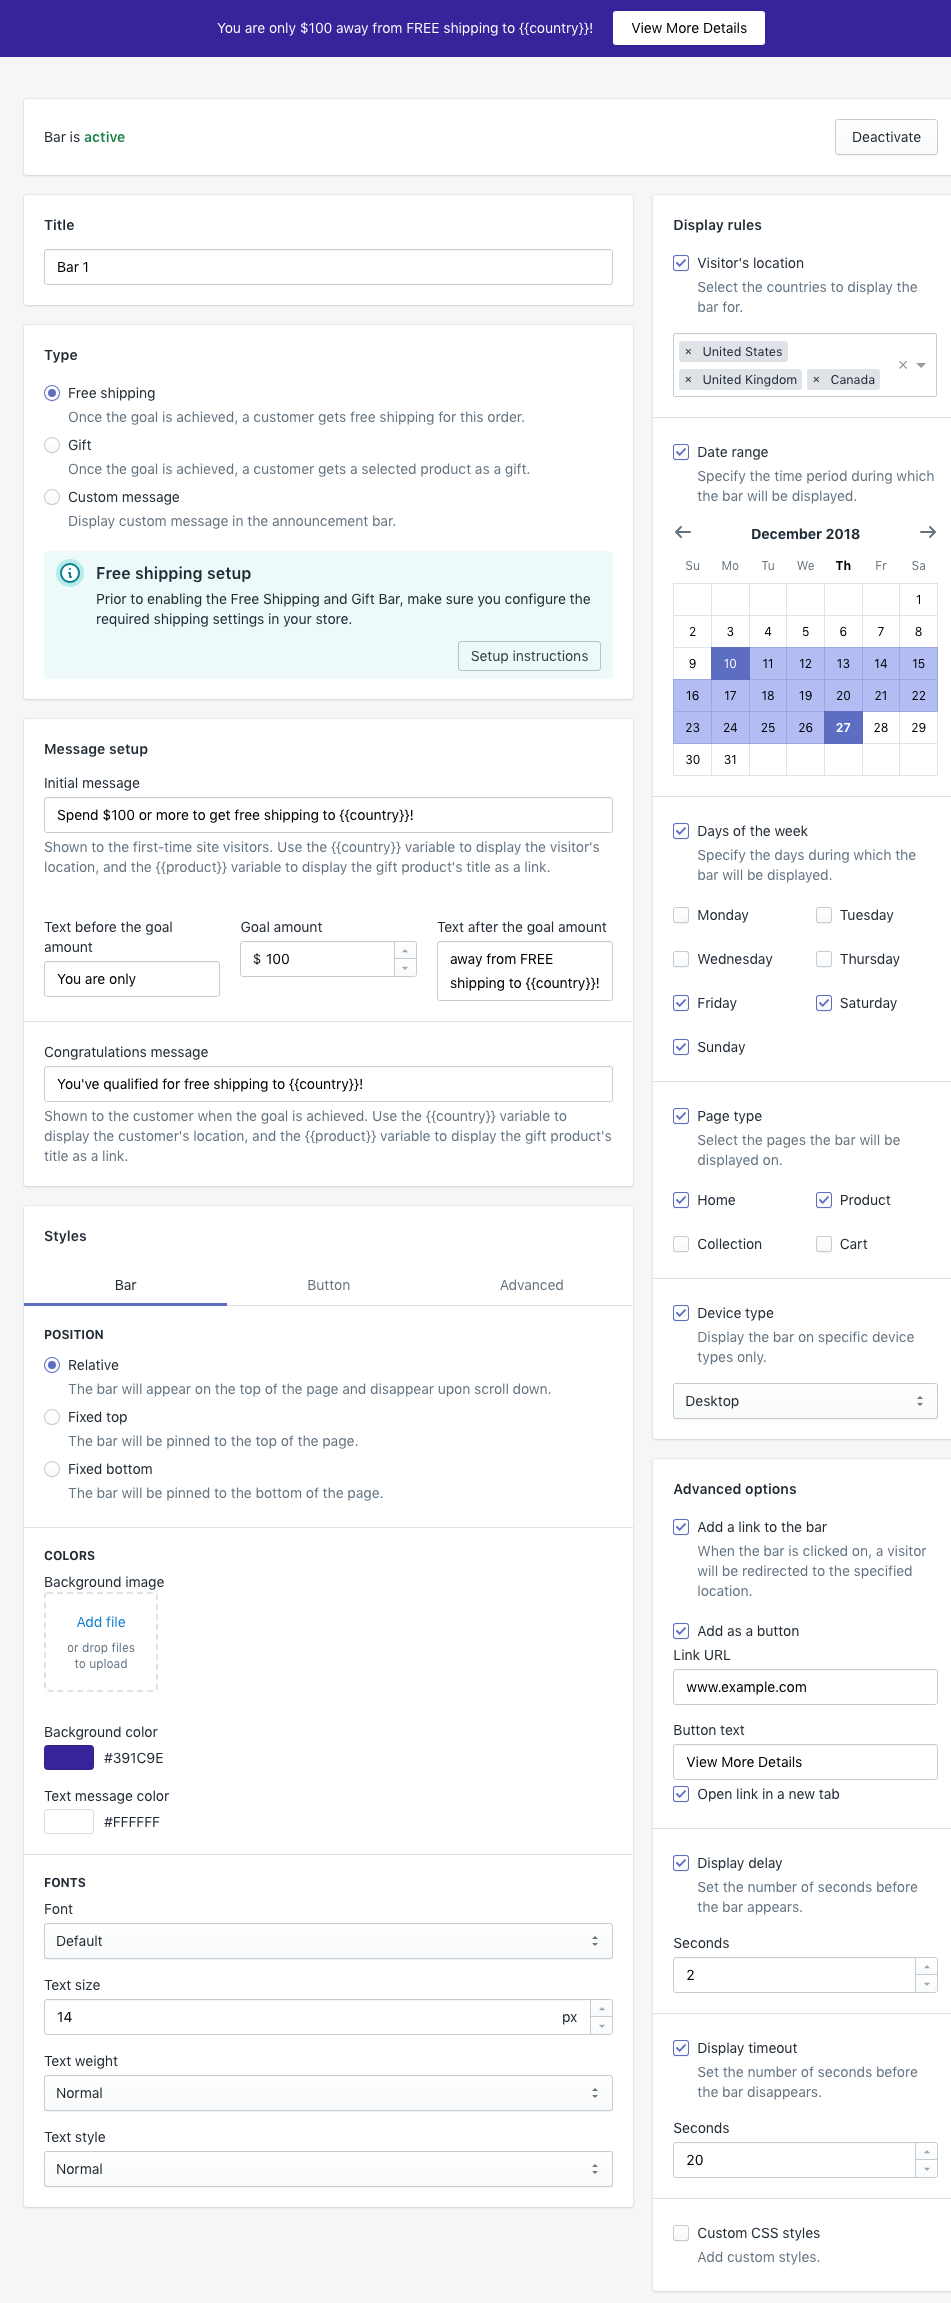
The app provides the possibility to select either the Free Shipping or Gift option. Alternatively, you can offer anything else to motivate the customers to place an order. By selecting the custom message option, you can enter a unique custom message that will be displayed in the announcement bar. If the Free Shipping is selected, a link to the Setup Instructions for will be displayed. By clicking it, you’ll get to the tutorial that tells how to configure this functionality in Shopify.
Bar Style
The Position setting defines how the bar is initially shown.
If Relative option is selected, it will be placed at the top of the page and disappear if the customer scrolls the page down.
The Fixed Top and Fixed Bottom bar attach the bar to the top or to the bottom of the page.
The bar style sample is displayed at the top of the settings page, and reflects the design changes in real time. The merchant can edit:
- Background color (supports the standard pallet with the possibility to set the exact shade via HEX or RGBA code);
- The paddings setting adds spaces above and below the text;
- Z-index property specifies the stack order of an element. An element with greater stack order is always in front of an element with a lower stack order. f the bar isn’t displayed, try to increase this number;
- Borders. These borders are shown for the bar and can be Solid, Dashed or Dotted. The border width and color can be selected here;
- Shadow. The bar can be framed with shadow along the borders. The merchant can specify the position of the shadow, add blur and spread, select the desired color.
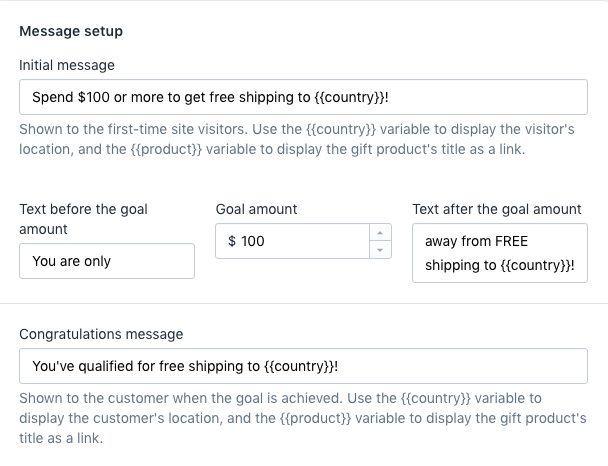
Bar Message Setup
These settings allow the store owner to specify the text displayed to the first-time visitors (The Initial Message field), the message offering to select the goal amount (the value will be changed automatically, when the customer adds a product to cart, the merchant just needs to specify the initial goal).
The Congratulations Message will be shown to the customer if the goal is achieved.
The initial and congratulations messages support the {{country}} and {{product}} variables. The merchant can set the size, style (italic), weight (bold) and color.
Display Rules

These are the most important settings of the app that let you set the motivation bar display according to various marketing scenarios.
The store owner can tweak the visibility settings for any created bar.
The Visitor’s location setting shows the bar to the users from the selected countries.
The Date range, if selected, shows the calendar with the possibility to show the bar only on some particular days.
This option can further be restricted by the Days of the week option.
The merchant can show the bar only on the home page, on product pages, on collection pages or on cart.
The appearance can be also restricted according to the client’s Device type: the bar can be shown for the users from Desktop or Mobile devices.
Advanced Options
The merchant can Add the link to the bar with the possibility to open the link in the same (by default) or a new tab.
The Display Delay and Display timeout settings allow to configure the delay before the bar appears and the number of seconds before the bar disappears.
If the merchants need to add some Custom CSS styles, they can paste them in the corresponding field.
Questions?
For any technical and pre-sale questions, feel free to contact us at apps@mageworx.com.